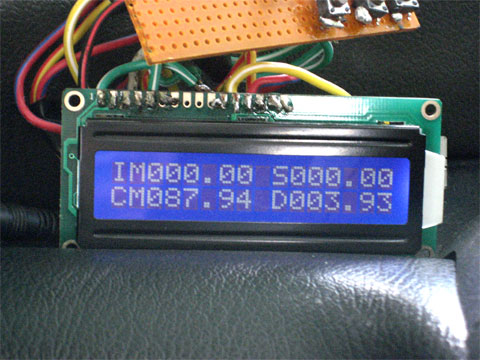
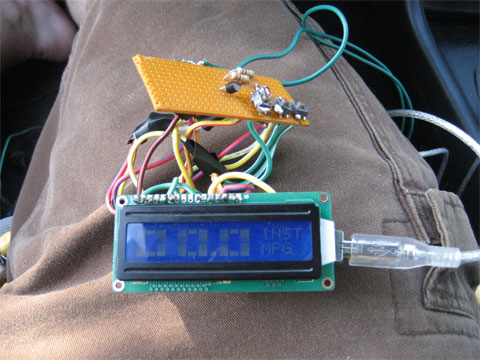
NOTE: The above readout may seem a bit unclear at first glance, but from left to right, top to bottom, here’s what the information means: Instantaneous MPG, Speed, Trip MPG, Distance. I took this photo after a short drive.
By now, we know about devices like the PLX Kiwi and the Scangauge II, but what about those of us who don’t have 1996 or newer cars? How about those who don’t want to spend $170-$300 on instrumentation or prefer to support open-source projects?
Well, the MPGuino is the answer! A few months ago, Darin posted on the forums looking for someone to help him build an open-source MPG gauge for all fuel injected cars. From there, forum member dcb stepped up to the plate and has taken the reigns in a really big way. Nowadays, on release v0.66, the MPGuino is a fully functioning, useful display that anyone with a bit of soldering kills can put together.
Building the MPGuino
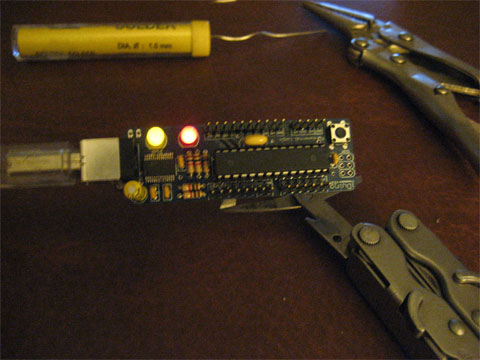
The MPGuino is based on the arduino platform, and for it’s tiny footprint I chose to base my build around the iDuino, even though lots of folks use the freeduino. Since the iDuino doesn’t accept the car’s 12v, I used a cell phone charger to convert to 5v and wired directly to the board. Everything else, down to the LCD, which I bought on ebay, is pretty standard to the build. For more of the basic, check out the release one thread.
Anyway, here was my parts list and aproximate prices:
– iDuino: $20
– HD 44780 LCD: $10
– Parts from ratshack: $6-7
– Auto cell charger: $5 (at the dollar store)
Total: $42-43
It’d be a bit cheaper with a freeduino and some parts you might have laying around or found online, but I was trying to slap this together quickly.
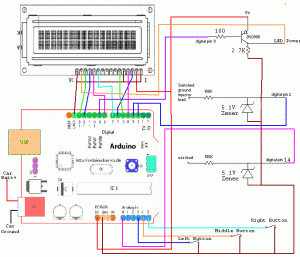
Anyway, on to the assembly! The first thing I did was follow the iDuino assembly instructions, posted and annotated by the makers of the kit. However, I didn’t insert the jumper pins because I found it easier to just run the wires I would be connecting through the holes and soldering directly. From there, go ahead and follow the wiring instructions from this image:
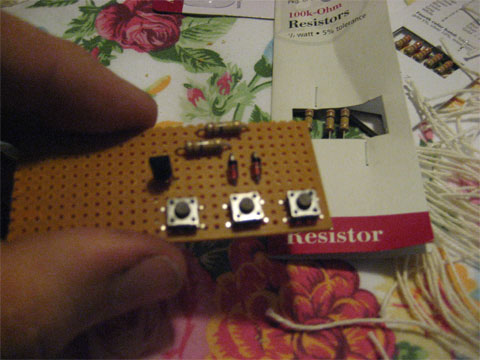
My button and component board is a little ugly, but here’s what it ended up looking like:
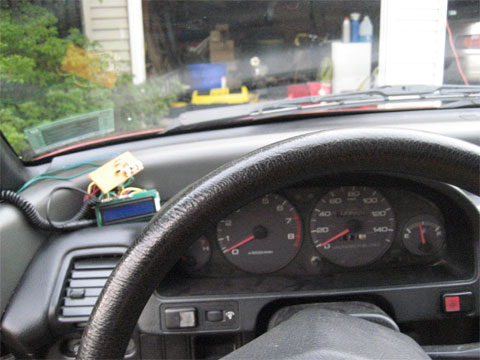
The next step from here would be to find a project box and try to clean up the mounting a bit, but I haven’t quite gotten to that part yet.
Anyway, with the physical unit put together, go ahead and download the arduino 11 platform to your computer and then test out some of the sample programs. If it isn’t broken (hopefully it isn’t!), go ahead and upload the latest MPGuino software and make sure that everything is working.
That’s about it! The next is to wire it into the car. I disassembled the cigarette lighter cell charger like this and wired it into one of the spare spots on my fuse box so that it would be powered whenever the key was in I or II. From there I simply tapped into the speed sensor wire and fuel injector wire, which I’ll leave up to you to find on your own car, though some suggestions can be found here.
The next step is to power up the MPGuino in your car and figure out how to use it.
Using the MPGuino
Luckily, there’s really not much to using the MPGuino. The first thing you need to do is go ahead and figure out the calibration figures for your car. I’m told that most Japanese makes will use 8204 for the speed sensor and that many American makes will use 10000. However, it’s easy enough to compare the distance on the MPGuino to your odometer in order to see if any adjustments need to be made.
The fuel variable is a bit trickier. Some of them have been figured out, so I would search and then ask, but if your car hasn’t seen the likes of the MPGuino before, you might be the pioneer who figures out the numbers for a perfect calibration. The trick here is to simply keep track of your tank mileage on the MPGuino and then compare it to a standard fill up and make adjustments based on the percentage you’re off from the pump fill.
I’ll be the first to admit calibration can be a pain in the ass, but luckily it’d already been done for me. After that’s out of the way, you can check out your mileage by simply using your three buttons to scroll through the screens. See more about that here.
Personally, I tend to use the instant/current screen the most, and when I’m on longer trips or trips where the sun will hurt visibility on the screen, I use the big instantaneous numbers.
Anyway, this is really were the fun begins. The MPGuino in conjunction with your EcoDriving skills will net some good numbers (see first image).
Limitations of the MPGuino
As of writing (v0.66), the MPGuino has a few issues, the biggest of which is that you have to do all the assembly yourself. That’s not a problem for a lot of us, but for the MPGuino to go more mainstream we’ll have to figure out how to make it more accessible to your average ecomodder.
What’s more, the LCD leaves a little to be desired in terms of readability in the sunlight. However, a solution is currently being worked on.
For more issues, and more up-to-date issues, check this thread or more generally look around the MPGuino forum.
Places for MPGuino Improvement
Luckily, the MPGuino’s faults all play into it’s biggest asset: open-source. Sure, I may want an AFR display, but all that means is that I’ll have to do it or find someone smarter to do it for me. Though limited by hardware (but only to a small degree, platform changes are always a possibility), everything else is up in the air with the MPGuino and anyone can edit the code. If you’re interested, check it out for yourself in the Arduino 11 environment.
Well, I hope you’ll find this useful. If you have any questions or knowledge, don’t hesitate to post in the forums, open-source relies on all you to test and help improve the project!
If you liked this post, sign up for out RSS Feed for automatic updates.
Popularity: 9% [?]




{ 3 comments }
Push hard for Bus Rapid Transit in your area and avoid gridlock parking jamb-ups, accidents expensive gas, large down payments, monthly payments, repair bills, maintenance costs, depreciation, driving stress, liabilities, air pollution, traffic congestion, and social pressures of being on time. We Americans try too hard, at the expense of our own health to meet the demands of our ‘corporate serving’ lives. We need to get out and stay out of debt, learn to enjoy real freedom, and coast through life, taking time to enjoy it all. Legalize marijuana and stop this ridiculous rat race to death in an SUV!
This is good stuff here, a bit complex for me, but still really cool.
Thank you for the great post! I’m really tempted to try this! I’m a big fan of open-source, personally, so this kind of project appeals to me, but you are right that the project must evolve a little more before it can be used in a commercial application. Shouldn’t take long, right? 😉
Comments on this entry are closed.
{ 10 trackbacks }