 10-23-2014, 01:55 PM
|
#181 (permalink)
|
|
Master EcoModder
Join Date: Jan 2008
Location: Sanger,Texas,U.S.A.
Posts: 15,879
Thanks: 23,955
Thanked 7,219 Times in 4,646 Posts
|
talked about
Quote:
Originally Posted by freebeard

If things go right nobody is overtaking you from the rear.
It wasn't the testing that did in the front skirt. Here's what we talked anout at the Salt Flats Cafe. At least what I got done before Wings3D locked up. It replaces the top hinge with a 4-bar arrangement.
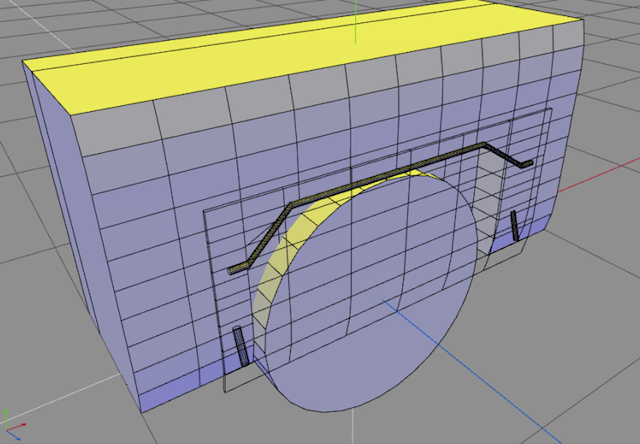 |
Yes,this was the original plan.The panel would move as on a parallelogram.
What has scared me off from it is all the impact loads from expansion strips,non-flush manhole covers,and potholes.With the extra pivot points the things might be destroyed unless extremely low mass and robust pivots with tight clearances.
I've done carbon fiber and I really like it.To justify it I'd have to do two master plugs (both sides),pull a mold off that,then layup some pre-preg,bag it,and autoclave it.
Since I don't do that sort of thing all the time,it would mean a tremendous investment in time to do it right.And I'd have to build an autoclave with vacuum capability like we used in school.
To properly do all the tooling and produce a single carbon part the size of a loaf of bread required about 240-man-hours.And that's just a bare part with no 'finish.' 
__________________
Photobucket album: http://s1271.photobucket.com/albums/jj622/aerohead2/
|
|
|

|
 Today Today
|
|
|
|
 Other popular topics in this forum...
|
|
|
|
|
10-23-2014, 02:03 PM
|
#182 (permalink)
|
|
Master EcoModder
Join Date: Jan 2008
Location: Sanger,Texas,U.S.A.
Posts: 15,879
Thanks: 23,955
Thanked 7,219 Times in 4,646 Posts
|
turntable
Quote:
Originally Posted by Frank Lee
Wish they had a turntable so it could easily be yawed...
|
That would have been awesome.
One of the LT-1 Corvettes they tested a few days before me got sideways at 220-mph,nose lifted,it went vertical,then a reverse-endo,landing on the nose.
Yaw testing would have shown that propensity,and they might have run trip fences all the way down the fenders to kill that lift.
Only GM or Lockheed,Marietta are accessible for yaw testing so far.And you've got to be a race team to get in there.
__________________
Photobucket album: http://s1271.photobucket.com/albums/jj622/aerohead2/
|
|
|
|
|
10-23-2014, 02:23 PM
|
#183 (permalink)
|
|
Master EcoModder
Join Date: Jan 2008
Location: Sanger,Texas,U.S.A.
Posts: 15,879
Thanks: 23,955
Thanked 7,219 Times in 4,646 Posts
|
separation line
Quote:
Originally Posted by California98Civic
The way the streamline hugs the side, around the bumper and passing the front wheel skirt, is cool. The movement over the hood, windshield, and roof was striking--the flow just hugs the surface of the body. And it loved your lingering use of the wand to "see" the wake at the aft end of the truck. Seejng the separation line and that stagnation point of sorts under the aft end was fun too. Fully worth it. Every penny.
|
In some instances the streamline smoke filament seemed a bit 'nervous'.When I held the wand against the body there was no descernible counterflow,so I couldn't really detect any separation except behind the wheels/tires,mirror and its mounting/A-pillar-to-sideglass.,the rear-view cap window fenestration,and behind the stinger truncation.
The diffuser area did look unstable,but when the wand was held to the surface it showed attached flow.
The tail seemed to demonstrate the cambered flow both on top and sides with a very healthy turbulent boundary layer.
One problem with the truck is that cap establishes a flow pattern which is mutilated when it nears the plane of the bed top rails and flat portion of the cap,losing flow continuity as the taper has to 'begin again' at the boat tail.
I'd like to run the skirts all the way down,but it adds frontal area,and the fronts would strike curbs when parking,as the wheels are off-center when approaching.
__________________
Photobucket album: http://s1271.photobucket.com/albums/jj622/aerohead2/
|
|
|
|
|
The Following User Says Thank You to aerohead For This Useful Post:
|
|
|
10-23-2014, 02:58 PM
|
#184 (permalink)
|
|
Master EcoModder
Join Date: Jan 2008
Location: Sanger,Texas,U.S.A.
Posts: 15,879
Thanks: 23,955
Thanked 7,219 Times in 4,646 Posts
|
predictions
Quote:
Originally Posted by ennored
First thing that popped into my head after knowing that the test was over and read some of the results was: How did it match your predictions? What did you think the CD would be? Based on what? Does the measured number match your predictions based on fuel economy? Coastdown testing? Tuft testing? Don't know that you had any specific predictions for this exact configuration, but you still must have had a number in your head that you thought it would do, right?
Your list of improvements seems to go after small stuff. Are there any BIG things that you can't really go after? Plan taper on the bed may be larger than I'm thinking? Maybe ride height? Lots of little stuff adding up?
I selfishly vote for a large vehicle to the wind tunnel next. Some sort of RV or box truck. Love to copy the Dryden van and try a few different tails.
|
Predicting was going to be problematic before I left on the trip.
*The design velocity was going to be lower (65-mph) for which I have little data.The trip did indicate the highest mpg I've seen at 65 (over 37.5 mpg),so I felt like the most recent mods had a chance for 'showing.'
*Crashes and way-points forced 'shorter' distances between top-offs.There were some overnight stays with cold-restarts the next morning which is typically a no-no for testing.
*The wind never stopped blowing for the entire trip (hurricanes Dolly,Norbert,and Odile),so the trip was not indicative of past testing.
*Rain and wind from Odile killed me from Southern California to New Mexico.
*Air density can be 12% lower at elevation depending on temp and local baro.pressure,so it's going to skew the numbers.
*In 2012 I failed to reach terminal velocity at Bonneville,and without a top speed it would be impossible to use Hucho's 30%/10% rule.And the salt was so wet,even If they let me run the 5-mile course,the salt rolling resistance (Cf 0.055 vs 0.008) would have corrupted the top speed.
*Shooting from the hip,I thought I might see as low as Cd 0.18,do to the fineness ratio,but the lack of plan-taper of the truck box and incongruity of its shape,with respect to the aero shell seems to doom it to higher drag since it screws up all the tumble home and radii you'd get without the 'boxy' sides.I might be losing over 16% right there according to Kamm and Fachsenfeld.
*The diffuser is too steep also and that would require some effort to correct in a 'roadable' version.
*Maybe Cd 0.203 measured at A2 with a custom bed.
*Maybe Cd 0.182 with new bed and camera system as measured at A2.
--------------------------------------------------------------------------
I can't think of any big-ticket items I could go after.
Torsion-bar suspension makes active (lowering) suspension problematic.
--------------------------------------------------------------------------
If we want to do larger vehicles we should talk to the tunnel guys.Hucho says we can't exceed 30% blockage ratio.We'd want to run the numbers.
__________________
Photobucket album: http://s1271.photobucket.com/albums/jj622/aerohead2/
|
|
|
|
|
The Following 2 Users Say Thank You to aerohead For This Useful Post:
|
|
|
10-23-2014, 03:07 PM
|
#185 (permalink)
|
|
Master EcoModder
Join Date: Jan 2008
Location: Sanger,Texas,U.S.A.
Posts: 15,879
Thanks: 23,955
Thanked 7,219 Times in 4,646 Posts
|
sticker
Quote:
Originally Posted by Sven7
I'd be in for a no-drag sticker and maybe a magnet if there are any extras. $$$ 
Video's great! Thanks for posting. I see there are also a couple new images to crop for wallpapers. |
No magnets,but I did print a few sheets of stickers.Let me see if I dig out your address. 
__________________
Photobucket album: http://s1271.photobucket.com/albums/jj622/aerohead2/
|
|
|
|
|
10-23-2014, 03:57 PM
|
#186 (permalink)
|
|
Master EcoModder
Join Date: Jan 2008
Location: Sanger,Texas,U.S.A.
Posts: 15,879
Thanks: 23,955
Thanked 7,219 Times in 4,646 Posts
|
Thanks to the videographer
Special thanks to Gary DeLassus of Colorado Springs,Colorado for his project support and fine work behind the viewfinder at Darko.These images would not have been possible without him.Nor the data on the Prius III.
Gary and I were both quite the neophytes when it came to this sort of thing.'turned out pretty good for a couple of newcomers. 
__________________
Photobucket album: http://s1271.photobucket.com/albums/jj622/aerohead2/
|
|
|
|
|
10-23-2014, 04:46 PM
|
#187 (permalink)
|
|
Batman Junior
Join Date: Nov 2007
Location: 1000 Islands, Ontario, Canada
Posts: 22,515
Thanks: 4,062
Thanked 6,959 Times in 3,603 Posts
|
Agreed, Phil - good raw video. I didn't leave much out except where you guys were moving around / getting set up to test a new section.
|
|
|
|
|
The Following User Says Thank You to MetroMPG For This Useful Post:
|
|
|
12-29-2014, 04:15 PM
|
#188 (permalink)
|
|
Master EcoModder
Join Date: Jan 2008
Location: Sanger,Texas,U.S.A.
Posts: 15,879
Thanks: 23,955
Thanked 7,219 Times in 4,646 Posts
|
poco loco tailcone MIA
A couple Fridays ago I took off for Mineral Wells after dark.After a rest stop at Runaway Bay,I noticed that the tailcone for the bed cover was missing.
I'd been driving in total darkness.
This weekend I made the same trip,but left during daylight.I retraced the route,scanning for anything that might have remained.I never saw hide nor hair of it.
The cone was the original mockup:cedar/foam/glue/and polyester resin.No glass.40-hours work.
Highway 380 has been under construction (widening) for years now.The roughness of the 'open' section of the road was enough to eventually break a plumbers tape hold down.The boat tail displaced rearwards,ripping the screws out of the poco loco bedcover attachment points,leaving only a trailing edge anchorage.
At up to 70-mph,the air would have caught the leading edge,lifting and ripping from its remaining purchase,sending it airborne for a bit.
My apology to anyone following.
Some of the fractured passenger side headlight cover went away as well.
I had made a concrete cast of the tailcone,and I'll be able to recreate it as an FRP shell,much lighter.Better secured.
BamZipPow gave the thumbs down to plumbers tape and he turned me onto a more robust version of perforated flat stock available at the Home Depot.
TexDOT may not improve on the road situation so I'm just going to have to build stronger. 
__________________
Photobucket album: http://s1271.photobucket.com/albums/jj622/aerohead2/
|
|
|
|
|
The Following User Says Thank You to aerohead For This Useful Post:
|
|
|
12-30-2014, 12:03 AM
|
#189 (permalink)
|
|
Master EcoModder
Join Date: Aug 2012
Location: northwest of normal
Posts: 27,649
Thanks: 7,764
Thanked 8,575 Times in 7,061 Posts
|
Quote:
|
I had made a concrete cast of the tailcone,and I'll be able to recreate it as an FRP shell,much lighter.Better secured.
|
In hindsight, that was good foresight.
Can you show a picture of the part that's no longer there? Fore or aft of the tailgate? |
|
|
|
|
The Following User Says Thank You to freebeard For This Useful Post:
|
|
|
12-30-2014, 11:17 AM
|
#190 (permalink)
|
|
EcoModding Apprentice
Join Date: Jun 2010
Location: Virginia
Posts: 114
Thanks: 33
Thanked 56 Times in 38 Posts
|
Quote:
Originally Posted by aerohead
They use polypropylene,forced under air pressure up to the wand head,where the heating element flashes it into the smoke.
|
Looks like it's actually propylene glycol or mineral oil: Smoke Generator - Aerolab
Does the hood bulge add to the airflow encountered by the side mirrors?
|
|
|
|
|
The Following User Says Thank You to Ardent For This Useful Post:
|
|
|


