12-12-2012, 03:17 PM
|
#181 (permalink)
|
|
Master EcoModder
Join Date: May 2008
Location: Maynard, MA Eaarth
Posts: 7,907
Thanks: 3,475
Thanked 2,950 Times in 1,844 Posts
|
I designed around an arrangement like FVT used in their eVaro - twin AC motors back to back, each driving one front wheel through a drive shaft. The differential function is done within the controller(s).
The thought of removable or folding seats has been a possibility all along. At first there will only be one seat in the center for the driver.
Having the driver in the center affords (much?) better crash protection, all else being equal. The entire structure protects the driver, rather than just one corner of it. It also allows the driver to be moved farther forward (between the front wheels) into the larger volume that is created by the overall shape - which is used because it is (or should be) lower drag. One thing leads to another.
|
|
|

|
|
The Following 2 Users Say Thank You to NeilBlanchard For This Useful Post:
|
|
 Today Today
|
|
|
|
 Other popular topics in this forum...
|
|
|
|
|
12-12-2012, 08:24 PM
|
#182 (permalink)
|
|
Master EcoModder
Join Date: Aug 2012
Location: northwest of normal
Posts: 27,695
Thanks: 7,775
Thanked 8,584 Times in 7,068 Posts
|
That sounds like a very reasonable drive train, actually.
A hubless wheel with the centerline of the motor at '9 0'clock' would enable a suspension movement similar to the trailing arms on a VW front end. Or a bevel gear to put the motor inside the hubless wheel. Hmmm....
Will the controls be a wheel and pedals, or handlebars (under the seat like a recumbent)? Or will you just hold an iPad up in the air?
|
|
|
|
|
12-12-2012, 09:34 PM
|
#183 (permalink)
|
|
Master EcoModder
Join Date: May 2008
Location: Maynard, MA Eaarth
Posts: 7,907
Thanks: 3,475
Thanked 2,950 Times in 1,844 Posts
|
The only variation in controls that I'm contemplating (but this is waaaaay down the road) is a third pedal on the left (where the clutch would be) for all the regenerative braking. The accelerator would be just for power (fancy that?) and the middle pedal is just for friction brakes. This puts the "integration" of braking in the control of the driver, maximizing the efficiency, and would greatly simplify the systems.
As long as we're talking future plans - I hope that after I get CarBEN EV5 up and running, that I then could work with the folks at Energy Return Wheel to make an airless ultra-low rolling resistance wheels. Their current designs, unfortunately are high aero drag because they are open on the sides. If low RR dictates a stiffer wheel then the suspension needs to be redesigned:
It might be possible to work with Levant Power to make regenerative shocks that take advantage of the stiffer wheels. The suspension needs to be more compliant for small motions since the wheels would be passing more energy into the suspension, so to both avoid a harsh ride and to make a bit more energy from it; rather than just heat up the shocks.
Oh, and ideally any low aerodynamic drag car needs ride leveling and height control, too.  |
|
|
|
|
12-13-2012, 01:49 AM
|
#184 (permalink)
|
|
Master EcoModder
Join Date: Aug 2012
Location: northwest of normal
Posts: 27,695
Thanks: 7,775
Thanked 8,584 Times in 7,068 Posts
|
The reason I ask is that I like the idea of making it wheel-chair accessible.
A small market but under-served.
|
|
|
|
|
12-13-2012, 10:13 AM
|
#185 (permalink)
|
|
EV test pilot
Join Date: Jan 2008
Location: Oconomowoc, WI, USA
Posts: 4,435
Thanks: 17
Thanked 663 Times in 388 Posts
|
Quote:
Originally Posted by freebeard

The reason I ask is that I like the idea of making it wheel-chair accessible.
|
When I broke my ankle this spring, I started paying a WHOLE LOT MORE attention to handycapped access.
Nearly all EVs are "Fly by Wire", using electric components to send signals. That gives more design flexibility. No reason why a car couldn't be designed with a foot pedal, but moving just one potentiometer and a pair of wires to the dashboard makes it a hand-control.
In residential construction, there's a concept known as "aging in place". A house is designed with some small changes that you don't really notice, such as kitchen counters being slightly lower, and how and where staircases are or aren't used. As an able-bodied person, you barely notice the differences, but living there, if you have to use a wheel-chair or walker or have other physical/health problems, the house is already designed to accomodate you.
I like the concept of designing a car that isn't specifically for a wheel-chair user per se, but is already designed with that in mind so that just a very simple/cheap/quick modification would take care of it.
Designing a car from scratch, like this project, is the perfect opportunity to "build-in" clever little features like this.
I also like the idea of a separate pedal for regenerative brakes. On my hybrid truck project, I'm leaning towards separate accelerators for the engine and electric motor systems, as this maximizes the driver's control. Any sort of computer-controlled or automated system does not take into account all driving situations, whereas the driver can. |
|
|
|
|
The Following User Says Thank You to bennelson For This Useful Post:
|
|
|
12-19-2012, 02:06 PM
|
#186 (permalink)
|
|
Master EcoModder
Join Date: May 2008
Location: Maynard, MA Eaarth
Posts: 7,907
Thanks: 3,475
Thanked 2,950 Times in 1,844 Posts
|
I got my new flexible sanding tool (from a boat building tool supplier) and after an initial stumble, I figured out how to use it:
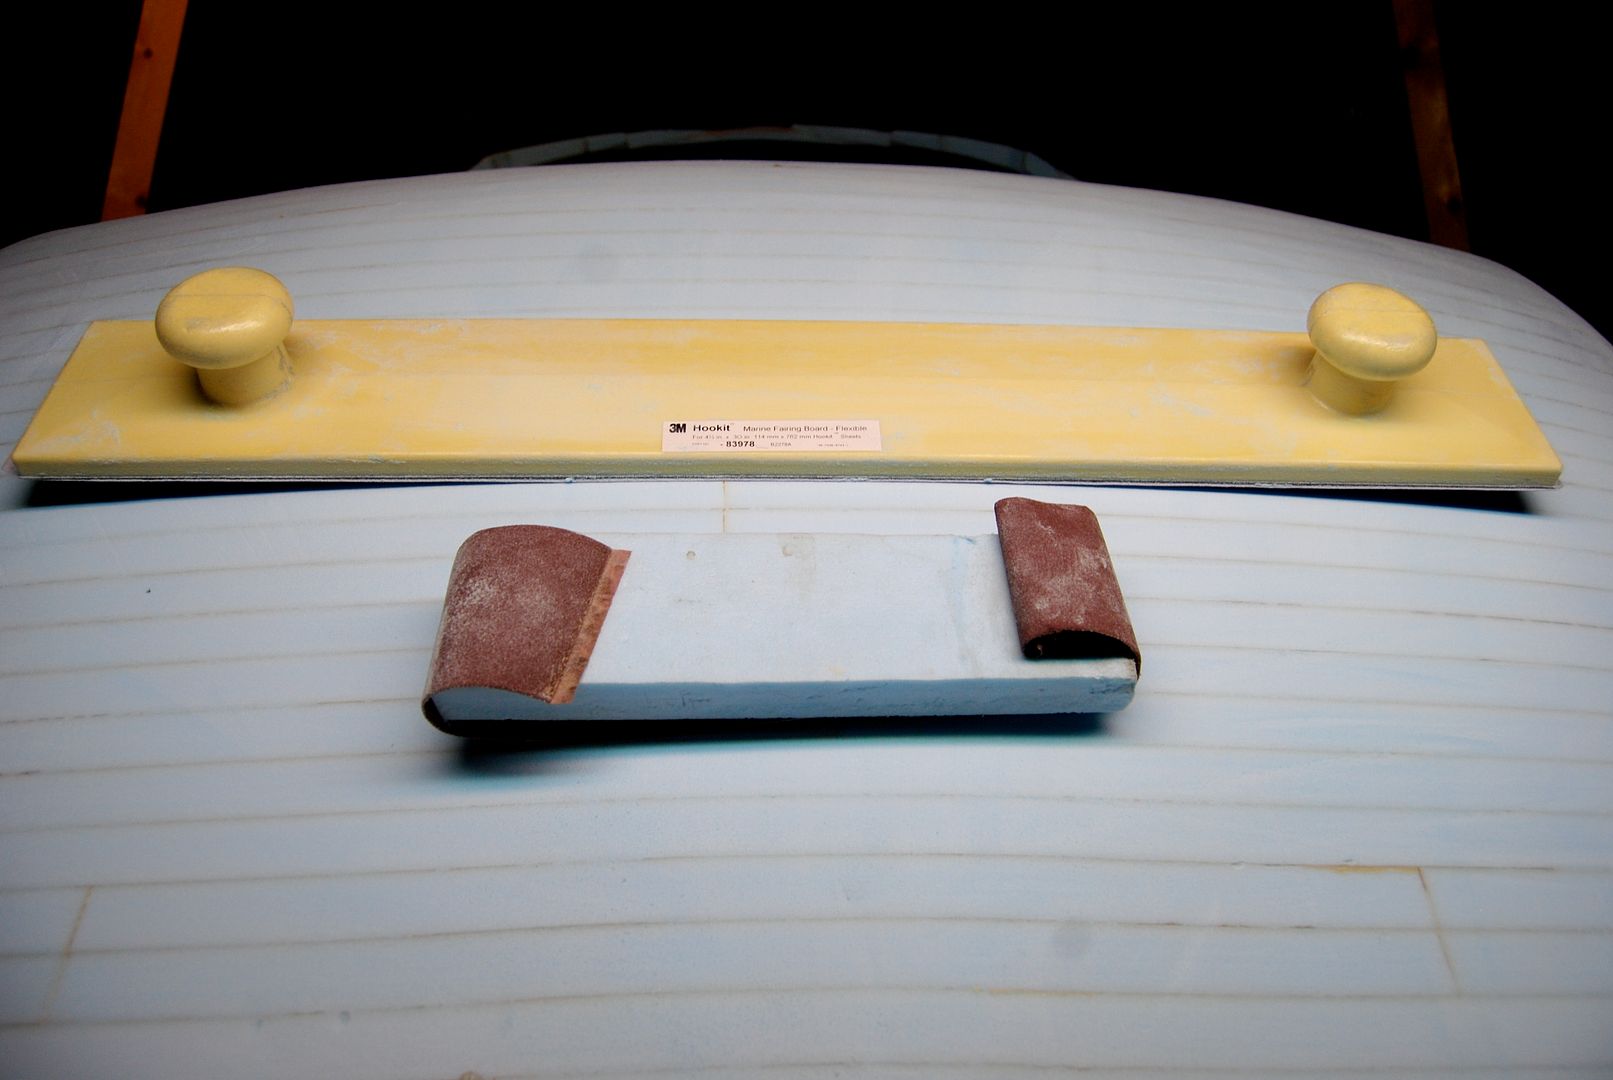
It is fine on fully convex surfaces, but I first tried it on the "twisted" shoulder surface and the edges of the sandpaper started digging nasty long gouges in the foam... ;( In the cold the board is not all that flexible and since the paper extended 1/4"+ beyond the board and when the board was bent, the edge sawed into the surface in one stroke. Ouch.
I trimmed off the excess edges of the sandpaper, and when I use it on the convex surfaces along the sides of the hatch opening and on the roof above the driver, it works much better. The 30" length and the 4 1/2" width of the tool let it conform to the long curves, but it still bridges over the low spots. I miss the self-vacuuming of the disk and belt sanders - I now have to wear a dust mask.
 Full Slideshow
The smaller tool is obviously homemade - I cut a piece of 1" foam to the width of the 120 grit belt sander paper (it got too much moisture sitting in my basement for years, and pulled apart at the seam). It happens to work quite well for the shoulder and other areas that are too tight for the large sanding tool.
Last edited by NeilBlanchard; 12-19-2012 at 02:11 PM..
|
|
|
|
|
12-19-2012, 02:19 PM
|
#187 (permalink)
|
|
Master EcoModder
Join Date: Dec 2012
Location: ff
Posts: 459
Thanks: 59
Thanked 38 Times in 30 Posts
|
I was trying to source you a composite sheet we used in 1/4 miler car.
It is also common material for sign shops as it has good strength, machinable, and comes prepainted.
It is black synthetic rubber sandwiched between aluminum. Very strong and durable compared to other sheet materials.1/4" thick is strong like 5/8 plywood but 1/16th weight. But alas Ive failed hope someone reads this and puzzles it together really excellent stuff 4x8 sheets.
|
|
|
|
|
12-19-2012, 02:29 PM
|
#188 (permalink)
|
|
Master EcoModder
Join Date: Dec 2012
Location: ff
Posts: 459
Thanks: 59
Thanked 38 Times in 30 Posts
|
Ok a little more just in case you do find it use a router to cut v groove into back to make 90 bends
It will roll some tight bends with a sheet roller but I recomend heating it up under heat rods first.
Very drastic bends that arent angles will require removal of 70 Percent of the aluminum from backside of bend area. It would really make your mockup look ready to drive.
Your going to heed heatrods for polycarbonate window bends anyway. look to mcmaster carr thier affordable. and a heatgun to spread the fun.
|
|
|
|
|
12-19-2012, 03:59 PM
|
#189 (permalink)
|
|
Master EcoModder
Join Date: Aug 2012
Location: northwest of normal
Posts: 27,695
Thanks: 7,775
Thanked 8,584 Times in 7,068 Posts
|
NeilBlanchard -- Excellent. Consider making a foam block that is a negative impression of the convex edges as a sanding block to maintain the edge contour along its length.
justme1969 -- I am interested in that material. Any brand name, or what should I ask about at the local sign shop? I'd want to chemically strip the paint if it's not available without.
EDIT: Here is a manufacturer: http://nudo.com/. Available locally for $104.95 for a 1/4" sheet.
Last edited by freebeard; 12-19-2012 at 04:15 PM..
|
|
|
|
|
12-20-2012, 05:13 AM
|
#190 (permalink)
|
|
Master EcoModder
Join Date: Jul 2009
Location: idaho
Posts: 282
Thanks: 0
Thanked 96 Times in 74 Posts
|
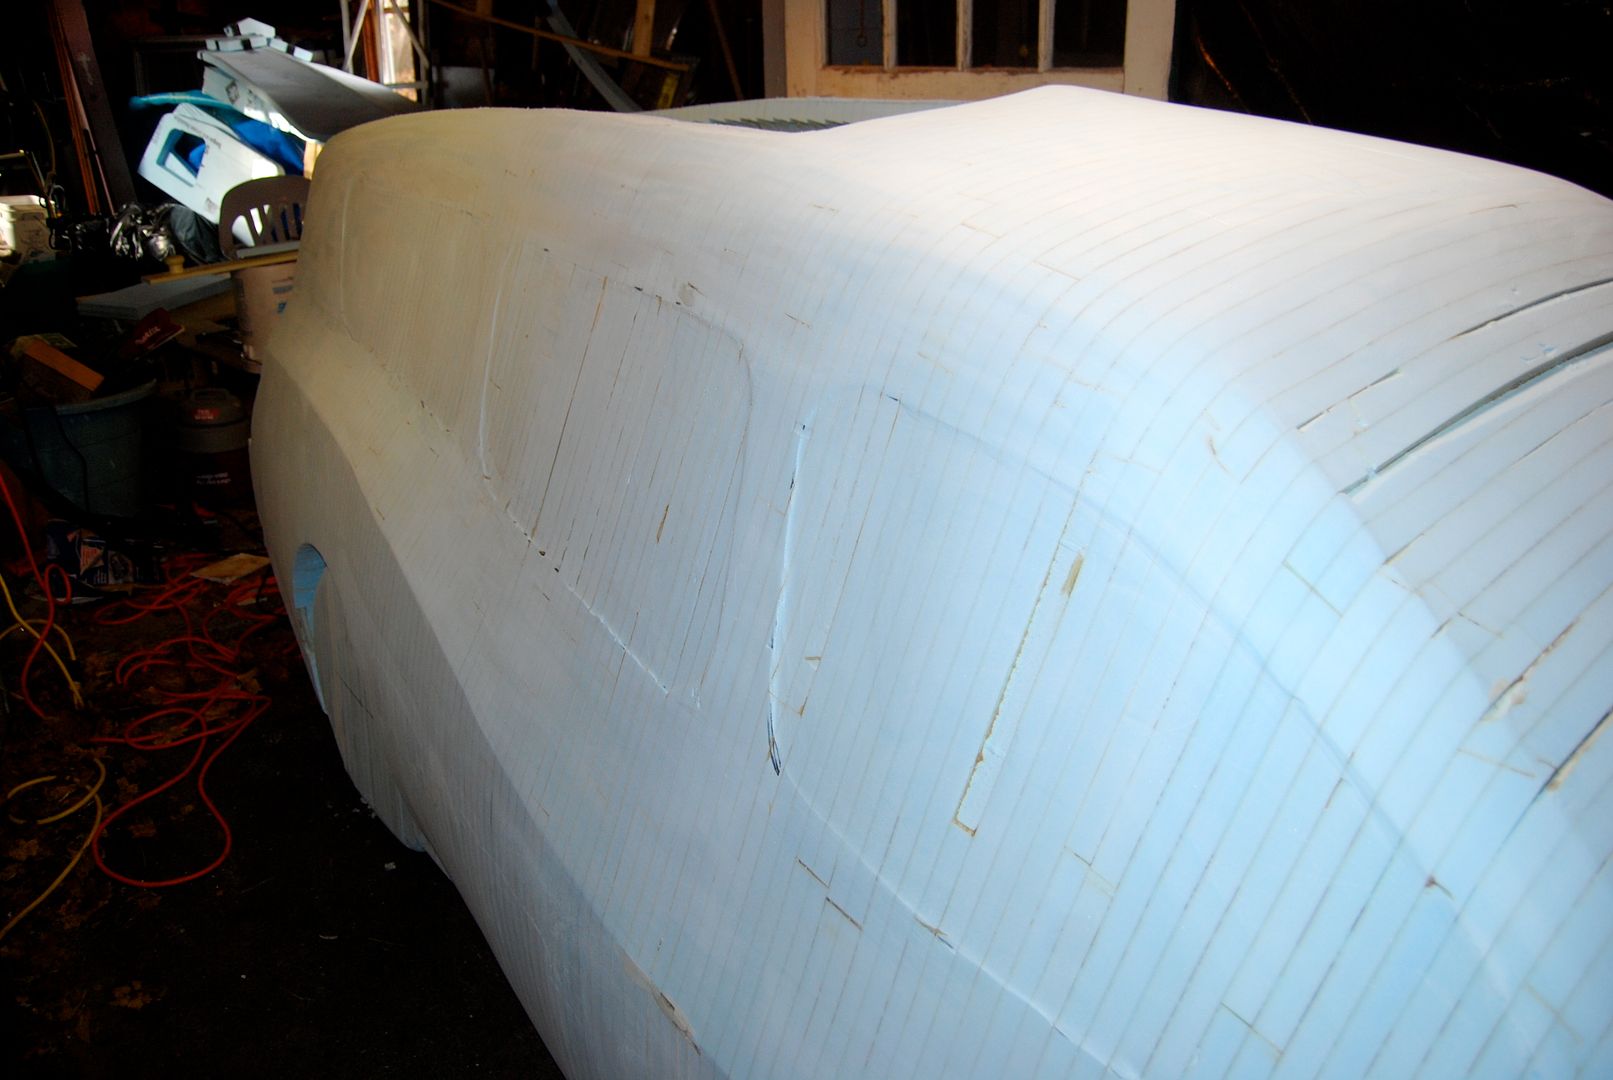
This is one amazing build. How are you assuring left/right symmetry as you smooth the surface?
Are the thick side areas solid or are they hollowed out for things like air ducts and wiring?
Since you live in the northeast, you will need some sort of opening hatch or window on the left side, accessible from the driver's seat... or do you plan to always take all the twisty back roads to avoid tollbooths? 
One thing I'd change to make things somewhat easier is the fin on top of the hatch and the ones under the back. Instead of building them up in stacked slices, change the slices to have a notch. Then into that line of notches glue fins made in a single piece. For strength concerns, laminate the fins from two thinner sheets.
The bulkheads between the battery bays could also be made that way and with a glass or carbon fiber laminate would add strength. Laminate two pieces of foam with glass or CF layer in between, then a full wrap around the outside for even more strength. That would also make glassing the rest of the battery bays easier because part of the walls would already be done, just lap the other up the sides of the bulkheads a bit.
The design would have to be modified to enable sliding in and gluing the bulkheads as that part of the stack is finished.
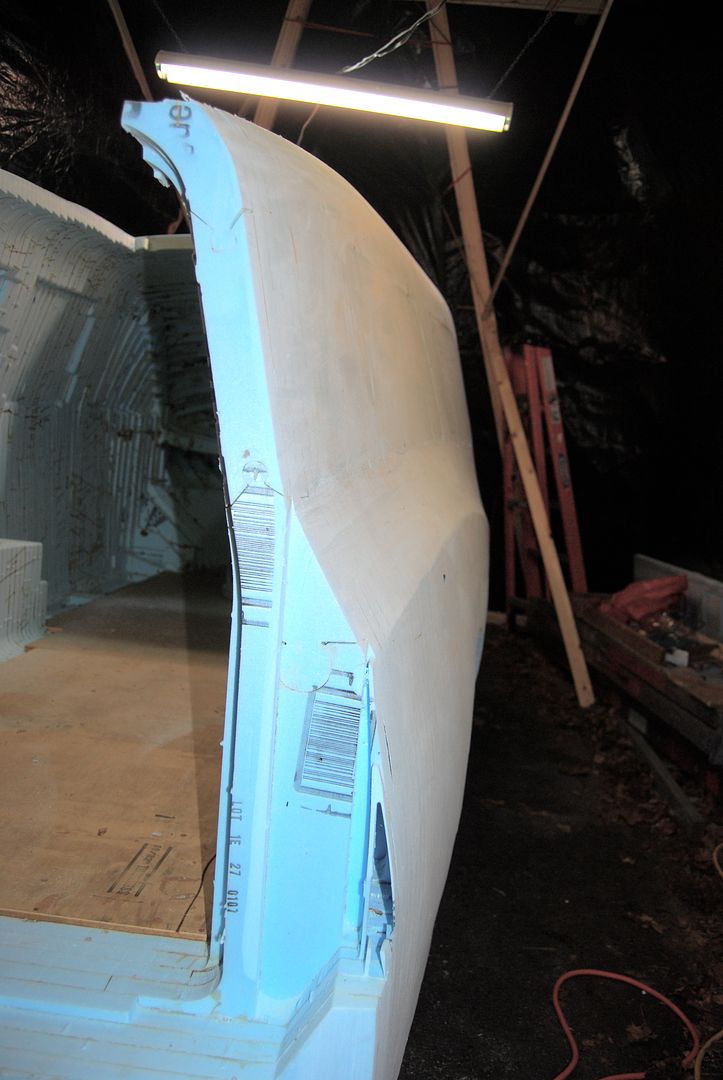
Really sharp inside and outside corners are a huge PITA with composite layup, especially with woven material. The stuff does not like to stay stuck into or pulled around corners. It'll pull loose and get air under it.
One fix is staples. Pull the fabric tight and staple it to the foam to keep it down over outside corners and into concave areas. How well staples work depends on the density of the foam.
A pioneer of this type of vehicle construction is Robert Q. Riley CAD Product Design Consultant | DIY Product Design and Development | Robert Q Riley Enterprises
|
|
|
|
|
The Following 2 Users Say Thank You to Galane For This Useful Post:
|
|
|