09-11-2010, 01:09 PM
|
#1 (permalink)
|
|
Master EcoModder
Join Date: Mar 2008
Location: USA
Posts: 568
Thanks: 1
Thanked 73 Times in 58 Posts
|
Coroplast thermoforming
Has anybody tried heating Coroplast to shape it, such as creating permanent bumps or depressions, or gentle curvature at the edges?
If this works, it would be very useful adapting a flat piece of Coro to fit over the occasional underbody protrusion, or making fairings for the wheels, etc..
It would also be very handy for a shaped pickup truck bed cover.
Thoughts?
|
|
|

|
 Today Today
|
|
|
|
 Other popular topics in this forum...
|
|
|
|
|
09-11-2010, 01:18 PM
|
#2 (permalink)
|
|
(:
Join Date: Jan 2008
Location: up north
Posts: 12,762
Thanks: 1,585
Thanked 3,555 Times in 2,218 Posts
|
I've formed it with a heat gun. Of course simple 2-D curves are a snap; compound curves can be done as well. It is very easy to overdo it with the heat and cause unwanted melting. The ribbed internal structure of coroplast collapses if too severe angles are attempted- that might be no problem though. The concave side of curves collapses/wrinkles as well, so if you are concerned about the aesthetics of the part try to only have the conves surfaces visible as the concave ones will look shriveled.
Overall it is a very easy material to form and work with but the ribbing causes some aesthetic limitations.
|
|
|
|
|
The Following User Says Thank You to Frank Lee For This Useful Post:
|
|
|
09-11-2010, 06:33 PM
|
#3 (permalink)
|
|
Do more with less
Join Date: Jul 2010
Location: North Eastern Missouri
Posts: 930
Thanks: 66
Thanked 177 Times in 112 Posts
|
I agree with my twin frank lee. (that is if I lost 30 pounds and I lost 30 years and he grew a decent beard  )
Coroplast can be heated on the inside of the bend with a heat gun. The side that you heat gets funky but once it cools the structure becomes much more rigid. It takes practice to do it right. Keep the heat gun moving over the entire area that you want to flex. Gentle bends are sometimes the most difficult. Practice on a scrap or two first.
Remember this is becoming election season. Do your civic duty and pick up as many 4x8 election signs as you can. You have to go out on the evening of the election.
__________________
The further a society drifts from the truth, the more it will hate those that speak it. George Orwell
Before a standing army can rule, the people must be disarmed; as they are in almost every kingdom in Europe.
The supreme power in America cannot enforce unjust laws by the sword; because the whole body of the people are armed.
Noah Webster, 1787
|
|
|
|
|
The Following User Says Thank You to Varn For This Useful Post:
|
|
|
09-11-2010, 09:37 PM
|
#4 (permalink)
|
|
Master EcoModder
Join Date: Mar 2008
Location: USA
Posts: 568
Thanks: 1
Thanked 73 Times in 58 Posts
|
Thanks, guys, that's what I was hoping to learn.
This will come in handy at belly pan time, when a low hanging widget would otherwise prevent use of flat sheet of Coroplast, or when I want to make an AR-5 type of vent to the slipstream of engine cooling air. In such cases, heating would allow the Coroplast to have a teardrop-shaped blister at the low hanging widget, and gently curl up to make a nice exit pathway for the hot air.
BTW, is there a good, durable adhesive for Coroplast?
|
|
|
|
|
09-12-2010, 08:07 AM
|
#5 (permalink)
|
|
Coasting Down the Peak
Join Date: Jun 2008
Location: M I C H I G A N
Posts: 514
Thanks: 27
Thanked 42 Times in 35 Posts
|
I have folded the coroplast using heat, with the purpose of doubling the edge for strength and to make it easier to fasten to. I took a metal straight edge, clamped it down along the coroplast at the bend, and ran a propane torch along the bend area, then quickly grabbed the coroplast and bent it. Then flamed the other side a bit to make the coroplast relax and keep the bend.
I think you could make a bump in the middle of the coroplast. Cut a hole in a piece of plywood in the right shape. Set the coroplast on the plywood. Make a plug with rounded edges, smaller than the hole in the plywood, and make it so you can add weight. Put the plug with weight on the coroplast over the hole, and from underneath, start flaming the coroplast. It will probably get wavy and buckle, but I think it would work and would be permanent if you let it cool before removing the plug and weight. You might want to make a stop so that the plug doesn't go all the way through.
Coroplast could probably be vacuum formed, within limits. The corrugation reduces the ability to change the shape, but some changes could be made.
|
|
|
|
|
The Following User Says Thank You to skyl4rk For This Useful Post:
|
|
|
09-12-2010, 01:15 PM
|
#6 (permalink)
|
|
Master EcoModder
Join Date: Mar 2008
Location: USA
Posts: 568
Thanks: 1
Thanked 73 Times in 58 Posts
|
Quote:
Originally Posted by skyl4rk

I have folded the coroplast using heat, with the purpose of doubling the edge for strength and to make it easier to fasten to. I took a metal straight edge, clamped it down along the coroplast at the bend, and ran a propane torch along the bend area, then quickly grabbed the coroplast and bent it. Then flamed the other side a bit to make the coroplast relax and keep the bend.
I think you could make a bump in the middle of the coroplast. Cut a hole in a piece of plywood in the right shape. Set the coroplast on the plywood. Make a plug with rounded edges, smaller than the hole in the plywood, and make it so you can add weight. Put the plug with weight on the coroplast over the hole, and from underneath, start flaming the coroplast. It will probably get wavy and buckle, but I think it would work and would be permanent if you let it cool before removing the plug and weight. You might want to make a stop so that the plug doesn't go all the way through.
Coroplast could probably be vacuum formed, within limits. The corrugation reduces the ability to change the shape, but some changes could be made.
|
That's what I was hoping to hear: Suppose I could otherwise attach Coro to existing fix points on the bottom of my Ford Econoline van, but for a couple or widgets protruding below a horizontal plane formed by the vehicle's rocker panels and other structural geometry. By making a plywood template of teardrop shape and putting it at the proper places on the Coroplast, I could make thermoformed aerodynamic blisters in the sheet, so it bulges down far enough to clear the pesky widgets, but is still basically flat to take advantage of the van's rocker panels and other co-planar attach points.
Such localized heat forming would also be handy for making flat nose undertrays into wheel fairings--flat in the middle but gently drooping blisters at sides to fair the air past wheels. Some of the baby Benz cars have this sort of fairing, but we could do it on the cheap. |
|
|
|
|
05-07-2014, 06:53 PM
|
#7 (permalink)
|
|
EcoModding Lurker
Join Date: May 2014
Location: charlotte, nc
Posts: 24
Thanks: 0
Thanked 2 Times in 2 Posts
|
THERE IS another plastic called Con Pearl, it is used in a lot of car trunks. they are located in greenville, SC a couple of hours from me. I've always wanted to use their product. It's like corplast on steroroids, because it has a honey comb like pattern and no grain.
for bonding coroplast use 3m epoxy, I forget the product number, just call up 3m and ask them for a sample and they will mail you one, as long as you make it sound like you will be using a lot of it.
|
|
|
|
|
The Following User Says Thank You to aluminumwelder For This Useful Post:
|
|
|
05-08-2014, 12:35 AM
|
#8 (permalink)
|
|
Master EcoModder
Join Date: Aug 2012
Location: northwest of normal
Posts: 27,695
Thanks: 7,775
Thanked 8,584 Times in 7,068 Posts
|
This stuff?
http://http://www.conpearl.com/packa...-pearl-boards/
It's an interesting material. The middle layer they call pearls, I'd call egg-crating.
I'm looking forward to the Primary. I want to try slipping curved pieces of welding rod in the flutes to stiffen edges and get it to hold curves. And stuffing metal washers in slots to make attachment points.
Polypropelene isn't very stable dimensionally. There is a product called alumalite—
Alumalite | Alumalite Panel | Alumalite Sign Board | Laminators Inc.
—that is coroplast with aluminum skins on both sides. Good for strength, heat, and using adhesives. Spendy though. |
|
|
|
|
The Following User Says Thank You to freebeard For This Useful Post:
|
|
|
05-08-2014, 07:40 AM
|
#9 (permalink)
|
|
EcoModding Lurker
Join Date: May 2014
Location: charlotte, nc
Posts: 24
Thanks: 0
Thanked 2 Times in 2 Posts
|
yes that is the stuff, i have never tried thermoforming it, but my guess is it would work ok. Alumalite cant do compound curves, but is great for straight lines.
|
|
|
|
|
05-09-2014, 08:52 AM
|
#10 (permalink)
|
|
Master EcoModder
Join Date: Jul 2011
Location: Ann Arbor, Michigan
Posts: 4,158
Thanks: 120
Thanked 2,790 Times in 1,959 Posts
|
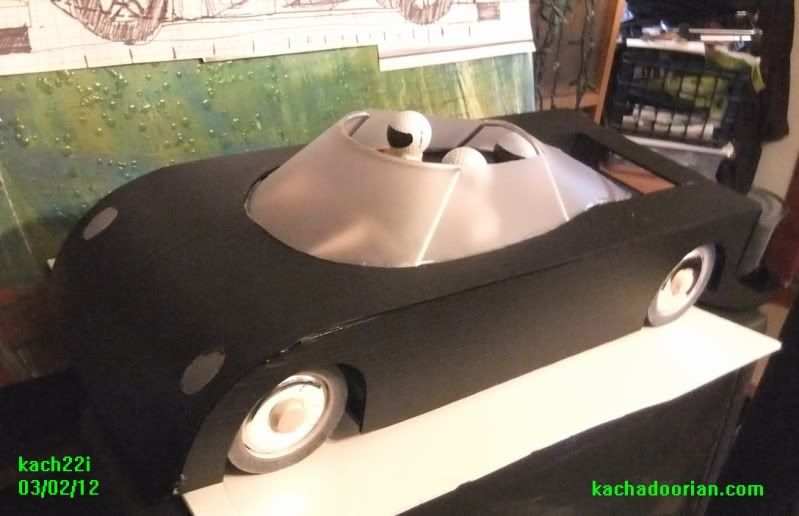
I've built some models using coroplast, and agree with others in this thread about it's limitations - and no 3D or complex curves.
Thermoplastic Construction - Boat Design Forums
 http://ecomodder.com/forum/showthrea...ept-20793.html
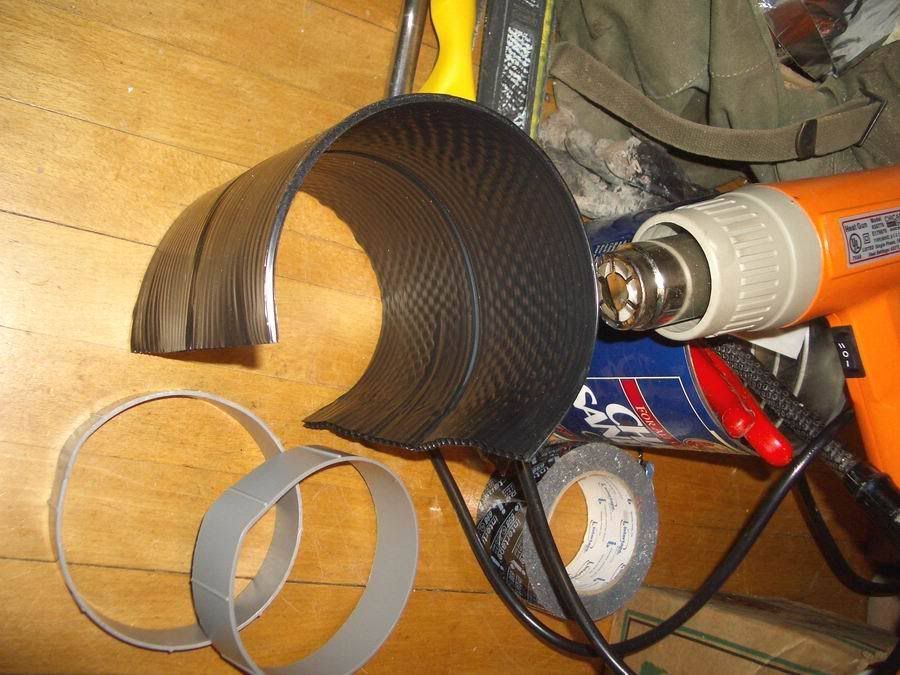
If you set up a jig like you would for bending metal, that is to say support the edge to be bent and then bend over an arc as large as a barrel, and ending with a curve as small as a mailing tube or PVC drain pipe with many steps in between you may have success.
Or you could just cowboy it like I did, and trim off the wavy edges ( where I grabbed and pulled on it) as waste.
Last edited by kach22i; 05-09-2014 at 09:03 AM..
|
|
|
|
|
The Following 3 Users Say Thank You to kach22i For This Useful Post:
|
|
|