08-12-2016, 11:01 PM
|
#11 (permalink)
|
|
Aero Deshi
Join Date: Jan 2010
Location: Vero Beach, FL
Posts: 1,065
Thanks: 430
Thanked 668 Times in 357 Posts
|
Awesome!!!! You Nailed It!!! (or is that glue and screws? hahaha!) You have really built something that is as close to optimized as I have ever seen built. You should get very close to the best Cd you can achieve with a cap, but you have nailed getting the best C L. Your truck is going to feel like yer driving an arrow down the road. If your travels take you to snowy places, you'll really appreciate the stability.
How may I ask did you figure this out???
Great Job!!!

|
|
|

|
 Today Today
|
|
|
|
 Other popular topics in this forum...
|
|
|
|
|
08-12-2016, 11:11 PM
|
#12 (permalink)
|
|
Aero Deshi
Join Date: Jan 2010
Location: Vero Beach, FL
Posts: 1,065
Thanks: 430
Thanked 668 Times in 357 Posts
|
BTW, I use Tiny Pic to upload my pictures to and I use the "Insert Image" thing above, or, I grab the "IMG Code for Forums & Message Boards" on the image page in TinyPic and paste it right into the post. You may wanna limit your image size to 600 pixels wide in order to avaoid sort of crashing the page.
Huge Welcome To You as well!!! As long as you don't consider adding golfball dimples or vortex generators to your exquisite creation  ...you'll be very well received here. |
|
|
|
|
08-13-2016, 12:14 AM
|
#13 (permalink)
|
|
EcoModding Lurker
Join Date: Aug 2016
Location: Texas
Posts: 86
Thanks: 0
Thanked 225 Times in 56 Posts
|
Haha, thanks. Yeah, it's glued and screwed... well at least the ribs to bed rail pieces are. The longitudinal piece at the top middle is just glued. I will be using glue and brad nails on the cedar, which I have started cutting up.
I appreciate the confidence but I can't really expect too much overall. I am mostly just hoping to offset the aerodynamic downgrades in the front end. The truck is set up for better off-road capabilities and with that comes maximum approach angle. You can see the entire wheels from the front. I'll take some more pictures of it tomorrow to show you.
As far as how I figured it out... I started by playing with the streamlined body picture overlay thing on this site to get a rough idea of the shape I wanted. Then I took some pictures of the back of the cab to get the profile, which I should have done more carefully in hindsight. I converted the image to a vector graphic so I could import it into CAD, which I use Fusion 360. I scaled the vector graphic based on known dimensions and traced it with a spline to the centerline of the cab outline and then mirrored that so the two sides were perfectly symmetric. I then took measurements of the bed rails and drafted those up. From there, I made an offset plane at the end of the bed rails parallel to the cab profile. On this plane I drafted the back end profile, basically winging it. I knew I wanted it more rounded with a steeper angle coming in from the sides. I also made it as short as I thought would be reasonable for entering and exiting the bed area figuring that I will have a slightly raised platform that holds the mattress. I also wanted to maintain usage of my rear view mirror. From there, I ran a curve from the cab profile to the rear profile. Again, I was sorta winging it, but I made the curve tangent to a line sloping down 1 degree from horizontal at the cab and tangent to a line sloping up 10 degrees from horizontal at the rear profile. I then used the loft command to make a body from the cab profile to the rear profile along that curve. I intersected evenly offset planes with the body to get the rib profiles. There's a bunch more after that, but that was basically the crux of the CAD work.
Oh, and thanks for the welcome. I'll also look into making the pictures smaller as you suggested.
|
|
|
|
|
The Following 3 Users Say Thank You to Macskyver For This Useful Post:
|
|
|
08-13-2016, 01:47 PM
|
#14 (permalink)
|
|
MPGuino Supporter
Join Date: Oct 2010
Location: Hungary
Posts: 1,807
iNXS - '10 Opel Zafira 111 Anniversary Suzi - '02 Suzuki Swift GL
Thanks: 828
Thanked 708 Times in 456 Posts
|
Quote:
Originally Posted by Macskyver

|
That is some beautiful work, there!
I would suggest adding in a provision for a detachable Bonneville-type spoiler. It might help even more.
|
|
|
|
|
08-13-2016, 10:26 PM
|
#15 (permalink)
|
|
Master EcoModder
Join Date: Dec 2014
Location: Butte, Montana
Posts: 725
Thanks: 208
Thanked 427 Times in 278 Posts
|
I take it this desine is for fixed, likse a standard shell.. I made my shell open to ease Ingress and egress, As I'm 6'3".
Looks like it will help more than anything off the shelf.
Good work so far
__________________
1st gen cummins 91.5 dodge d250 ,HX35W/12/6 QSV
ehxsost manafulld wrap, Aero Tonto
best tank: distance 649gps mi 24.04 mpg 27.011usg
Best mpg : 31.32mpg 100mi 3.193 USG 5/2/20

Former
'83 GMC S-15 Jimmy 2door 2wd O/D auto 3.73R&P
'79 Chevy K20 4X4 350ci 400hp msd custom th400 /np205. 7.5-new 14mpg modded befor modding was a thing
87' Hyundai Excel
83 ranger w/87 2.9 L FI2wd auto 18mpg on the floor
04 Mitsubishi Gallant 2.4L auto 26mpg
06 Subaru Forrester XT(WRX PACKAGE) MT AWD Turbocharged 18 plying dirty best of 26mpg@70mph
95Chevy Blazer 4x4 auto 14-18mpg
04 Chevy Blazer 4x4 auto 16-22mpg
|
|
|
|
|
08-13-2016, 11:03 PM
|
#16 (permalink)
|
|
EcoModding Lurker
Join Date: Aug 2016
Location: Texas
Posts: 86
Thanks: 0
Thanked 225 Times in 56 Posts
|
Quote:
Originally Posted by gumby79
I take it this desine is for fixed, likse a standard shell.. I made my shell open to ease Ingress and egress, As I'm 6'3".
Looks like it will help more than anything off the shelf.
Good work so far
|
Thanks. Yeah, the design is just like a standard shell, just hopefully more slippery. I went with the KISS principle on this project.
I like your aerocap. How much of a difference did it make for your vehicle? |
|
|
|
|
The Following 2 Users Say Thank You to Macskyver For This Useful Post:
|
|
|
08-13-2016, 11:07 PM
|
#17 (permalink)
|
|
EcoModding Lurker
Join Date: Aug 2016
Location: Texas
Posts: 86
Thanks: 0
Thanked 225 Times in 56 Posts
|
Quote:
Originally Posted by t vago
That is some beautiful work, there!
I would suggest adding in a provision for a detachable Bonneville-type spoiler. It might help even more.
|
Thanks. Are you thinking the spoiler would extend rearward behind the shell or sit on top of it? If it is to the rear, maybe I could make it into a cargo pod that mounts to the rear bumper or slides in the receiver hitch. |
|
|
|
|
08-14-2016, 01:52 AM
|
#18 (permalink)
|
|
EcoModding Lurker
Join Date: Aug 2016
Location: Texas
Posts: 86
Thanks: 0
Thanked 225 Times in 56 Posts
|
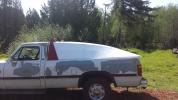
Before I forget, here is a picture showing the front end of the truck. 
As you can see, it won't win any low Cd contests. I probably won't be doing any mods here, as the current setup makes a huge difference in off-road capability. I might consider doing some sort of removable air dam (maybe made out of some sfiff rubber) that hooks over the bumper. And I will probably get rid of the round lights or swap them out with a light bar.
Anyways... Today was spent behind a table saw converting 2x6 (1.75"x5.75" actual) rough cut cedar into 3/4"x1/4" strips. This is basically the least expensive option I could find for getting the strips. You can order them online for about $5 a piece, but that gets real expensive when you need like 120 of them. You can get about 30 strips out of an $11 2x6 from Lowes. I ended up getting 6 boards so I would have extra figuring for waste. I will probably end up with a bunch left over though as the boards were surprisingly clean and knot free.
I started by ripping the boards into 1/4" strips:

Then I ripped those in half to get the roughly 3/4" wide strips:

I also started throwing together a makeshift router table for the bead and cove cuts: 
 |
|
|
|
|
The Following 7 Users Say Thank You to Macskyver For This Useful Post:
|
|
|
08-14-2016, 02:20 AM
|
#19 (permalink)
|
|
Master EcoModder
Join Date: Dec 2014
Location: Butte, Montana
Posts: 725
Thanks: 208
Thanked 427 Times in 278 Posts
|
Quote:
Originally Posted by Macskyver
I like your aerocap. How much of a difference did it make for your vehicle?
|
Went from~18.xx(290pmi) to 23.xxmpg(10,000mi) 60-65 with an average of 22.5. (1000usg 22,500mi) this 22.5 includes the 2900mi naked. Have had 5-6 100mi runs over Continental Divide @ 28. and 1 @28.95mpg @cruise set to 55mph. As compaired to 23.01 best naked. Plans are in motion to smoke test me and Aeroheads caps at DARCO in Ogden Ut sept9,16 I will be posting on that later. As well as a baby template. Im about 3000 mi behind on my fuellog right now.
Looks good so far . I will suggest a Kam back on tbe trailing edge .be tiped in 12.5° tord the center (down ontop 'in on both sides) of the last bow probably 6-8" in length . Make the edge a single smooth raidi ...sounds like you have some plains in this direction. With the rain over hang. .
To address the mishap on the cab just add a Corection pice with some Dalles or Woodruff keys.the 2nd bow may need some persuasion as well ,buyt might get lucky and only 1 . Or roll with it the small step will cost a small % reduction in mpg gain
. Gumby Stay Flexible
Dreem big chisel down to reality.
__________________
1st gen cummins 91.5 dodge d250 ,HX35W/12/6 QSV
ehxsost manafulld wrap, Aero Tonto
best tank: distance 649gps mi 24.04 mpg 27.011usg
Best mpg : 31.32mpg 100mi 3.193 USG 5/2/20
Former
'83 GMC S-15 Jimmy 2door 2wd O/D auto 3.73R&P
'79 Chevy K20 4X4 350ci 400hp msd custom th400 /np205. 7.5-new 14mpg modded befor modding was a thing
87' Hyundai Excel
83 ranger w/87 2.9 L FI2wd auto 18mpg on the floor
04 Mitsubishi Gallant 2.4L auto 26mpg
06 Subaru Forrester XT(WRX PACKAGE) MT AWD Turbocharged 18 plying dirty best of 26mpg@70mph
95Chevy Blazer 4x4 auto 14-18mpg
04 Chevy Blazer 4x4 auto 16-22mpg
|
|
|
|
|
08-14-2016, 03:03 AM
|
#20 (permalink)
|
|
Master EcoModder
Join Date: Aug 2012
Location: northwest of normal
Posts: 27,653
Thanks: 7,764
Thanked 8,575 Times in 7,061 Posts
|
What is the difference in length along the curve on the first and last rib? How does that compare with the number of strips required?
Will you lay them from the sides up or center out?
|
|
|
|
|