07-23-2020, 05:47 PM
|
#1 (permalink)
|
|
Cyborg ECU
Join Date: Mar 2011
Location: Coastal Southern California
Posts: 6,299
Thanks: 2,373
Thanked 2,172 Times in 1,469 Posts
|
Metal shaping technique showcase/discussion for ecomodders
A thread for metal shaping techniques: showcasing, discussion, and teaching/learning.
All metals, all reasonably DIY friendly tools and supplies for making or modding cars, bikes, motorcycles, and more.
Post whatever shaping work you have done or that you admire. Also books, videos, websites...
... just keep in mind that this is the DIY subforum ... whatever seems to speak to an ecomodding interest in DIY metal shaping belongs here, I figure.
Here is one to start. I love his discussion of making compound curves. I love the simplicty of his basic tool set.
I have zero metalshaping experience. And I am going to include aluminum composite sheet shaping as "metal shaping," even though it is definitely cheating.
__________________
See my car's mod & maintenance thread and my electric bicycle's thread for ongoing projects. I will rebuild Black and Green over decades as parts die, until it becomes a different car of roughly the same shape and color. My minimum fuel economy goal is 55 mpg while averaging posted speed limits. I generally top 60 mpg. See also my Honda manual transmission specs thread.


|
|
|

|
|
The Following 2 Users Say Thank You to California98Civic For This Useful Post:
|
|
 Today Today
|
|
|
|
 Other popular topics in this forum...
|
|
|
|
|
07-23-2020, 06:09 PM
|
#2 (permalink)
|
|
Master EcoModder
Join Date: Jun 2009
Location: SC Lowcountry
Posts: 1,795
Thanks: 226
Thanked 1,353 Times in 711 Posts
|
.
I plan on taking a class or two after the 1st of the new year.
https://www.proshaper.com/coachbuild...aping-classes/
Hes a real Metal worker and runs a first class operation.
Check out some of his videos.

>
.
__________________
Woke means you're a loser....everything woke turns to ****.
Donald J Trump 8/21/21
Disclaimer...
Im not a climatologist, aerodynamicist, virologist, physicist, astrodynamicist or marine biologist..
But...
I play one on the internet.

|
|
|
|
|
The Following 2 Users Say Thank You to redneck For This Useful Post:
|
|
|
07-23-2020, 10:40 PM
|
#3 (permalink)
|
|
Cyborg ECU
Join Date: Mar 2011
Location: Coastal Southern California
Posts: 6,299
Thanks: 2,373
Thanked 2,172 Times in 1,469 Posts
|
Quote:
Originally Posted by redneck

.
I plan on taking a class or two after the 1st of the new year... Check out some of his videos.
|
Cool. Will make a point of watching. When you do his class, I hope you'll post about it.
__________________
See my car's mod & maintenance thread and my electric bicycle's thread for ongoing projects. I will rebuild Black and Green over decades as parts die, until it becomes a different car of roughly the same shape and color. My minimum fuel economy goal is 55 mpg while averaging posted speed limits. I generally top 60 mpg. See also my Honda manual transmission specs thread.
|
|
|
|
|
08-06-2020, 05:59 PM
|
#4 (permalink)
|
|
Master EcoModder
Join Date: Aug 2012
Location: northwest of normal
Posts: 27,664
Thanks: 7,767
Thanked 8,575 Times in 7,061 Posts
|
For the record here is my Polymetal picture from 2015. Sheared, rolled and braked with a hand operated bench brake with an 18" lever arm. I'd like to see 5ft rollers made from old water heater tanks to roll full sheets.
Chris Runge is on that other level. A practical project might be an EMPI Imp in stainless steel.
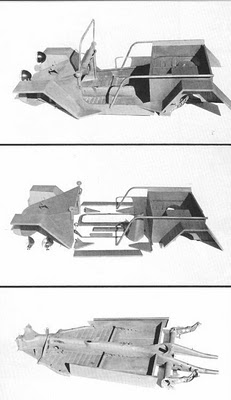
[Tesla-powered?] Cyber Dune Buggy
edit:
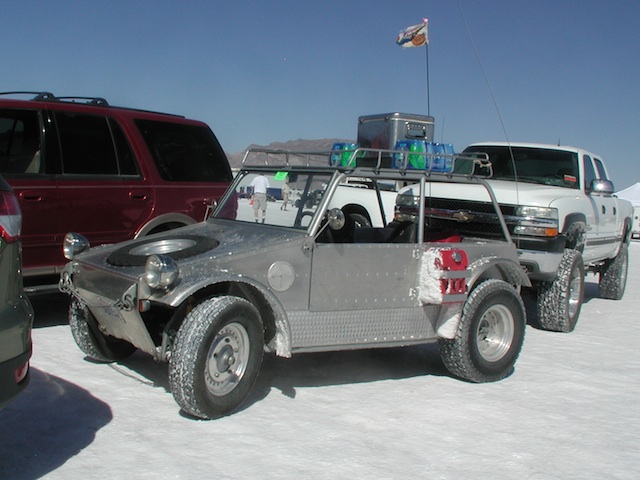
For comparison, a 2-door Type 181 in aluminum.
 en.wikipedia.org/wiki/Incremental_sheet_forming
I can imagine a situation where you put a strip of metal in a U-shaped buck and then pass a nylon roller back and forth incrementally conforming a cycle fender. The edges that were held in the form would be trimmed, else bead rolled and wire-wrapped in a separate operation.
__________________
.
.Without freedom of speech we wouldn't know who all the idiots are. -- anonymous poster
____________________
.
."We're deeply sorry." -- Pfizer
Last edited by freebeard; 08-06-2020 at 06:49 PM..
|
|
|
|
|
The Following 2 Users Say Thank You to freebeard For This Useful Post:
|
|
|
08-07-2020, 11:31 AM
|
#5 (permalink)
|
|
Cyborg ECU
Join Date: Mar 2011
Location: Coastal Southern California
Posts: 6,299
Thanks: 2,373
Thanked 2,172 Times in 1,469 Posts
|
Quote:
Originally Posted by freebeard
...
a 2-door Type 181 in aluminum.
... |
Love how the spare tire is recessed into the hood.
__________________
See my car's mod & maintenance thread and my electric bicycle's thread for ongoing projects. I will rebuild Black and Green over decades as parts die, until it becomes a different car of roughly the same shape and color. My minimum fuel economy goal is 55 mpg while averaging posted speed limits. I generally top 60 mpg. See also my Honda manual transmission specs thread.
|
|
|
|
|
08-12-2020, 02:37 PM
|
#6 (permalink)
|
|
Master EcoModder
Join Date: Jan 2008
Location: Sanger,Texas,U.S.A.
Posts: 15,883
Thanks: 23,957
Thanked 7,219 Times in 4,646 Posts
|
incrementally
Quote:
Originally Posted by freebeard
For the record here is my Polymetal picture from 2015. Sheared, rolled and braked with a hand operated bench brake with an 18" lever arm. I'd like to see 5ft rollers made from old water heater tanks to roll full sheets.
Chris Runge is on that other level. A practical project might be an EMPI Imp in stainless steel.
[Tesla-powered?] Cyber Dune Buggy
edit:
For comparison, a 2-door Type 181 in aluminum.
en.wikipedia.org/wiki/Incremental_sheet_forming
I can imagine a situation where you put a strip of metal in a U-shaped buck and then pass a nylon roller back and forth incrementally conforming a cycle fender. The edges that were held in the form would be trimmed, else bead rolled and wire-wrapped in a separate operation.
|
Some metals begin fully annealed and work-hardens during forming. In order not to tear the metal, it may require re-annealing as you draw it deeper and deeper towards the finished product.
Around a decade ago, Chrysler mentioned that some of their body panels required six separate stamping operations, six sets of stamping dies, plus the multi-thousand-ton presses to force the sheetmetal to the depth of the final shape.
__________________
Photobucket album: http://s1271.photobucket.com/albums/jj622/aerohead2/
|
|
|
|
|
The Following User Says Thank You to aerohead For This Useful Post:
|
|
|
08-13-2020, 10:35 AM
|
#7 (permalink)
|
|
Somewhat crazed
Join Date: Sep 2013
Location: 1826 miles WSW of Normal
Posts: 4,061
Thanks: 467
Thanked 1,111 Times in 980 Posts
|
All metal work hardens when forming, tearing is caused by thinning below the tensile strength needed during the forming or granular formation. Annealing stops the granularity and makes the metal more plastic again.
At McStarlite, we baked our aluminum at 350 between passes in the press which should have been an ageing temp but it worked.
Stamp forming is kinda violent and doesn't allow the metal to flow thicker which is why there are ripples along the flanves. Tonnage is just the power required to move that metal. On a couple of square ft you can get to 100 tons required really fast.
Last edited by Piotrsko; 08-13-2020 at 10:43 AM..
|
|
|
|
|
The Following User Says Thank You to Piotrsko For This Useful Post:
|
|
|
10-06-2020, 03:34 AM
|
#8 (permalink)
|
|
マット
Join Date: Nov 2015
Location: Indiana
Posts: 718
Thanks: 131
Thanked 258 Times in 188 Posts
|
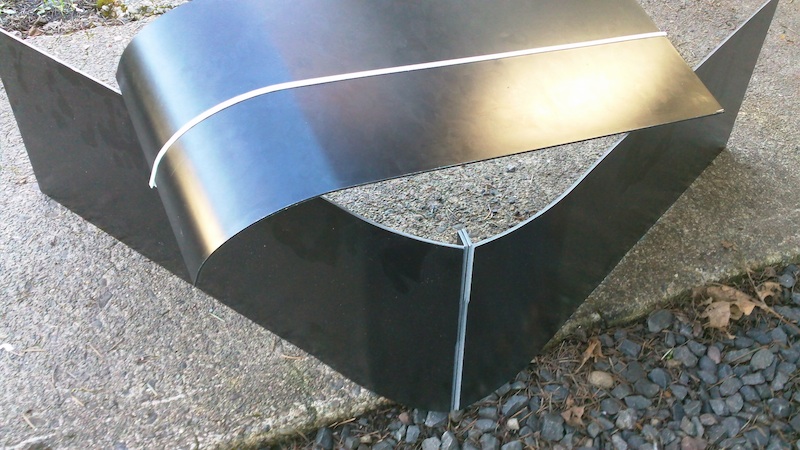
I am going to try and make another upper grill block for the mercury. I cut a section out of a water heater skin and just wanted to attempt to make the right curve that I wanted. I only used the shrinker (blue in background of last picture). I did use the stretcher (yellow one on right) to flatten out the hood side a little bit because I over shrunk it. I need to make the flange not so thick. It made it difficult to get the metal to move. My vise is a little high too. I ended up using a stool  so I could get more leverage on the shrinker.
Pics and captions:
 I just cut out a small section of a water heater skin. This piece is probably about 3"x10"
 I flattened the piece back out some more and put it in the vice with a 1" piece of square tubing and used a carpenter's hammer to bend it over to a 90

 And finally the end product. You can see the cut out piece on the right, that is the bumper side. The left end of the piece is towards the hood. Most of the curve is towards the bumper end. I wanted it to be kind of flat as it meets the hood. It lines up with the hood curve a little better that way.
The longer version of this post can be seen here:
https://ecomodder.com/forum/showthre...tml#post632893
__________________
1973 Fiat 124 Special
1975 Honda Civic CVCC 4spd
1981 Kawasaki KZ750E
1981 Kawasaki KZ650 CSR
1983 Kawasaki KZ1100-A3
1986 Nissan 300zx Turbo 5 spd
1995 Chevy Astro RWD (current project)
1995 Mercury Tracer
2017 Kawasaki VersysX 300
2022 Corolla Hatchback 6MT
 https://www.youtube.com/channel/UC6s...LulDUQ8HMj5VKA
|
|
|
|
|
The Following 2 Users Say Thank You to M_a_t_t For This Useful Post:
|
|
|
10-06-2020, 07:42 PM
|
#9 (permalink)
|
|
マット
Join Date: Nov 2015
Location: Indiana
Posts: 718
Thanks: 131
Thanked 258 Times in 188 Posts
|
The rest of the pictures are on my camera. I will upload them when it is completely finished. Here is my first attempt (and it looks like only) at the grill block. Again cut out of a water heater skin. I bent a 1/2" flange on the 2 short sides of a 27.5"x10.5" piece. Then I shrunk the bumper side. I didn't shrink anything on the upper side. It didn't put a curve all the way across the panel though so I got out the english wheel and rolled it across the 2 shrunk sections to roll it over. That worked. Once I had that pretty well lined up I test fit it, but couldn't close the hood to check it. I marked a line and cut out a notch so that the hook could grab the latch and shut. I had to stretch the 2 sides back out a little bit as I had over-shrunk it. Now the short sides touched the hood, but there was a gap in the middle because the hood has a curve to it. At first I tried english wheeling the middle 1/3 section to push it out and curve it. It seemed to help but wasn't enough. I trimmed the top of it so that it was in line with the notch I had made earlier. Then I used the shrinker on the middle 1/3, a little heavier in the dead center though. Once I finished that and test fit it again it was all pretty well lined up. There was still a little gap, but because of how it is screwed into the bumper I could just pull up a little bit and it filled the gap well. I then used a box to make some endplate template. Unfortunately the bumper is cracked and broken a little on top so I had to modify that side a little more to get it to fit well. At this point I was thinking about trying to bead roll the mercury logo onto it so it wasn't so plain looking. I didn't want to mess up all that work so I got another piece of metal, attempted to hand draw the logo and then bead roll it. I don't think it turned out very well. I will definitely try again though. I stopped there as I had been messing with it for awhile and the sun was starting to set.
I want to strip the panel down and paint it once it is finished. I need to see if I can remove/level the marks from the wheel though. They aren't very deep though so if I lay the primer on a little thick it will probably mask it pretty well. I am planning on welding the end pieces on (of course before paint), backup attachment is pop rivets. This was kind of an introduction to it before I attempt to start patching rust holes in the car.
TLDR:
I did record the process so a video version of that description should be available once I finish it completely.


__________________
1973 Fiat 124 Special
1975 Honda Civic CVCC 4spd
1981 Kawasaki KZ750E
1981 Kawasaki KZ650 CSR
1983 Kawasaki KZ1100-A3
1986 Nissan 300zx Turbo 5 spd
1995 Chevy Astro RWD (current project)
1995 Mercury Tracer
2017 Kawasaki VersysX 300
2022 Corolla Hatchback 6MT
https://www.youtube.com/channel/UC6s...LulDUQ8HMj5VKA
|
|
|
|
|
10-06-2020, 10:05 PM
|
#10 (permalink)
|
|
Master EcoModder
Join Date: Aug 2012
Location: northwest of normal
Posts: 27,664
Thanks: 7,767
Thanked 8,575 Times in 7,061 Posts
|
Nice tools. I'm sure each one will get better. Else just paint it black.
__________________
.
.Without freedom of speech we wouldn't know who all the idiots are. -- anonymous poster
____________________
.
."We're deeply sorry." -- Pfizer
|
|
|
|
|
The Following User Says Thank You to freebeard For This Useful Post:
|
|
|