Go Back   EcoModder Forum > EcoModding > Aerodynamics
Register Now
 Register Now
 

Reply  Post New Thread
 
Submit Tools LinkBack Thread Tools
Old 07-09-2009, 01:44 AM   #1 (permalink)
Pokémoderator
 
cfg83's Avatar
 
Join Date: Dec 2007
Location: Southern California
Posts: 5,864

1999 Saturn SW2 - '99 Saturn SW2 Wagon
Team Saturn
90 day: 40.49 mpg (US)
Thanks: 439
Thanked 530 Times in 356 Posts
Wheel Covers using bicycler DIY ...

Hello -

Because I have alloys, snap-on racing disk wheel-covers are not an option for me. Here is my current OEM alloy :


What you don't see is that there is a slight bulge to the wheel. A flat plastic disk won't work because the edge will not touch the rim of the wheel.

Now, I just found this :


I think this would be a good idea for a no-frills get-the-job-done wheel cover that is also easy to take off (more zip ties will have to die for the cause).

CarloSW2

__________________

What's your EPA MPG? Go Here and find out!
American Solar Energy Society
  Reply With Quote
The Following User Says Thank You to cfg83 For This Useful Post:
j12piprius (03-14-2011)
Alt Today
Popular topics

Other popular topics in this forum...

   
Old 07-09-2009, 02:37 AM   #2 (permalink)
Moderate your Moderation.
 
Join Date: Nov 2008
Location: Troy, Pa.
Posts: 8,919

Pasta - '96 Volkswagen Passat TDi
90 day: 45.22 mpg (US)
Thanks: 1,369
Thanked 430 Times in 353 Posts
Quote:
Originally Posted by cfg83 View Post
Hello -

Because I have alloys, snap-on racing disk wheel-covers are not an option for me. Here is my current OEM alloy :


What you don't see is that there is a slight bulge to the wheel. A flat plastic disk won't work because the edge will not touch the rim of the wheel.

Now, I just found this :


I think this would be a good idea for a no-frills get-the-job-done wheel cover that is also easy to take off (more zip ties will have to die for the cause).

CarloSW2
Looks like it would work out pretty good...

By the way:
1. Those linear cuts that he made are called "pie cuts". They allow a shape to bend on another axis without compromising the original geometry. Or something like that.
2.You can remove zip ties with a small pin... it doesn't take much, but imagine how many less of them you'd be throwing away?
__________________
"żʞɐǝɹɟ ɐ ǝɹ,noʎ uǝɥʍ 'ʇı ʇ,usı 'ʎlǝuol s,ʇı"

  Reply With Quote
Old 07-09-2009, 02:56 AM   #3 (permalink)
Dartmouth 2010
 
SVOboy's Avatar
 
Join Date: Nov 2007
Location: Hanover, NH
Posts: 6,447

Vegan Powa! - '91 Honda CRX DX
Team Honda
90 day: 66.52 mpg (US)
Thanks: 92
Thanked 122 Times in 90 Posts
Send a message via AIM to SVOboy Send a message via MSN to SVOboy Send a message via Yahoo to SVOboy
Bike polo is a sport for crazy people, and they would come up with something like that.

However, it looks like an interesting idea and his construction seems very straightforward, but I would not recommend drilling into one's own lap the way he does in the video. That is a safety no-no
  Reply With Quote
Old 07-11-2009, 08:52 PM   #4 (permalink)
Pokémoderator
 
cfg83's Avatar
 
Join Date: Dec 2007
Location: Southern California
Posts: 5,864

1999 Saturn SW2 - '99 Saturn SW2 Wagon
Team Saturn
90 day: 40.49 mpg (US)
Thanks: 439
Thanked 530 Times in 356 Posts
Hello -

I started this album with pop-up details on the pix :

Fuel Economy, Hypermiling, EcoModding News and Forum - EcoModder.com - cfg83's Album: Wheel Cover

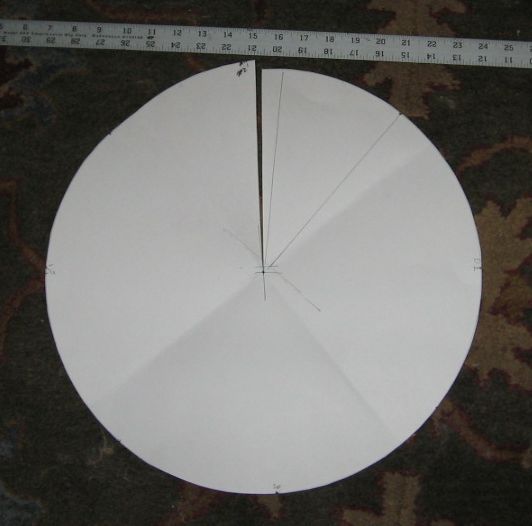
First, I used a 16" pizza pan to cut a circular pattern on posterboard paper. I needed the posterboard paper circle to figure out the center point (two folds) and test fit the circle on the wheel :


Then I used the Pizza Pan as a hard edge to cut another circle in "sign plastic" :


Here it is installed :


Front view of it installed :

Notice how much it bows out. This could be mitigated by starting with a smaller diameter plastic circle. However, I think the shape under my wheel may need this much to fit correctly, *and* to provide enough plastic for overlap.

Here is a "cut-away" of where I attached the zip ties :

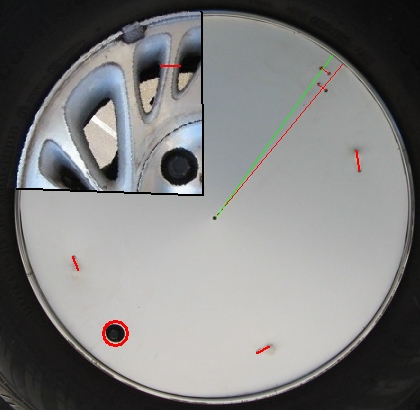
The "green line" along the cutting edge is the "underneath overlap". I used two mini-zip ties instead of one because I considered that the "weak spot". I also drilled a center hole to (hopefully) mitigate my initial cut continuing to break along the cutting line. The wheel rotates forward counter-clockwise in this picture, so I made the overlap so that the air can't get under the wheel cover.

Benefits :
- Cheap. I paid $6 for the sign, but I'll bet you can get this plastic for a lot cheaper. I was just in the hardware store at the time and it was the right size to do the job.
- Fits really well. The overlap allowed me to "fit" the cover to the inner groove of the wheel. You can see the rim of the wheel in the last picture.
- Easy cut zip tie to remove.
- Matches my car color without trying (I like this style going wayyyyy back), but I think it could be painted to match any color. I am also thinking of "black out plastic" for a different look.
- I can add-air. My valve caps have a "bolt" shape to the end, so I will carry a little wrench of the right size and remove the caps with that (though I think I will need to Dremel the hole to be a little bit bigger).
- Light plastic. I am not worried about wheel balancing or it flying off and hurting anything.
- I have a "4 point" attachment setup for the zip ties because I have a "x4" wheel spoke design, but this could be N point for wheels with "x3" or "x5" wheel spoke designs.
- 100% reversible (EDIT)

Problems :
- PITA to make (my eternal complaint). Pending test of single one, others should go more smoothly. I have a friend that can cut perfect circles in plastic, so I will go to him for new ones.
- Sign plastic may not be durable. I would like to have used a "softer" more durable plastic, similar to what zip ties or car mudflaps are made of. This plastic may be too "brittle" under impact. Time will tell.
- I like to go to a car wash every now and then. Years ago my snap-on racing disks were damaged by a car wash. I think these covers will pass the grade, but I will need to do more measurements and/or give up the car wash. My hunch is that I am safe because the metal racing disks bowed out *a lot* in order to work with any type of wheel. This shape is more conical.
- The zip tie attachment sticks out. I didn't zip it from the back because I was lazy and I have a dust brake shield in the way. I am doing "proof of concept" right now, so I am not too worried about it.

At this point I will be testing it for durability. If it works, I will make the rest and I will have my RACING DISKS BACK!!!!!!!!!!!!!!!!!

CarloSW2
__________________

What's your EPA MPG? Go Here and find out!
American Solar Energy Society

Last edited by cfg83; 07-21-2009 at 12:50 AM..
  Reply With Quote
Old 07-11-2009, 10:34 PM   #5 (permalink)
Batman Junior
 
MetroMPG's Avatar
 
Join Date: Nov 2007
Location: 1000 Islands, Ontario, Canada
Posts: 22,515

Blackfly - '98 Geo Metro
Team Metro
Last 3: 70.09 mpg (US)

MPGiata - '90 Mazda Miata
90 day: 52.71 mpg (US)

Even Fancier Metro - '14 Mitsubishi Mirage top spec
90 day: 70.75 mpg (US)

Appliance car - '14 Mitsubishi Mirage ES (base)
90 day: 52.48 mpg (US)
Thanks: 4,062
Thanked 6,959 Times in 3,603 Posts
Good write-up.

I'm not crazy about the idea of a seam in the wheel cover - I just think it's going to be a point for wear.

I keep coming back to this issue myself. I suppose there is no easy way to press that domed shape into sheet aluminum, or we'd all be doing it by now.
__________________
Project MPGiata! Mods for getting 50+ MPG from a 1990 Miata
Honda mods: Ecomodding my $800 Honda Fit 5-speed beater
Mitsu mods: 70 MPG in my ecomodded, dirt cheap, 3-cylinder Mirage.
Ecodriving test: Manual vs. automatic transmission MPG showdown


EcoModder
has launched a forum for the efficient new Mitsubishi Mirage
www.MetroMPG.com - fuel efficiency info for Geo Metro owners
www.ForkenSwift.com - electric car conversion on a beer budget
  Reply With Quote
Old 07-11-2009, 10:51 PM   #6 (permalink)
Moderate your Moderation.
 
Join Date: Nov 2008
Location: Troy, Pa.
Posts: 8,919

Pasta - '96 Volkswagen Passat TDi
90 day: 45.22 mpg (US)
Thanks: 1,369
Thanked 430 Times in 353 Posts
Yes, there is.
__________________
"żʞɐǝɹɟ ɐ ǝɹ,noʎ uǝɥʍ 'ʇı ʇ,usı 'ʎlǝuol s,ʇı"

  Reply With Quote
Old 07-11-2009, 11:02 PM   #7 (permalink)
Pokémoderator
 
cfg83's Avatar
 
Join Date: Dec 2007
Location: Southern California
Posts: 5,864

1999 Saturn SW2 - '99 Saturn SW2 Wagon
Team Saturn
90 day: 40.49 mpg (US)
Thanks: 439
Thanked 530 Times in 356 Posts
Christ -

Quote:
Originally Posted by Christ View Post
Yes, there is.
Oooooh, sounds good. Can it be done without many tools? I ask because I am bereft of access to specialty tool items. For instance, I can only get professional circles cut in plastic, not metal.

CarloSW2
__________________

What's your EPA MPG? Go Here and find out!
American Solar Energy Society
  Reply With Quote
Old 07-11-2009, 11:05 PM   #8 (permalink)
Pokémoderator
 
cfg83's Avatar
 
Join Date: Dec 2007
Location: Southern California
Posts: 5,864

1999 Saturn SW2 - '99 Saturn SW2 Wagon
Team Saturn
90 day: 40.49 mpg (US)
Thanks: 439
Thanked 530 Times in 356 Posts
MetroMPG -

Quote:
Originally Posted by MetroMPG View Post
Good write-up.

I'm not crazy about the idea of a seam in the wheel cover - I just think it's going to be a point for wear.

I keep coming back to this issue myself. I suppose there is no easy way to press that domed shape into sheet aluminum, or we'd all be doing it by now.
I agree. You can cut the plastic so that there is no overlap, but then you have a long seam for air to get in.

In terms of wear, that's why I only ever do one wheel at a time. Not gonna waste effort on a bad design. I will report on damage to the cover as/if it happens.

CarloSW2
__________________

What's your EPA MPG? Go Here and find out!
American Solar Energy Society
  Reply With Quote
Old 07-11-2009, 11:09 PM   #9 (permalink)
Pokémoderator
 
cfg83's Avatar
 
Join Date: Dec 2007
Location: Southern California
Posts: 5,864

1999 Saturn SW2 - '99 Saturn SW2 Wagon
Team Saturn
90 day: 40.49 mpg (US)
Thanks: 439
Thanked 530 Times in 356 Posts
Christ -

Quote:
Originally Posted by Christ View Post
Looks like it would work out pretty good...

By the way:
1. Those linear cuts that he made are called "pie cuts". They allow a shape to bend on another axis without compromising the original geometry. Or something like that.
2.You can remove zip ties with a small pin... it doesn't take much, but imagine how many less of them you'd be throwing away?
I'm in R&D mode right now, so the zips will die a quick death. I can already think of a (complicated) no zip tie solution, but I want to prove/disprove the durability of the mod first.

CarloSW2
__________________

What's your EPA MPG? Go Here and find out!
American Solar Energy Society
  Reply With Quote
Old 07-11-2009, 11:43 PM   #10 (permalink)
Moderate your Moderation.
 
Join Date: Nov 2008
Location: Troy, Pa.
Posts: 8,919

Pasta - '96 Volkswagen Passat TDi
90 day: 45.22 mpg (US)
Thanks: 1,369
Thanked 430 Times in 353 Posts
You need something that's already the shape that you want, to use as a mold, of sorts.

For plastic convexes, you just use the oven, and #1 or #2 plastic (check the recycling logo, or just know what you're working with.) Set your mold in a pan (in case you melt the plastic too much) and preheat the oven to about 240*. Place the plastic disc (not trimmed out yet) on top of your mold and walk away for about 5-7 mins. Once it's in the proper shape, shut off the oven and let it cool without opening the door. (The sudden cool-down might warp it if you open the door.)

For metal: Use a soft metal, such as galvanized or aluminum sheeting. Find something that approximates the shape and size of the object you want to make. Center punch/drill your metal's center, fasten it to your shaping object, securely. Set up so that your shaping object can spin at a relatively low speed (~100RPM, give or take). Get a 6" steel caster wheel (smaller works, but will take longer, obviously) or a steel ball that fits in a socket that allows it to spin freely in all directions (this is better, casters are easier to come by). While your metal is spinning, starting from the center, apply mild pressure (you'll feel it bend a bit) and start working your way to the outside. NEVER go from the outside in, as this will wrinkle your metal. Work from the center out as many times as it takes to get the desired cone-shape and pitch.

What happens (in the metal one) is that you're actually stretcing the metal over the mold, the same way you would with leather or fabrics. The thing is that as you "work" the metal with the wheel, it heats up ever so slightly (it should get warm to the touch, but not hot) this makes the metal more malleable, and it loses it's "memory". Once you're done working it, give it a few mins to cool and calm down before you remove it from the mold, and it will "memorize" the new shape. You'll need to work the metal from inside to outside several times, though. This process is not fast. It's pretty intensive.

For wheel skirts, I'd stick with denser plastics in the oven, personally.

__________________
"żʞɐǝɹɟ ɐ ǝɹ,noʎ uǝɥʍ 'ʇı ʇ,usı 'ʎlǝuol s,ʇı"

  Reply With Quote
Reply  Post New Thread


Thread Tools


Similar Threads
Thread Thread Starter Forum Replies Last Post
DIY: plastic rear wheel skirts (Geo Metro) MetroMPG DIY / How-to 57 06-12-2014 09:16 AM
DIY Rubber Front Wheel Skirts newtonsfirstlaw DIY / How-to 32 05-19-2011 07:45 AM
Cheap-o Smooth Wheel Covers bennelson Aerodynamics 40 03-15-2009 11:55 PM
wheel covers: corugated plastic or taped hubcaps? modmonster Aerodynamics 4 02-08-2009 07:54 PM
Modded wheel covers to make them smooth MetroMPG Aerodynamics 1 11-27-2007 08:43 PM


Powered by vBulletin® Version 3.8.11
Copyright ©2000 - 2024, vBulletin Solutions Inc.
Content Relevant URLs by vBSEO 3.5.2
All content copyright EcoModder.com