Go Back   EcoModder Forum > EcoModding > Aerodynamics
Register Now
 Register Now
 

Reply  Post New Thread
 
Submit Tools LinkBack Thread Tools
Old 04-29-2009, 02:29 PM   This thread is in the EcoModder Project Library | #1 (permalink)
EcoModding Lurker
 
sepp's Avatar
 
Join Date: Jan 2009
Location: belgium
Posts: 60

the jeep - '02 nissan kingcab
Last 3: 29.07 mpg (US)
Thanks: 0
Thanked 6 Times in 5 Posts
sepp's second aerocap

hello, as some may remember i already have a thread here about the first aerocap i made for my pickup truck.here: http://ecomodder.com/forum/showthrea...ocap-6889.html
and after lots of thinking and observing i decided to start building a second improved version. my first cap works well though it has some drawbacks, mainly its heavy weight, no rear visibility and has to be dismounted if you want to load things taller than the tailgate.

my new cap is meanth to eliminate those problems, it will be open-able, be verry light and hinder rear visibilty as few as possible.

here is the new model i made in sketchup:
i use that model to measure all the parts i will need to build, i could print out proper plans but i know how relative the value of such plans are. especially when you are building with scrap wood without any standard sizes. so i use it as a base to help me, but the more the construction advances, the more i get away from the plans.

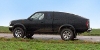
here is the base i made:
entirely made of scrap wood that i "saved" from a roof-builder company that gives their scrap away as heating wood. a reason why i now started making this new cap is that i bought a second hand bandsaw wich allows me to cut out with ease any shape or form. for my previous cap i had cut out all the round parts with a table saw, what a nightmare...

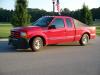
here it is on its host :
you can see the opening part of the cap opened, about 3/4th of the top opens, i left the remaining 1/4th solid with the structure to give the whole a minimal structural solidity.
as opposed to my first cap, this one doesn't go down all the way, but ends above the tail, and even slightly further back. this is partly for "looks" and also because i suspected that my old cap may have had a to steep downward end-curve wich could have caused the airflow to separate prematurely.

and here is the latest development:

added sideway and upper support beams, and you can start seeing what will be the most crazy and "WTF??" feature about this cap, there are two flaps inside the opening part of the cap (show in opened posistion) that will open and close electrically. when opened these "should" give me a 80% rear visibility. they look verry low, and initially i wanted to make 3 flaps, but i tested and with these two i can more than enough. it's the best (and coolest ) i could come up with, as transparent plexiglass wouldn't let you see through at such an angle.

i have no real idea yet of how to make the opening mechanism for the flaps, it has to be simple and cheap. any suggestions are welcome. i had in mind using a small 12 v motor i have and making a wooden mechanism that would pull or push to open or close the flaps with a button probably placed on the gear stick.

and finally suggestions are welcome about what would be the best way to cover the cap, im gonna paint the wooden structure with a product to protect the wood and render it watertight. and then i was thinking of covering it with aluminium sheets. the top and sides would be no problem, but the problem is the corner where the top goes over into the sides, that place is bent in 2 dimensions. and only a bodyworker can bend such parts.
i bought 3 aluminium sheets of each 3 sqaure meters at €10 each, but i made a big mistake by taking too thin ones (0.8 mm) wich basically reacts like paper. i also think i will put plexi windows to the side on the passenger side only, so i can see to the sides aswell.

Attached Thumbnails
Click image for larger version

Name:	aerocap-model.JPG
Views:	756
Size:	25.1 KB
ID:	3352   Click image for larger version

Name:	Photo 028.jpg
Views:	753
Size:	69.2 KB
ID:	3353   Click image for larger version

Name:	Photo 031.jpg
Views:	746
Size:	89.1 KB
ID:	3354   Click image for larger version

Name:	Photo 034.jpg
Views:	746
Size:	87.8 KB
ID:	3355  
  Reply With Quote
Alt Today
Popular topics

Other popular topics in this forum...

   
Old 04-29-2009, 02:33 PM   #2 (permalink)
Dartmouth 2010
 
SVOboy's Avatar
 
Join Date: Nov 2007
Location: Hanover, NH
Posts: 6,447

Vegan Powa! - '91 Honda CRX DX
Team Honda
90 day: 66.52 mpg (US)
Thanks: 92
Thanked 122 Times in 90 Posts
Send a message via AIM to SVOboy Send a message via MSN to SVOboy Send a message via Yahoo to SVOboy
Looking good so far!
  Reply With Quote
Old 04-29-2009, 02:47 PM   #3 (permalink)
EcoModding Lurker
 
Join Date: Jul 2008
Location: Carmel, IN
Posts: 61

Kayak hauler - '05 Mitsubishi Lancer ES
90 day: 33.88 mpg (US)
Thanks: 3
Thanked 3 Times in 3 Posts
Not sure if I can explain this idea well enough but I will try. Put the motor at the top portion of the hinged part. Run a wooden rod down the center and attached to one side of the gear on the motor. The rod would be attached to the flaps and allowed to push the flaps open. This would require it to be attached by some type of hinge to allow for angle change. I am not sure how to control the motor. Hope this helps.
  Reply With Quote
Old 04-29-2009, 03:04 PM   #4 (permalink)
Moderate your Moderation.
 
Join Date: Nov 2008
Location: Troy, Pa.
Posts: 8,919

Pasta - '96 Volkswagen Passat TDi
90 day: 45.22 mpg (US)
Thanks: 1,369
Thanked 430 Times in 353 Posts
Whatever you decide to do for opening of the rear, as a safety feature, wire it in w/ the reverse lights.

Personally, I'd use a linear actuator, but that's just me, and a motor would be just as easy and probably lighter.
__________________
"¿ʞɐǝɹɟ ɐ ǝɹ,noʎ uǝɥʍ 'ʇı ʇ,usı 'ʎlǝuol s,ʇı"

  Reply With Quote
Old 04-29-2009, 03:12 PM   #5 (permalink)
EcoModding Lurker
 
Join Date: Jul 2008
Location: Carmel, IN
Posts: 61

Kayak hauler - '05 Mitsubishi Lancer ES
90 day: 33.88 mpg (US)
Thanks: 3
Thanked 3 Times in 3 Posts
Great idea! Wiring to the reverse lights would be easy to disconnect as well.
  Reply With Quote
Old 04-29-2009, 03:18 PM   #6 (permalink)
EcoModding Lurker
 
sepp's Avatar
 
Join Date: Jan 2009
Location: belgium
Posts: 60

the jeep - '02 nissan kingcab
Last 3: 29.07 mpg (US)
Thanks: 0
Thanked 6 Times in 5 Posts
the thing is that i would prefer being able to open them at any time, even on the highway. as im somewhat of a slow-driver i need to watch my back more oftenly than my front. and it would help in confusing situations.
also when connected to the reverse lights you could let the system open, but it would stay open as you need a switched signal to close it back again if using a dc motor.
my idea for now would be to use my small motor, make some reductions for it with wooden gears or pulleys because its not powerfull enough to directly open or close the flaps. and then make it rotate some kind of wheel with a rod or shaft attacked to it (like steam locomotives had) that would push and pull. but with a stop to it so the wheel can only make half a turn. and then with a switch you could invert the current and make it open and close. but that would still require to turn off the switch as soon as the flaps are in place, otheriwse the engine keeps trying to push.
  Reply With Quote
Old 04-29-2009, 04:02 PM   #7 (permalink)
Eco Dreamer
 
Join Date: Mar 2009
Location: Exton, PA
Posts: 104

Versa - '08 Nissan Versa SL Hatchback
Thanks: 1
Thanked 1 Time in 1 Post
Quote:
Originally Posted by sepp View Post
the thing is that i would prefer being able to open them at any time, even on the highway. as im somewhat of a slow-driver i need to watch my back more oftenly than my front. and it would help in confusing situations.
also when connected to the reverse lights you could let the system open, but it would stay open as you need a switched signal to close it back again if using a dc motor.
my idea for now would be to use my small motor, make some reductions for it with wooden gears or pulleys because its not powerfull enough to directly open or close the flaps. and then make it rotate some kind of wheel with a rod or shaft attacked to it (like steam locomotives had) that would push and pull. but with a stop to it so the wheel can only make half a turn. and then with a switch you could invert the current and make it open and close. but that would still require to turn off the switch as soon as the flaps are in place, otheriwse the engine keeps trying to push.
Just use a momentary switch.

But I think an actuator would by far be the best solution.
  Reply With Quote
Old 04-29-2009, 06:43 PM   #8 (permalink)
Master EcoModder
 
aerohead's Avatar
 
Join Date: Jan 2008
Location: Sanger,Texas,U.S.A.
Posts: 15,883
Thanks: 23,957
Thanked 7,219 Times in 4,646 Posts
compound curves

Without a English Wheel to create these complex compound surfaces in sheetmetal,I used composites for these areas.I've used polyester resin and fiberglass wet layups over polyisocyanurate foam from the building center,and also got away with open-cell styrofoam,by first coating it after shaping,with a coating of regular white glue and letting that dry completely.---------- Also,a cedar-strip- canoe construction technique can be used to create the curves,also covered with a layer of fiberglass reinforced polyester or epoxy.--------------------------------- With respect to the louvers,I ended up putting a passenger side plexi-glass window for side vision,and a "step" on the back-sloping section with a short,full-width vertical plex window for rear vision.Not as sexy as the louvers,but simple and very good vision.------- Commercial exhaust fans often have often have what is called a gravity-damper,which has a beautiful mechanism you could copy,which would allow the two louvers to operate together.A simple tension spring might keep them from "dancing" while closed and going down the road.---------- A push/pull cable,air-ram,hydraulic-ram,12-volt electric solenoid from a door or Radio-controlled electric toy car,etc.,or,high-torque gear motor from a children's 24-VDC riding electric toy car might provide the means to actuate the louvers.------------- Your first cap was a sweetheart,will be fun to see #2 going down the road.
  Reply With Quote
Old 04-29-2009, 10:31 PM   #9 (permalink)
Master EcoModder
 
Big Dave's Avatar
 
Join Date: Jan 2008
Location: Steppes of Central Indiana
Posts: 1,319

The Red Baron - '00 Ford F-350 XLT
90 day: 27.99 mpg (US)

Impala Phase Zero - '96 Chevrolet Impala SS
90 day: 21.03 mpg (US)
Thanks: 0
Thanked 186 Times in 127 Posts
The shape looks to be excellent.

Reinforce the hinge structure. It is a high stress area.

The lid may be heavy and an electric linear actuator may be the ticket.

Leave yourself a hard point or two for one or two lipstick CCTV cameras.
__________________
2000 Ford F-350 SC 4x2 6 Speed Manual
4" Slam
3.08:1 gears and Gear Vendor Overdrive
Rubber Conveyor Belt Air Dam
  Reply With Quote
Old 04-30-2009, 02:24 AM   #10 (permalink)
Master EcoModder
 
Join Date: Feb 2008
Location: belgium
Posts: 663

vectra a - '95 Opel Vectra GLS
90 day: 37.51 mpg (US)
Thanks: 14
Thanked 61 Times in 44 Posts
Quote:
as a safety feature, wire it in w/ the reverse lights.
wire it with the breaks!, instant airbreak ala veyron and its always a good idea to have a look at how fast the truck behind you is going before standing on the breaks (not that that's very hypermiler like but still)

for actuators perhaps a powered window motor and some pulleys could work? i assume some of these motors might already have witches build in to detect the end of the windows travel... although the operations speed and strength might not be enough for what you need

  Reply With Quote
Reply  Post New Thread


Similar Threads
Thread Thread Starter Forum Replies Last Post
nissan kingcab aerocap sepp Aerodynamics 45 12-07-2016 05:59 AM
2008 Dodge Dakota AeroCap electricman Aerodynamics 52 10-08-2011 10:47 AM
aerocap or tonneau? (build thread?) ModelE Aerodynamics 9 01-04-2009 09:36 PM


Powered by vBulletin® Version 3.8.11
Copyright ©2000 - 2024, vBulletin Solutions Inc.
Content Relevant URLs by vBSEO 3.5.2
All content copyright EcoModder.com