Honda IMA batteries can last a very long time, but they do not typically outlast the car. With the ten year IMA warranty expiring on the earliest Honda Insights, and the warranty void on Salvage cars, I hope this information will be useful to some EcoModders. You can repair your own IMA battery for $100-350 including equipment and replacement cells, instead of paying someone $1000 to do it for you, or dropping $3000 at the dealership.
Warning: This post is longer than most, and parts of it may not be of interest to you.
Warning: High voltage is dangerous. Read the section on safety, and don't work on things you're not comfortable with.
Do I have an IMA battery problem?
You can tell how much usable capacity the Insight's battery has by observing the range of its state of charge (SoC) gauge. A healthy battery will move through the entire range. As the battery degrades, it will move through fewer LCD bars on the gauge. A check engine light will come on with the P1447 code once the battery's capacity is reduced to about a third of what it was when it left the factory, which corresponds to a battery that moves through only about 5-6 bars on the gauge. You may want to repair your IMA battery even if you don't have a check engine light, just to obtain longer-lasting assist and regen.
What goes wrong with IMA batteries?
Battery imbalance: Honda IMA batteries consist of a large number of NiMH cells in series. Due to unequal rates of self-discharge, some of the cells will have a higher or lower state of charge than others. This is easy to correct, but failure to do so results in diminished battery capacity, and can damage the cells that are too high or too low.
Cell degradation: One of the treatable problems that diminishes the cell's capacity is the formation of nickel dendrites in the cell. Rapidly charging and discharging a cell through its full range can help restore its performance.
So how do you fix an IMA battery?
Battery state of charge imbalance is easy to treat. If you take a NiMH cell that is fully charged, then continue to apply charging current to it, it will convert the extra current into heat. Provided that the current is small so the cell doesn't overheat, this doesn't appear to damage the cell. Thus if you apply a little charging current to an imbalanced battery, the cells that are high will peak first, and begin to convert the current into heat while the other cells catch up.
You can build a grid charger/balancer for around $100. Insight guru Mike Dabrowski came up with
this design, which is an adjustable 174V-210V, 350mA constant current power supply. Leave it charging your battery (with the battery fan running) for 36 hours or so, and it will top off ALL your cells, restoring state of charge balance. You can do this without removing the battery from the car, and it may be enough to get you back on the road.
You should occasionally have the car run the battery through its full range of SoC. Go heavy on the gas until it's depleted (an assist/regen disable toggle switch, or some hills, will help). Then let the car charge the battery until it's full. Do not do this with an imbalanced pack.
Advanced methods
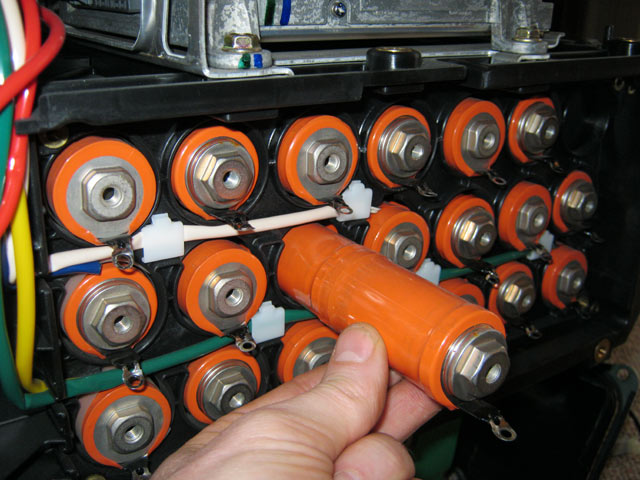
If these things are not sufficient, you can get a more thorough repair by removing the battery from the car and disassembling it. An Insight's pack of 120 NiMH D-cells breaks up into 20 sticks of 6 cells each. Using a battery charger/discharger/analyzer like the MRC Super Brain 989 ($150), you can charge and discharge each stick through its full range. Write down the discharge capacity of each stick, and keep cycling each stick until the capacity stops improving. Once you have finished cycling each stick, charge it fully and write down the date and time. Come back in a week and charge it again, and record how much energy it took to charge. That is that stick's weekly self-discharge rate.
You'll probably find some of your sticks have an abnormally high or low rate of self discharge. These are the sticks that are causing the pack to go out of balance. If you grid charge monthly, you can live with that problem indefinitely. You may also find that while most of your sticks have 5500-6500mAh capacity, there may be one or two that are stubbornly lower. These weak cells will hold back the entire pack. You will need to replace the weak sticks. A professional repair involves building a pack out of used sticks whose capacity and rate of self-discharge matches.

I pulled a battery from the junkyard and cycled each of its sticks. The chart at the top right is the most important one. You want all your cells to match as closely as possible in terms of self-discharge, and the performance of the pack will be the same as that of its weakest cell. This particular junkyard pull was probably a fairly new battery that didn't need anything more than a good, long grid charging.
You many be wondering what settings to use on the Super Brain 989. You want to go as fast as you can without overheating the cells, so I chose 7A charge, 10A discharge, and I didn't need to run the battery fan, with ambient temperature at 62°F. The Insight's cells are 6500mAh nominal, I used 5mV per cell peak detection, and 0.9VPC cutoff.
How to access the Insight's battery
First, remove the key from the ignition. This de-energizes the power cables leading from the battery to the inverter and DC/DC converter. Second, remove the rear carpet from the car. Remove two bolts from the little door at the center of the IPU lid to access the service disconnect switch. Throw that switch to Off, which means the battery is no longer a complete circuit. There's still dangerous voltage differences under the plastic covers on the junction board, so treat the whole battery with respect. The IPU lid is held on by a dozen T30 bolts and a dozen 10mm hex head bolts. Remove it, and you'll be looking at this:

The battery module is on the right, with its fan in the foreground, its computers on top, and its junction board on the left. If you wish to attach a grid charger, you must attach its + terminal to the "hot" side of the high voltage relay or bypass relay (that's the bottom), and its - terminal to the battery's - terminal.
If you want to remove the battery module, it's held on by six bolts, four cables, and six wire harness connectors. You'll need to move the car's center bulkhead aside to get at some of the bolts, which involves removing some interior trim. If you'd like to disassemble a battery module, it's pretty self-explanatory, but remove the contact grid (which puts the cells in series) from the side of the battery opposite the junction board before you do anything else. Once you do that, the battery is pretty much safe, with no more than 17V anywhere.
Warnings and Safety
Foremost, know what you're doing, and don't work on anything you're not comfortable with.
These batteries have plenty of voltage and current to kill you dead, quick. The key must be removed from the ignition and the service disconnect must be "off" whenever you open the IPU lid (the battery compartment). Wait a few minutes after throwing the switch to "off" before you touch anything in there, because there are capacitors in the battery assembly and in the grid charger which hold a charge for a little while. I ignored this warning - once - and electrified enough muscle fibers in my little finger to launch a screwdriver across the car. Not good.
If, unbeknownst to you, your high voltage relay and service disconnect failed in the closed position, you could die. I've never heard of it happening, but still, when in doubt, check it with a voltmeter. Who knows, even the 174V 350mA charger might be sufficient to kill you. So don't handle it while it's plugged in.
Final Thoughts
If you have a hybrid that's been sitting (maybe waiting to be sold, or maybe put in storage for a month or more), it's probably going to develop IMA battery problems. The uneven rate of self-discharge will drive the battery out of balance, and subsequently driving the car will damage the cells. I feel that a grid charger is pretty much required equipment for anyone who lets a hybrid sit. It's arguably overkill, but if I were to buy one of these cars, I would throw the service disconnect switch to "off", cut the charging system inhibit wire, and THEN drive it home.
I wrote this article with the Insight's battery in mind. That means it applies to Insights and first gen Civics, and to a lesser extent, Accords. But you can use the methods discussed here to recondition ANY large array of cylindrical NiMH cells, whether for a Toyota, an EV, or whatever. There's a lot more information available on what's going inside a NiMH cell, but I think this covers what you need to know to repair your own IMA battery.
Feel free to share your own thoughts on battery repair, and if you disagree with anything I've presented, please share.
You can also read about
MetroMPG's successful DIY battery refurbishment (2000 Honda Insight).