I can only buy the 2" thick EPS in 24" x 96" sizes, so the 27" width is fine. The sections need to be cut in segments to reduce waste, anyway.
Here's my system for keeping track of the pieces: the section at the highest point of the roof (just behind the driver's head) is Section 0. The first 2" slice (the foam is actually closer to 1 15/16" thick!) forward of this is F1, then next is F2, etc. up to F39. The first slice just behind Section 0 is R1, R2 -- up through R47.
Each section then is made in segments, to best fit on a 24" x 96" sheet, and the part where it meets up with the adjacent segments is made into a 'V' so they will align properly. The position of each segment relative to a clock face will determine the name -- so if it is on the right side about at the 3 o'clock position, it would be called F23-3 or R42-3, etc. If it is on the bottom of the car, then it would be called F7-6 or R16-6, etc.
Now, some parts of the car will work better if I cut the section longitudinally; namely the center of the hood out to the fender chines, and the back foot or so of the car. Anything that tapers more abruptly than 2" thick sections can resolve easily. These are named FL0 - FL13, and RL0 - RL10 (front / rear longitudinal).
Here's the plan view of all the sections

The longitudinal sections will be mirrored and duplicated for the right side of the car.
And here is F1 and F2:
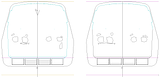
The back of the driver's head is what you see at the centerline of F1. The other bits are the two front passenger's thighs and arms and their seats.
The biggest challenge is to figure out which surfaces are increasing and transfer the profile from the adjacent section, so that there will be enough foam to be able to carve away the step and leave the correct form. To clarify, the top outside of F1 is the section of the model at that point -- but since the bottom of the car gets lower, I'll transfer the profile from section F1 back to F0, and the profile from F2 back to F1, etc. Same thing for the inside of the roof -- the inside profile of F1 (in cyan) has been transferred over to F0 so there will be enough foam to be able to carve it away, to leave the smooth surface.