Update 015 - Bodywork Fabrication
So now the initial test phase is over Im working on improving the engineering standard of some items and completing more of the outer bodywork. So I thought Id share some step-by-step photos of how I do my prototype bodywork.
What I am making, in effect, are a series of plugs from which mould tooling will be fabricated. Importantly though it makes no sense to invest a lot of time and effort in a search for perfection at this stage, since testing will require many changes as I home in on the perfect aero shape. So what I need are simple stylish parts that are lightweight and will perform much the same as the final version. The method I have chosen for this work is described below, and is learned from practical experience (years of prototype bodywork design) rather than any books or formal training.
Firstly I specify my part what its size and function are, and how it will be attached. For this example I am making a rear section lid, which will simply cover the luggage area behind the driver. It will be hinged at the front to allow access just like a car bootlid (or trunk) and it will have a tapering aero profile to minimise drag from the rear of the headrest/helmet area.
Image 1 I have cut some shapes from existing polyurethane production bumpers. I have access to bodyshop scrap (most car repair bodyshops have a mountain of replaced bumpers from auto accidents) which allows me to cut pieces, that have the shapes I desire, out of the damaged panels. In this case I have used two black panels from an Audi front bumper, two white side edges from a BMW rear bumper, and a single black strip from the centre section of a Ford Fiesta front bumper.
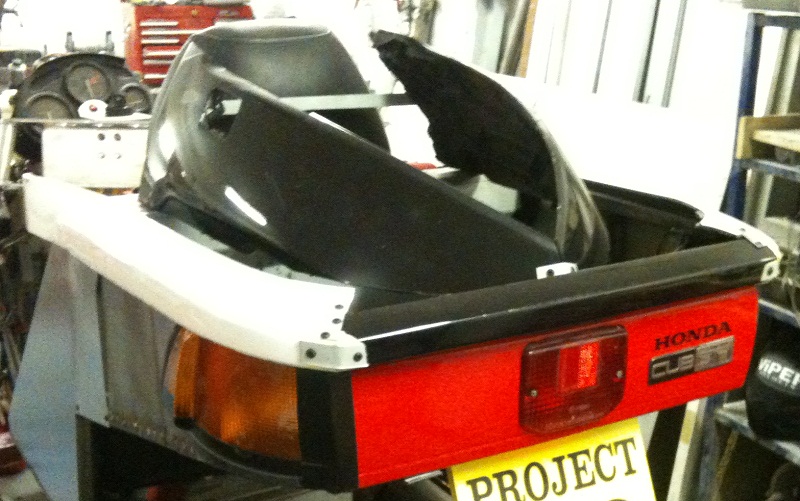
I have held each item in reference to the other panels with thin metal strips screwed with self-tapping screws. There are obviously large areas that need filling, and this is where you need some imagination.

The next step involves flat sheets of thin (single layer 400gram CSM) fibreglass. I make my own sheets using a waxed flat surface and some black pigment in the resin. I keep some automotive window glass from doors and screens if I want to copy some very subtle curves. I make cardboard patterns before cutting the fibreglass, which can be done with tin-snips when still green.

The parts can be held in register with masking tape while the metal tabs are screwed into place. At this stage the outer finish is not critical and small gaps between parts does not matter later stages in the process will rectify these issues, the key skill is keeping symmetry.

The final stages will be in my next post.