Not too long ago I decided to attempt to learn digital electronics. It is something that has always intrigued me, but something that has always been over my head. Circuits and wiring? Easy. Computer code? Not so much.
Long story short, I ended up getting a couple of Arduino boards and started playing around. Armed with a helpful tutorial in C here:
HowStuffWorks "The Basics of C Programming" I started to get the hang of it.
The reality is, there really is no end to what an Arduino board is capable of. My $14 Chinese Arduino Nano copy has 8 analog inputs and 13 digital I/0s. All that is required is the brain power to program it to make it do what you want.
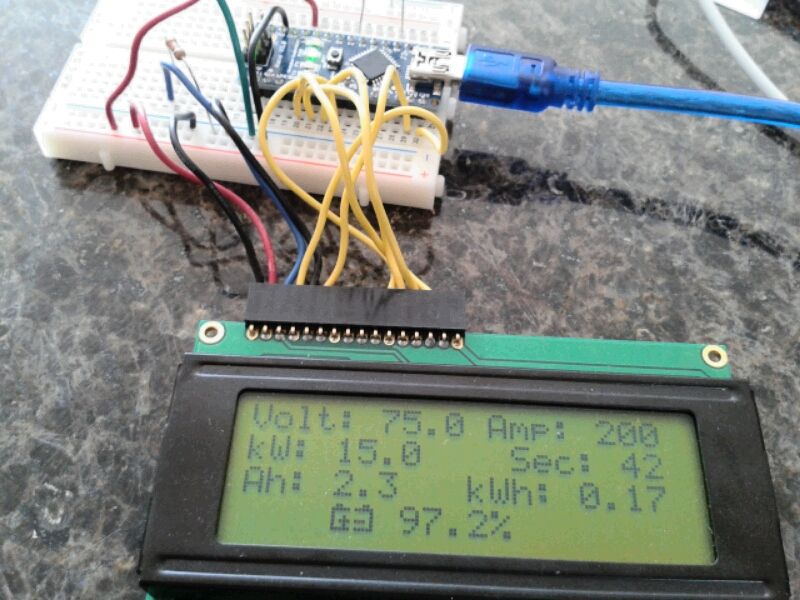
So I am now testing my code on a better battery monitoring system for the Electric Booger. Since it is 72V, all I need is 6 voltage monitoring inputs, one input from the amp sensor and maybe a temp sensor on the motor. I have successfully make an Ah counter program that works very well. Here it is running with a simulated volt and amp input:
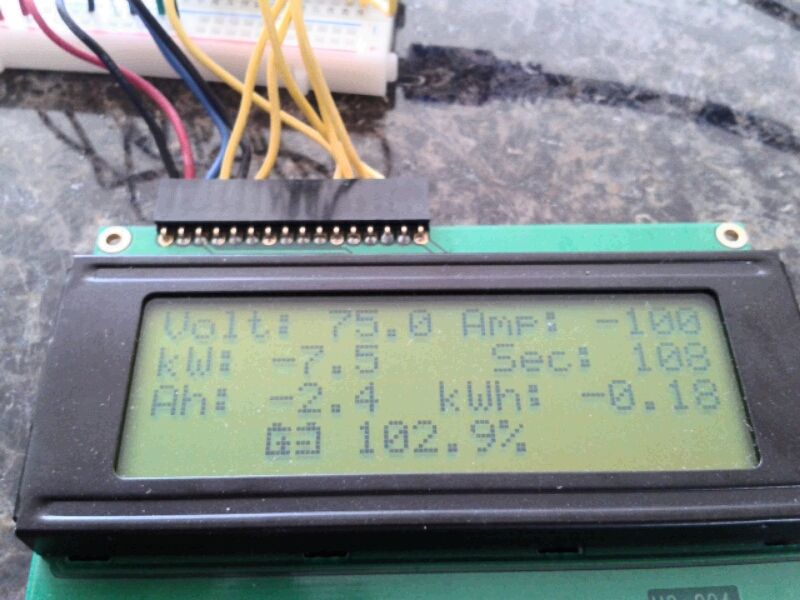
It even works for charging, when current is reversed:
Here is the code so far:
Quote:
// AH Counter Simulation
#include <LiquidCrystal.h>
#include <LcdBarGraph.h>
// Adjustable parameters
const float charge_correct = 0.8; // reverse current charing efficiency factor
const int fuel_tank = 83; // total avail capacity in Ah
const int voltPin = 0;
const int ampPin = 4;
const int reset = 6;
LiquidCrystal lcd(12, 11, 5, 4, 3, 2);
byte batt1[8] = { // These two together make a nice battery symbol
B01100,
B11111,
B10000,
B10010,
B10111,
B10010,
B11111,
};
byte batt2[8] = {
B00110,
B11111,
B00001,
B00001,
B11101,
B00001,
B11111,
};
float battVolt = 0;
float kwatts = 0;
int sample = 0;
int time = 0;
float raw_amps = 0;
float amps = 0;
float totCharge = 0;
float avg_amps = 0;
float ampSec = 0;
float ampHour = 0;
float kwHour = 0;
float fuel_level = 0;
void setup() {
pinMode(voltPin, INPUT);
pinMode(ampPin, INPUT);
pinMode(reset, INPUT_PULLUP);
lcd.begin(20, 4);
lcd.createChar(0, batt1);
lcd.createChar(1, batt2);
}
void loop() {
battVolt = 75; // Simulated Value
raw_amps = -100; // Simulated Value
if(raw_amps < 0) {
amps = raw_amps * charge_correct; // Charging efficiency factor
} else {
amps = raw_amps;
}
kwatts = raw_amps * battVolt / 1000; //kW for display only
sample = sample + 1;
time = millis() / 1000;
totCharge = totCharge + amps;
avg_amps = totCharge / sample;
ampSec = avg_amps * time;
ampHour = ampSec / 3600;
kwHour = battVolt * ampHour / 1000;
fuel_level = (fuel_tank - ampHour) / fuel_tank * 100;
lcd.clear();
lcd.setCursor(0, 0);
lcd.print("Volt: ");
lcd.print(battVolt, 1);
lcd.setCursor(11, 0);
lcd.print("Amp: ");
lcd.print(raw_amps, 0);
lcd.setCursor(0, 1);
lcd.print("kW: ");
lcd.print(kwatts, 1);
lcd.setCursor(12, 1);
lcd.print("Sec: ");
lcd.print(time);
lcd.setCursor(0, 2);
lcd.print("Ah: ");
lcd.print(ampHour, 1);
lcd.setCursor(10, 2);
lcd.print("kWh: ");
lcd.print(kwHour, 2);
lcd.setCursor(4, 3);
lcd.write(byte(0));
lcd.write(byte(1));
lcd.print(" ");
lcd.print(fuel_level, 1);
lcd.print((char)37);
delay(200);
}
|
The adjustable parameters at the top:
1) charge_correct: counts reverse amps at an 80% rate to account for battery charging inefficiency
2) fuel_tank: size of available Ah to begin with.