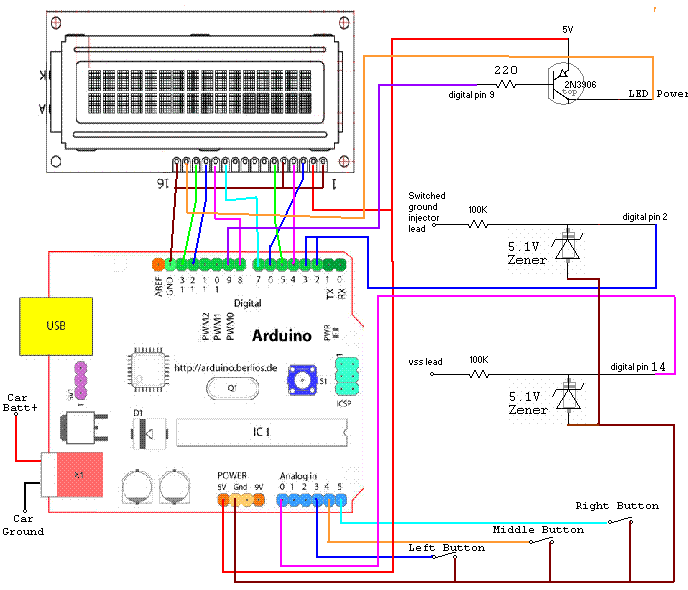
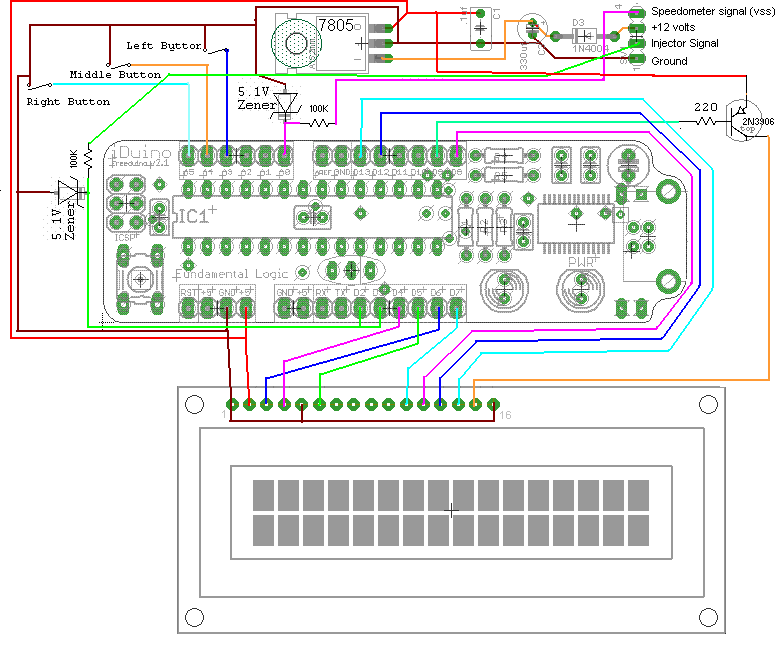
Requirements and Knowledge
Basic soldering and electronic building skill
The following parts list for the Arduino assembly
2 5.1v zener diodes
1 2n3906 PNP Transistor
1 220 ohm resistor
2 100k resistors
3 tactile switches
1 freeduino arduino clone (any arduino can probably be made to work) i.e. an iduino:
spiffie.org - This website is for sale! - spiffie Resources and Information. or a Freeduino
1 LCD (others might work as well, check pinout and chipset, etc). 16x2 LCD Module While Characters Blue Backlight Or a green one from sparkfun or mouser (a number of folks like the green ones better)
Sufficient Perfboard
A case to hold it all together
Additional parts for the iDuino assembly
1 7805 Voltage Regulator
1 1n4004 diode
330 uf cap
1 .1uf cap.
You will need to find the wires for the VSS on the vehicle computer or control unit.

 User Guide
Screens
1. Instant MPG/Speed Current MPG/Distance
2. Instant MPG/Speed Tank MPG/Distance
3. Large font instant MPG
4. Large font current MPG
5. Large font tank MPG
6. Current MPH, MPG, Miles, Gallons
7. Tank MPH, MPG, Miles, Gallons
8. Instant Raw Data (very useful for connection troubleshooting) Injector open seconds, Injector open microSeconds, Injector pulse count, Vehicle Speed Sensor pulse count
9. Current trip Raw Data Injector open seconds, Injector open microSeconds, Injector pulse count, Vehicle Speed Sensor pulse count
10. Tank trip Raw Data Injector open seconds, Injector open microSeconds, Injector pulse count, Vehicle Speed Sensor pulse count
11. CPU Monitor Max CPU %utilization, Tank running Time mm.ss, Free Memory (bytes)
Start-up Settings
There is also a setup screen that displays the first time the program is run and by pressing all three buttons at once. It walks you through the following setup variables. Use left and right buttons to select the digit you wish to change or the OK or Cancel (XX) items. Use middle button to rotate the current digit or select OK or XX if that is where the cursor is. Selecting OK will save the currently displayed value to the current variable and advance to the next variable. Selecting XX will just advance to the next variable.
1. Contrast - This comes up first on a brand new run and changes on the screen are immediate so if you can't see anything try pressing middle button a few times.
2. VSS Pulses/Mile - use this to adjust displayed speed/miles. If the speed/miles displayed on the mpguino is low then decrease this number by the percentage that it is off and vice versa for high readings. Most asian cars will be a multiple of 8204 and GM will be 10000, we are hoping users will contribute model specific data here.
3. MicroSec/Gallon - use this to adjust displayed fuel consumption. You may want to readjust this initially to get a ballpark MPG reading (after VSS Pulses/Mile is deemed accurate), then calibrate it with a couple fillups. If the mpguino displayed MPG is high or the displayed tank gallons is low at fillup then reduce MicroSec/Gallon by the percentage that the gallons are low or the displayed mpg is high. Like the vss pulses, this would benefit from user contributions about what values work for what specific cars.
4. Pulses/2 revs - not currently used, but a single injector on a 4 cylinder sequential system will make 1 squirt in 2 revolutions. Hope to be able to base RPM on this at some point.
5. Timout(microSec) - defaults to 7 minutes. If there are no injector or speed signals from the car and no buttons are pressed in that time then the display backlight turns off. When activity resumes the display will turn back on and the current trip will reset and the tank trip will be restored to the point of last activity.
6. Tank Gal * 1000 - not currently used, but defaults to 13300 or 13.3 gallons.
7. Injector DelayuS - Represents the mechanical delay of the injector in microseconds. Advanced topic.
Button Functions
1. left: cycle through screeens in reverse
2. middle: cycle through pre-defined brightness settings
3. right: cycle through screeens forward
4. left+middle: tank reset
5. right+middle: current reset
6. left+middle+right: go to setup screen