 02-17-2010, 12:41 AM
|
#1 (permalink)
|
|
Master EcoModder
Join Date: Jan 2010
Location: Oregon
Posts: 471
Thanks: 15
Thanked 65 Times in 48 Posts
|
Air Dam vs. Front Undertray- One negates the other?
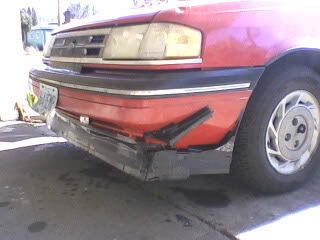
I found out that the extra scraps of coroplast I had were the perfect measurements for a front air dam. I already have a front undertray in place, though.
What I'm wondering is, will an air dam negate the effects of a front undertray? Would I be better off removing the undertray when I install the air dam?
__________________
In Reason we Trust

|
|
|

|
 Today Today
|
|
|
|
 Other popular topics in this forum...
|
|
|
|
 02-17-2010, 12:45 AM
|
#2 (permalink)
|
|
ecomonkey
Join Date: Dec 2009
Location: middleburg fl
Posts: 240
Thanks: 33
Thanked 30 Times in 21 Posts
|
a smoother undertray will always help, some air will always get under ,and it might allow you to use a smaller air dam which is good because a dam increases frontal area,,, just my 3 cents.
|
|
|

|
 02-17-2010, 01:15 PM
|
#3 (permalink)
|
|
Master EcoModder
Join Date: Jun 2008
Location: Northwest Lower Michigan
Posts: 1,006
Thanks: 8
Thanked 17 Times in 16 Posts
|
It probably depends a lot on what the rest of the underside of the car looks like. Once I removed my airdam and installed a partial front bellypan, and my mpg went back down to where it was before the airdam, which was about a 2 mpg difference. So the partial bellypan did nothing. In my case it is better to just use the airdam to keep the air out from under the car to start with.
__________________

Winter daily driver, parked most days right now

Summer daily driver
|
|
|

|
 02-17-2010, 02:59 PM
|
#4 (permalink)
|
|
EcoModding Lurker
Join Date: Nov 2008
Location: Portland, OR
Posts: 53
Thanks: 1
Thanked 7 Times in 5 Posts
|
I've been wondering about this on my car too. I've had a front undertray for awhile, which is now full length, but it's at a rather steep angle due to the high front bumper. I'm guessing this is stuffing too much air underneath the car (not more than stock, but still a lot), adding drag despite the smooth surface.
I am now toying with the front dam idea, but how would I combine it with a front undertray, or should I even bother? Just adding a dam would create quite a vacuum area, meaning the air would unattached and turbulent by the time it makes contact with the rest of the undertray. I the best solution of course would be to make a front undertray that is flush with the dam and flat from that point back. But then I'd be grinding it all the time and probably rip it off.
|
|
|

|
 02-17-2010, 03:36 PM
|
#5 (permalink)
|
|
Master EcoModder
Join Date: Jan 2010
Location: Oregon
Posts: 471
Thanks: 15
Thanked 65 Times in 48 Posts
|
Thanks for the advice!
I currently have 3 other panels underneath the car, placed around the exhaust and smoothing out the underside (I have a thread on that in the Ecomodding Central forum: http://ecomodder.com/forum/showthrea...ign-12096.html )
I'll see about lowering the front of my undertray and get it closer to horizontal. I'll need to pick up some longer screws, though.
__________________
In Reason we Trust

|
|
|

|
 02-17-2010, 04:41 PM
|
#6 (permalink)
|
|
EcoModding Lurker
Join Date: Nov 2008
Location: Portland, OR
Posts: 53
Thanks: 1
Thanked 7 Times in 5 Posts
|
Thanks, and after looking at your other thread, your undertray looks great, but I would significantly lower the angle of the rear diffuser. In fact, you don't want a "diffuser" at all. Diffusers create a greater low-pressure area by "diffusing" a given amount of air molecules over a greater volume of space. What you want is a smooth surface that reduces wake profile while keeping attached flow, and 25 degrees is too much to keep attached flow on top of the car, in open air, let alone underneath, where the air is trapped between the ground and underbody. You can search the forum for lengthy discussions on what is optimal, but I would stay around 10 degrees.
|
|
|

|
 02-17-2010, 07:37 PM
|
#7 (permalink)
|
|
Master EcoModder
Join Date: Jan 2008
Location: Mirabel, QC
Posts: 1,672
Thanks: 35
Thanked 86 Times in 57 Posts
|
I believe they both compliment each other when designed properly. The undertray deals with the floor while the airdam should be designed to deal with the wheels.
|
|
|

|
|
The Following User Says Thank You to tasdrouille For This Useful Post:
|
|
 02-18-2010, 04:10 PM
|
#8 (permalink)
|
|
Master EcoModder
Join Date: Jan 2010
Location: Oregon
Posts: 471
Thanks: 15
Thanked 65 Times in 48 Posts
|
I've got an idea- I'll leave a lip of the air dam over the sides of the undertray so the flow will detach before it goes toward the tires and suspension, but keep the middle section flush with the air dam to have some attached airflow on the undertray. Similar to the air dams on cars that sit lower on the corners and raise up in the middle, but reversed in a way.
Photos to come.
__________________
In Reason we Trust

|
|
|

|
 02-19-2010, 05:36 PM
|
#9 (permalink)
|
|
Master EcoModder
Join Date: Jan 2010
Location: Oregon
Posts: 471
Thanks: 15
Thanked 65 Times in 48 Posts
|
Photos:
Here's showing what I meant, having the undertray curved and the air dam flat:
(Looking at the right front corner from underneath the driver's door)

Corner view:

Front view:

The canards were there to reduce the front-end lift that the undertray seemed to have been causing, and are mounted at 25 degrees. After adding the air dam, I noticed the steering effort at speed was increased, which is a clear indicator of reduced lift/increased downforce. I'll most likely pull those off, since it doesn't seem like I need them anymore. (My goal for the aero is reduced drag with zero lift).
I don't have any mileage numbers yet, but I will once my tank is gone.
My fiancee's cell phone seemed to have raped the size of the first picure, so I'll try to take a better one today.
__________________
In Reason we Trust

|
|
|

|
 02-19-2010, 09:20 PM
|
#10 (permalink)
|
|
EcoModding Lurker
Join Date: Feb 2010
Location: Fargo
Posts: 16
Thanks: 0
Thanked 0 Times in 0 Posts
|
For the undertray, I first made a nice pattern by sticking few pieces together (some foam-core board) then cut according to pattern. Then drilling holes through it and the underlying bracing or brackets after. Finally, securing it with nylon push-rivets.
|
|
|

|
|