On the other hand, seems I've gravely underestimated the power of pedals lol doh >.<
Feelin' a bit adventurous, mayhaps jus' a bit silly - whichever it may have actually been I sorted the main power plug for the electric (no more accidental zots thanks) & temp tidied things a bit as I'd decided to "test ride" the thing as much as I could w/both the electric drive & pedal drive systems...
Insofar as the 3 or 4 feet forward & "wheelchairing" it back again counts as a "test ride" heh, whatever - I've not much room in my shop & even so I made meself giggle like a schoolgirl & learned a few things. First being (fortunately) my front braking system works quite well FTW, second being the electric drive functions under load, third being...
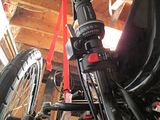
...I need to repair/redesign my rear pedal chain idler mount as it collapsed under load - the load being trying to pedal in the lowest gear with the front brakes locked, which in my own defense was exactly why I was doing such a silly thing, to see what would break & where.
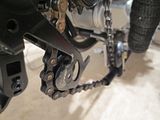
It's easy enough to fix & in retrospect obvious it needs a gusset, still it was a lil surprising how easily it folded given it's 3/16" aluminum angle & jus' me legs... I suppose it shows a bias that I undervalue human torque so, after all I motorize for a reason

It served to teach me to not underestimate
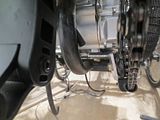
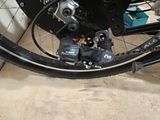
anything on this build & I spent the rest of the day going back over the entire taddy looking for anything else that may be underbuilt or overlooked - another example was the pedal chain tensioner, which is just a bit of a rear derailleur cut up & reversed, which as it's reversed doesn't have a chain retainer so when the chain came out of alignment it came off the cog, scraping up the arm & bound. Perhaps not an issue if the mount didn't fail... then again who knows what might happen should I be idly backpedaling up a hill (as is my wont whilst passing pedalers cause I'm evil) & hit a bump or something, so I need tinker a lil tab retainer for that as well *shrug*
Other'n that it was an educational and fun afternoon, not that I can be sure of much with a whopping 4 foot test track - but I found if I made a hard right turn I could get almost a
whole 5 feet of run lol, and that the steering & turning radius seems to be about right as well...
...& work has been madness of late, I'll spare ya'll the insanity if for no other reason than it's very,
very boring insanity heh, the entire point of a hobby is escapism after all, except in this instance it interfered w/my progress as I needed the welder, but needed to flee the workplace even more... I really should get my own b'danged MIG >.<
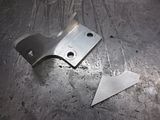
Anyhoo, it only took a moment to straighten the bent mount, cut a gusset on my bandsaw and bring it in for the two tiny stitch welds needed. After I got it home again I looked at it & thought I should have prolly welded both sides of the gusset, but I was worried about fastener clearance & I don't think it'll be an issue after more "testing" - that being trying to pedal in it's lowest gear with the brakes fully locked (no damage), then just for the lulz standing in front of the taddy and stomping a pedal, which presumably was to test shock load - but in actuality more because it leaves the cutest lil baby burn outs on the ply...
I never claimed to be mature
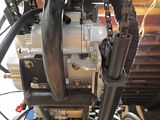
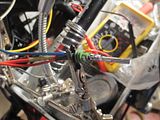
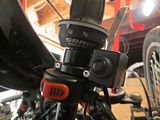
phew... I've no idea why but I just had quite the productive weekend lol, I started by adjusting & tightening about umpteen billion fasteners that were just finger tight, just sorta there to keep things in check - the entire front end assembly for example, the handlebar controls for another, then moved on to more critical tasks such as dealing with some of the blasted wires hangin' out all over the place... but to do that I needed to make sure they all had something to go to, which ofc meant digging up more connectors, fasteners and even the occasional bit of forgotten hardware - like the horn, which I hadn't even found a place to mount the thing and possibly offended by this neglect, had hidden itself away in my 'puter parts drawer of all places o_O
Anyway, skipping over the befuddled confusion & questing for misplaced widgets, trying to find the right color bit of wire to splice in, another b'danged connector half, the hours of sitting in a haze of burnt solder resin & other such repetitive banalities - turns out I had little to dread as again, a wiser self had taken great care to label each and every wire as well as full color coded schematics. So once the additional parts were found it all went together pretty easily.
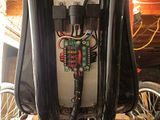
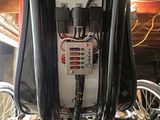
This isn't the end of the wiring ofc, but it's the beginning of the end & it's a relief to have at least most of it sorted. All the handlebar controls are complete now (except ICE start/run & rear brake) which may not sound like much... but included front and rear derailleurs, ICE & electric throttles, front brakes, horn, taillight, brake light, low & high beams, blinkers and ofc their corresponding indicators on the Vapor dash if applicable (blinkers, high beam, etc).
What's left for wiring is tidying up the electric drive components (wiring cut down to fit) and the ICE wiring (ignition) and what sending units are left for the Vapor (tach, temp, speed, neutral indicator)... it's true I don't have front blinkers yet, but as I have no fenders mounted I've no place to mount them lol, but that's easy enough and low priority, it won't get it's full fenders till after some test runs anyway.
It's not something easily shown, but all of the switch controls except the keyed main are easily operated with just the heel of the hand, which means that you need never release the handlebars to do anything - a seemingly minor consideration that took a surprising amount of effort, replaced & relocated, even customized parts... all because I don't like having to let go mid-turn to do whatever *shrug* picky I s'pose but I
hate hard to reach controls heh
A lil vid of the flashy stuff in action, sorry for the quality but I shut down the spotlights as to show the indicators better - there's still a 60w light in the room, but digitals seem to hate "low light" vids (HD setting helps some);
MVI_2788 - YouTube