01-11-2013, 09:39 PM
|
#61 (permalink)
|
|
Master EcoModder
Join Date: Feb 2010
Location: Elmira, NY
Posts: 1,794
Thanks: 320
Thanked 361 Times in 300 Posts
|
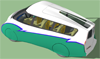
The ATV could be licensed as is in some states but I suspect a stretched chassis with a lowered seat behind the engine and street tires could work with a streamlined body.
|
|
|

|
 Today Today
|
|
|
|
 Other popular topics in this forum...
|
|
|
|
|
01-28-2013, 03:41 AM
|
#62 (permalink)
|
|
EcoModding Apprentice
Join Date: Aug 2011
Location: Maine
Posts: 105
Thanks: 8
Thanked 55 Times in 38 Posts
|
Still here, still tinkerin' - but it's goin' about as slow as me wonly wifi... ahh the joys of detail work heh
Let's see... where was I? hmm...
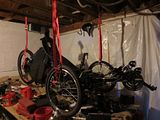
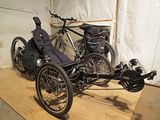
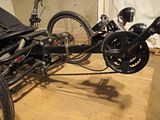
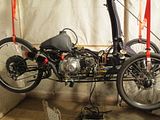
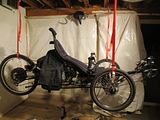
So, the time had come for the taddy to no longer be "put on a pedestal" so to speak, it needs be on the floor for the final assemblies. So I installed tie-downs to raise the project, to clean & disassemble the project table & then lower it to the floor... I'll spare you the woes of a filthy shop, but I'll admit it was more of a bother to clean then it shoulda been lol
While the taddy isn't that heavy at all, it's cumbersome to lift. With two people it's no problem, but waking a friend at 3am when the tinkerin' urge hits is a pretty good way to strain a friendship heh, besides it outa be handy for the occasional flood too I figure;
 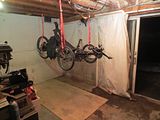 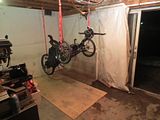 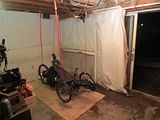 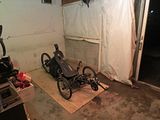
It seems so little settin' on the floor o.O
I've done a buncha assorted lil things in the meantime, most insignificant & some more experimentation... I'm still fiddling around with the upper seat mount trying for "perfect" (which is no doubt a myth), did some more electric system trials, finally attached the seat cover, but in all honesty as it's on the floor now, I might have spent a disproportionate amount of time jus' settin on the thing & chuckling... and attending to some ergonomics such as the above (amazing how 1/2" will change a seat frm awesome to eergh), handle bar & pedal boom position etc. ...ok, mebbe a lot of just makin' vroomie noises & leaning into those hard turns lol
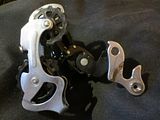
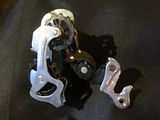
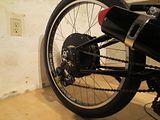
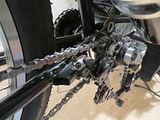
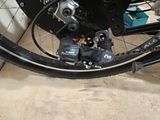
Now that the rear wheel & cassette is finalized, I did get around to modifying a rear derailleur to fit, I'm hesitant to say "finalized" though it should do fine - but it is a junk derailleur, tho a new shimano it's a stock take off from a box store bike, as they tend to refuse to index properly I'll replace it when it irritates me enough.
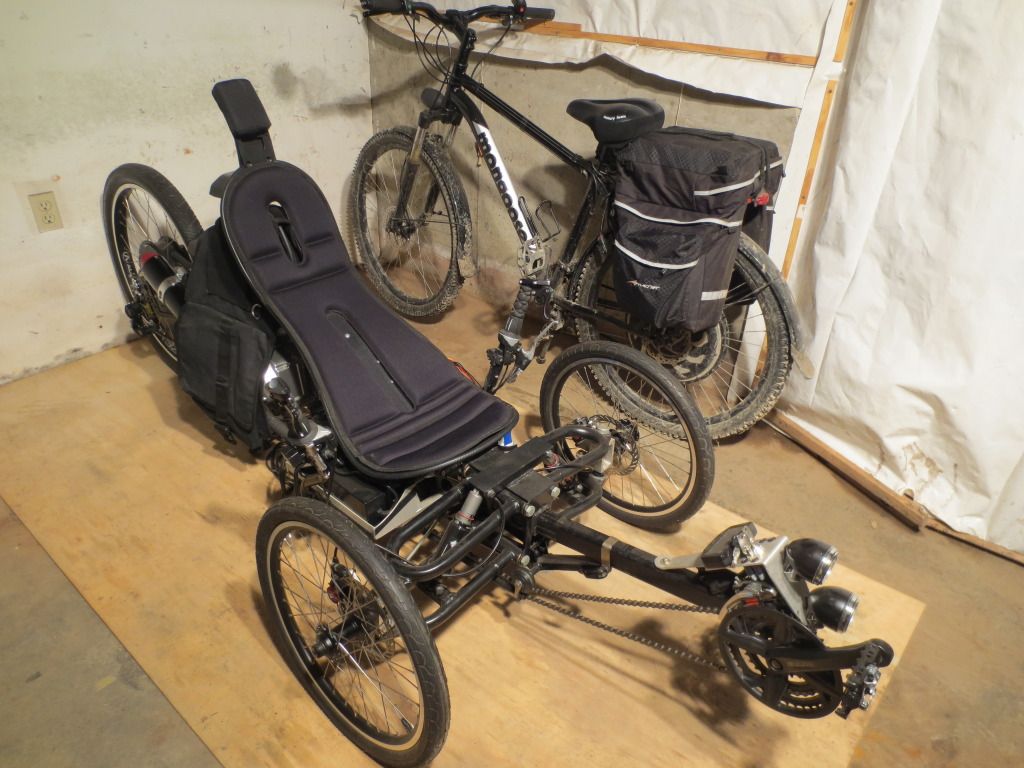
I stuck poor, filthy Mongo in the background of the last coupla pics for scale as although the taddy is obv settin on a 4x8' sheet of plywood, it's still kinda hard to figure scale w/o a reference;
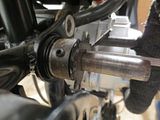
Plodding right along, the tale of the 79¢ bit of mystery... for so very long all I needed to be able to pedal the thing was to cut a coupla keys for the jackshaft (three actually, three sprockets ofc) & finagle a coupla spacers, except there was so many other things to attend to... and ofc I seem to have misplaced the key stock. No worries I thought to myself, I'll just buy another & for the past coupla weeks I've been patiently waiting for my local hardware store to restock so I could do just that. Finally, lil bit of metal in hand I was able to finish the jackshaft for good, except ofc it'd rusted quite a bit in the meantime, cleaned & keyed it'll get painted when everything else is too.
and a silly lil vid jus' for the lolz MVI_2643 - YouTube ...well, it amused me anyway *shrug* :P
speakin' of detail stuff, I got a couple more of the nearly endless list of minor things done, I picked up some (more) cabling (gaw, there's so much of it) & finally managed to dig up some hex set screws to replace & complete my front brake cable splitter, finding to my dismay that particular hex size was ofc the one I'm missing from my set, so I picked up a new hex set as well as it was no doubt sacrificed to the gremlin when I cleaned the shop heh
I dunno why I was surprised that it worked so well, it's a simple enough dealie *shrug* but one of the things I made sure of when I was making it was accounting for the possibility of cable breakage (w/a large slider area). There's nothing to be done if the single cable from the lever to the splitter snaps ofc (& that's more likely) and it'd be sketch to only have one functioning front brake, but better one than none... and during testing that seemed to work too, so good 'nuff I figure.
Moving right along I rigged up the rear derailleur cable & dialed in the shifter & started on the front...
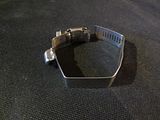
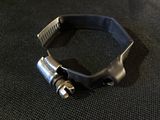
...to find a small oversight on my part heh - there's no cable seat/saddle thingie for the front cable to go into... um... yea, oops >.<
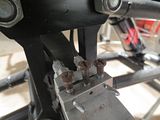   
Not to be deterred by a mere technicality, I though about resorting to the internet to find a clamp-on, but I feared that given the square tubing and the orientation I'd be wasting my time even looking. I could be wrong, but I also had no desire to wait two weeks for shipping, particularly as soon as the roads clear I'll be vroomin' on over to the welding shop and zottin' one on there (along w/a coupla of other lil things), so I just cobbed a clamp-on myself.
It's not the prettiest or most professional (220 Miller MIG was a touch overkill lol), but it suffices to get the job done, I added the shrink wrap to prevent scratching the already scratched to heck pant heh
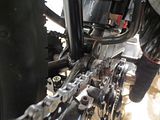
Anyhoo - both front & rear derailleurs are now completely functional & as I managed to sort the jackshaft keys last time, it's completely pedal-able, added a touch of cable & chain lube and it's far smoother & w/less drag than I thought given the sheer length & number of chains & their routing, another relief lol;
I was muckin' about tonight just trying to get more cable work done, cuttin' new ones for the throttle set & scared the heck outa myself when I went to test the electric... it's a damn foolish thing I know, but I haven't a proper plug going from the battery pack to the controller just yet & in a hurry I reversed polarity to the controller, naturally resulting in a zap of impressive intensity & what now seemed to be a completely unresponsive controller, no output, no lights, de nada.
Freaked and more than a little irritated with my stupid self, I checked the BMS to see if the battery was still puttin' out (yep), checked the plugs & wires for continuity (yep) & started to seriously worry I'd fried stuff as I was gettin' nothing other'n nothing at all... and then noticed that unlike my 'Pie hub (internal), this controller has an off switch, which a smarter self had ofc turned off last time I was done tinkerin' with it.
Whew - saved by happenstance, I quintuple checked polarity & flicked the switch, to my profound relief all the lights came on & a twitch of the throttle showed no harm, no foul... this time. Lucky indeed as this is a generic controller I doubt it's much in the way of protection from morons, it might have a breaker, it might have polarity protection... I suspect not though & better not test that luck again heh
Other'n that lil bit of humbling excitement, the rest went together like legos - as it outa as I've done this particular task before & already sorted the issues out. It's a different thumb throttle for the electric ('Pie stolen by Mongo), but that only required drilling a hole for the cable to pass through to utilize it as a remote cable actuated dealie for the trigger throttle (spring added for safety/throttle return).
...and yea, I might have spent too long w/the taddy on it's stand vrooming the electric drive "testing" it lol
I also redid the carburetor's throttle cable & it works well enough, I do think I'm gonna get another "springy" brake noodle (same as on the tops of the two trigger throttles) to replace the solid one I used on the carb - while it works, the inner sleeve diameter/bend is just a hair too tight & it drags a bit. I upgraded the slide return spring to a beefier one (safety/throttle return again) so it always returns, but it requires a bit too much pull for comfort & it's defo that noodle. Ah well, I needed 'nother excuse to visit my LBS right? heh
Well, that outa catch everythin' up fer now anyway lol |
|
|
|
|
The Following User Says Thank You to BarelyAWake For This Useful Post:
|
|
|
02-05-2013, 02:55 AM
|
#63 (permalink)
|
|
EcoModding Apprentice
Join Date: Aug 2011
Location: Maine
Posts: 105
Thanks: 8
Thanked 55 Times in 38 Posts
|
On the other hand, seems I've gravely underestimated the power of pedals lol doh >.<
Feelin' a bit adventurous, mayhaps jus' a bit silly - whichever it may have actually been I sorted the main power plug for the electric (no more accidental zots thanks) & temp tidied things a bit as I'd decided to "test ride" the thing as much as I could w/both the electric drive & pedal drive systems...
Insofar as the 3 or 4 feet forward & "wheelchairing" it back again counts as a "test ride" heh, whatever - I've not much room in my shop & even so I made meself giggle like a schoolgirl & learned a few things. First being (fortunately) my front braking system works quite well FTW, second being the electric drive functions under load, third being...
...I need to repair/redesign my rear pedal chain idler mount as it collapsed under load - the load being trying to pedal in the lowest gear with the front brakes locked, which in my own defense was exactly why I was doing such a silly thing, to see what would break & where.
 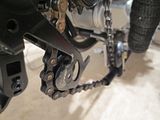
It's easy enough to fix & in retrospect obvious it needs a gusset, still it was a lil surprising how easily it folded given it's 3/16" aluminum angle & jus' me legs... I suppose it shows a bias that I undervalue human torque so, after all I motorize for a reason 
It served to teach me to not underestimate anything on this build & I spent the rest of the day going back over the entire taddy looking for anything else that may be underbuilt or overlooked - another example was the pedal chain tensioner, which is just a bit of a rear derailleur cut up & reversed, which as it's reversed doesn't have a chain retainer so when the chain came out of alignment it came off the cog, scraping up the arm & bound. Perhaps not an issue if the mount didn't fail... then again who knows what might happen should I be idly backpedaling up a hill (as is my wont whilst passing pedalers cause I'm evil) & hit a bump or something, so I need tinker a lil tab retainer for that as well *shrug*
Other'n that it was an educational and fun afternoon, not that I can be sure of much with a whopping 4 foot test track - but I found if I made a hard right turn I could get almost a whole 5 feet of run lol, and that the steering & turning radius seems to be about right as well...
...& work has been madness of late, I'll spare ya'll the insanity if for no other reason than it's very, very boring insanity heh, the entire point of a hobby is escapism after all, except in this instance it interfered w/my progress as I needed the welder, but needed to flee the workplace even more... I really should get my own b'danged MIG >.<
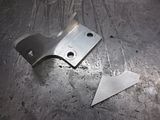
Anyhoo, it only took a moment to straighten the bent mount, cut a gusset on my bandsaw and bring it in for the two tiny stitch welds needed. After I got it home again I looked at it & thought I should have prolly welded both sides of the gusset, but I was worried about fastener clearance & I don't think it'll be an issue after more "testing" - that being trying to pedal in it's lowest gear with the brakes fully locked (no damage), then just for the lulz standing in front of the taddy and stomping a pedal, which presumably was to test shock load - but in actuality more because it leaves the cutest lil baby burn outs on the ply...
I never claimed to be mature
phew... I've no idea why but I just had quite the productive weekend lol, I started by adjusting & tightening about umpteen billion fasteners that were just finger tight, just sorta there to keep things in check - the entire front end assembly for example, the handlebar controls for another, then moved on to more critical tasks such as dealing with some of the blasted wires hangin' out all over the place... but to do that I needed to make sure they all had something to go to, which ofc meant digging up more connectors, fasteners and even the occasional bit of forgotten hardware - like the horn, which I hadn't even found a place to mount the thing and possibly offended by this neglect, had hidden itself away in my 'puter parts drawer of all places o_O
Anyway, skipping over the befuddled confusion & questing for misplaced widgets, trying to find the right color bit of wire to splice in, another b'danged connector half, the hours of sitting in a haze of burnt solder resin & other such repetitive banalities - turns out I had little to dread as again, a wiser self had taken great care to label each and every wire as well as full color coded schematics. So once the additional parts were found it all went together pretty easily.
This isn't the end of the wiring ofc, but it's the beginning of the end & it's a relief to have at least most of it sorted. All the handlebar controls are complete now (except ICE start/run & rear brake) which may not sound like much... but included front and rear derailleurs, ICE & electric throttles, front brakes, horn, taillight, brake light, low & high beams, blinkers and ofc their corresponding indicators on the Vapor dash if applicable (blinkers, high beam, etc).
What's left for wiring is tidying up the electric drive components (wiring cut down to fit) and the ICE wiring (ignition) and what sending units are left for the Vapor (tach, temp, speed, neutral indicator)... it's true I don't have front blinkers yet, but as I have no fenders mounted I've no place to mount them lol, but that's easy enough and low priority, it won't get it's full fenders till after some test runs anyway.
It's not something easily shown, but all of the switch controls except the keyed main are easily operated with just the heel of the hand, which means that you need never release the handlebars to do anything - a seemingly minor consideration that took a surprising amount of effort, replaced & relocated, even customized parts... all because I don't like having to let go mid-turn to do whatever *shrug* picky I s'pose but I hate hard to reach controls heh
A lil vid of the flashy stuff in action, sorry for the quality but I shut down the spotlights as to show the indicators better - there's still a 60w light in the room, but digitals seem to hate "low light" vids (HD setting helps some);
MVI_2788 - YouTube
     |
|
|
|
|
The Following User Says Thank You to BarelyAWake For This Useful Post:
|
|
|
02-05-2013, 11:24 AM
|
#64 (permalink)
|
|
Master EcoModder
Join Date: May 2008
Location: Maynard, MA Eaarth
Posts: 7,908
Thanks: 3,475
Thanked 2,953 Times in 1,846 Posts
|
This is a great project, and I'm glad to hear about your progress and lessons learned.
|
|
|
|
|
02-16-2013, 03:03 AM
|
#65 (permalink)
|
|
EcoModding Apprentice
Join Date: Aug 2011
Location: Maine
Posts: 105
Thanks: 8
Thanked 55 Times in 38 Posts
|
Thanks Neil, the lessons more important than the progress to me I do try to include at least most... erm... some of the mistakes made lol, forgive me if I don't include them all as it'd triple the length of the build thread at a minimum 
It has again "been awhile" since I last posted an update - this time however I've gotten a bunch of stuff done, thing is it's all insanely boring, repetitive & tedious crap that just needed to be attended to, very little of it being picture or note worthy... namely wiring, wiring, wiring & more wiring w/summore wiring on the side >.<
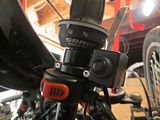
One of the little things I'm disproportionately proud of is in actuality quite simple, I dunno why it pleases me so much heh, but whatever - I modified the ebike controller with a remote activation, it's power switch still active the taddy's main relay bank now supersedes it, the key switch overriding so "off" is off no matter if the controller is switched on or not, turning the taddy's keyed main now activates/deactivates absolutely everything electrical on the thing, handy for both repairs & security, tho naturally it could still be pedaled.
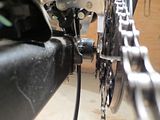
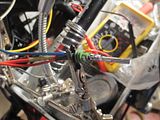
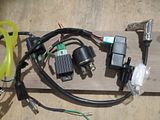
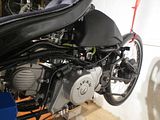
Last of the connections for the ebike & lighting sorted, it was time to move on to the Lifan four stroke & it's wiring and plumbing needs, I grabbed some alcohol resistant fuel line (a disgusting yellow, but whadda gonna do lol) and a pair of fuel filters (lil one is a disposable for initial fill/flush) & after just a bit of fumbling got that easy bit sorted...
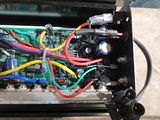
...& now comes the tough bit - there's five main wires comin' outa the engine, they ofc go to the CDI, coil & regulator but the tricky bit is even after more than a year of searching the interwebs, talking to repair shop techs and distributors, even the vendor that sold me the thing - no one could provide more than their "best guess" as to which wire did what, the colors meaningless & nonexistent in any available schematic or manual.
blarg
I hate guessing electricals as you'll very often not be allowed a second try, tendrils of smoke & spiky hair your reward for a mistake lol - fortunately the gas engine itself is a comparatively simple setup, not like it's a emissions regulated EFI or anythin' heh, so after some grumbling I carried on doing things backwards, wiring all the accessories & whatnot first, winnowing my way down to just the stuff I couldn't identify, then using the classic process of elimination to figure out the rest...
Somewhat surprisingly it worked, I only made one mistake and that was one the zot gods decided to forgive, oddly one that had little to do with the mystery wires and was just an error (wired the kill as a double kill instead of off/on);
    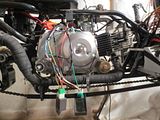
...and as of Friday 3:30am EST - IT'S ALIVE, IT'S ALIVE!!1!
Having checked for & gotten spark, I drizzled a bit of purloined two-stroke fuel (buddy's ped) into the cylinder & sure enough it fired right up w/a very satisfying four stroke rumble, resulting in a maniacal cackle from me & promptly doing it again lol, it speaks volumes for my upstairs neighbors that they came down to congratulate me on this milestone instead of (rightfully) complaining about the racket at almost 4am heh
Triumph indeed, nevertheless there's still a bunch to be done, lots and lots of little things, tidying up and adjustments, then some more readjustments. I got a good start on pulling together the harnesses, shortening excess wires, organizing the mayhem & rerouting things to prevent chafe, pinches, tugs & shorts, then adding conduit wrap to keep it all that way... but I've still heat guards & some mounts to make, there's still a bunch to be done but...
...without a shred of doubt I'll be riding this thing no later than this spring, sooner if the roads are dry and clean before then FTW;
     |
|
|
|
|
The Following 2 Users Say Thank You to BarelyAWake For This Useful Post:
|
|
|
02-16-2013, 08:56 AM
|
#66 (permalink)
|
|
Master EcoModder
Join Date: May 2011
Location: Syracuse, NY USA
Posts: 2,935
Thanks: 326
Thanked 1,315 Times in 968 Posts
|
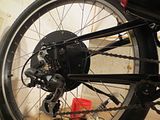
Very nicely done project. I hope when you get it finished that you would have the opportunity to show it off at some Green Festivals or fuel economy challenges. That hub motor has some nice features. Wide magnet structure and wires exiting beside the axle instead of through it. Similar to the new, $350, Crystalyte HS3540. Do you have a torque arm to beef up the rear drop out with? Powerful hub motors are known to spin out the slot in the drop out and rip their wires off. I have learned quite a bit from reading at
.
Endless-sphere.com • Index page
.
while planning my upcoming medium range commuter. I bought a suspended, 26" recumbent to add a full fairing and hub motor with 78v Amp20 cells to. The project goal is 40 mph average speed for 40 miles using 40 kW/hr per mile or 850mpge.
.
performer
. |
|
|
|
|
The Following User Says Thank You to sendler For This Useful Post:
|
|
|
02-18-2013, 03:24 AM
|
#67 (permalink)
|
|
EcoModding Apprentice
Join Date: Aug 2011
Location: Maine
Posts: 105
Thanks: 8
Thanked 55 Times in 38 Posts
|
Thanks sendler - I do hope to take it to some events, "Green Festivals or fuel economy challenges" don't seem to be terribly popular up here in the sticks, then again I am designing this thing w/long range comfort in mind so who knows lol... One of the possibilities that's recently occurred to me (suggested actually) is running it as a chase/cam/support vehicle (w/trailer) for some of the longer bicycle road races, which I think would be fun and interesting.
I did notice the at least superficial resemblance to the Crystalyte hubs, it makes me wonder if it's not partially cloned, but I'm not familiar enough with the Crystalyte hubs to say how similar they actually are beyond ascetics. For example the wires don't actually exit beside the axle, rather the commonplace through it via a keyway - there's just a spacer allowing the wires to exit the axle on the inside of the dropout instead of all the way through to the end. I do not as of yet have torque arms installed & may not, depending on the results of testing. While I respect their needful use on higher power ebikes, I've not needed them at all on my 48v 1000w (aluminum) ebike despite the pounding & high mileage it's accumulated, this hybrid tadpole got "downgraded" to a 36v but still 1000w setup so at most the rotational stresses on the (steel) dropouts would be about the same. If it develops signs of torque damage I'll defo attend to it & thanks for the "heads up" in any case (can't be too safe lol), I suspect I'll prolly weld hardened side plates to the steel dropouts (doubling their thickness) instead of aftermarket torque arms as changing a flat rear tire can be an annoyance even w/o any additional parts...
I did get a small chuckle from your "40 mph average speed for 40 miles" goal for a "medium range commuter" - funny how it's all comparative, were it not a electric recumbent there's nothing "medium" about those goals lol, I hope you exceed all expectations 
I should swing by endless... I've not much in the way of questions left & TBH their goals aren't generally compatible w/mine (high powered electrics vs low power hybrid), but I'm in no way an "expert" when it comes to electric drive systems & this one is slightly different then my other - there's three main power supply wires from the controller to the hub & I need to figure them out, to reverse polarity & thus, be able to back the taddy up w/o "wheelchairing" it, with fenders - that's not really an option... and ofc I've no idea whatsoever what effect if any this might have w/the hall sensors etc... ahh, just another thing on the "to do" list lol & speaking of;
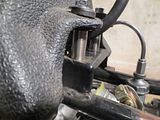
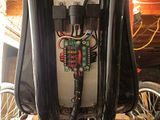
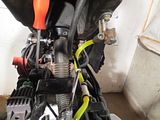
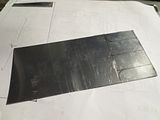
Still hammerin' away at the seemingly endless list of finishing details, there's a bunch more things finished that aren't pic worthy, or impossible to take a pic of... lil but important things like header wrap ties, assorted fastener replacement, more wiring ofc, fiddling about with the upper seat mount again, but the two things that took most of this weekend's free time are relatively minor, the first being nothing more than just trying to find the stupid crush washer/exhaust manifold gasket - I'd somewhat belatedly remembered I'd never installed it, there was nothing between the header & the exhaust manifold but I'd not seen it in at least a year and worse yet, it's not something I could just cob out of a pie tin. Fortunately, just before I gave up all hope and ordered another (but not before I thrashed my shop, office & room), I found the lil thing & threw it up in there, completing another system for good this time lol
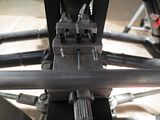
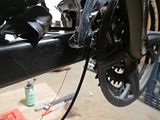
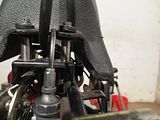
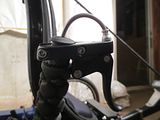
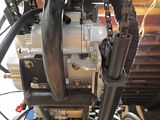
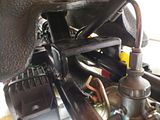
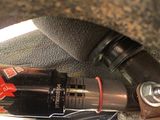
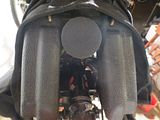
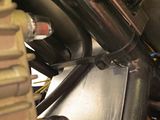
Of slightly more interest perhaps then fasteners, cable ties & gaskets is the air filter & remote intake - I'd some vague plans to either find an air filter small enough to fit in the space directly behind the carb, or the somewhat more grandiose thought of running it back & up through the tank halves, for easier general access & maintenance... the catch with both being ofc fitment, a filter to fit the carby let alone a hose to fit both...
Poking around at my local MC shop there was just not much to choose from, they seemed to come in three sizes, too big, huge & what the heck man, but the guy workin' there knows my project & went out of his way to find what he thought might work, diggin' through piles of new parts he came up with a 'Uni' clamp-on "Pod" filter I thought too big, but he pointed out the obvious, that it's squishy lol
So figurin' it'd do for test runs, it'd keep the fung out at least until I could find something better, I started trying to cram it into the lack of space that makes up this project. After much frustration & pinched fingers I got it mounted directly to the carb, but it was squashed & fugly & a nightmare to get to... which will not do as I need no maintenance nightmares, certainly not with something I designed myself as then it's all my fault.
So I dug around lookin' for a flexible hose, I've this "big" empty space between the tank halves, one of the only open & unused spaces on the project I figured better use it & the Uni filter plugged in there like it was made for it (minus the outer sock naturally). Gutting a dead four wheeler (generous name, it's a pile of half chopped up scrap lol) I pulled a hose that'd work & finagled it all together, making a new front tank mount while I was at it, the result far better than if I'd planned it that way heh
...& yea, the fuel tank tilts back for easy access just as the seat flips forward, again - too much stuff in too little space;
     |
|
|
|
|
02-18-2013, 07:58 AM
|
#68 (permalink)
|
|
Master EcoModder
Join Date: May 2011
Location: Syracuse, NY USA
Posts: 2,935
Thanks: 326
Thanked 1,315 Times in 968 Posts
|
Quote:
Originally Posted by BarelyAWake

there's three main power supply wires from the controller to the hub & I need to figure them out, to reverse polarity
|
There is a wiki with a spread sheet regarding how to systematically determine the the correct wire hook ups for an unknown motor and controller including how to select reverse.
.
Determining the Wiring for a Brushless Motor - Endless Sphere Wiki
.
And some simple but hefty rear drop out reinforcements that can be welded on or just bonded on with epoxy. These are slotted torque arms without the "arm" so the wheel still drops out for a tire change simply by loosening the axle as before.
.
Endless-sphere.com • View topic - Doc's ULTIMATE TORQUE ARMS fit most of the frame UPDATE 2013
.
There is also tons of good battery balancing info there as well.
.
Medium range is my 37 mile jaunt to work every day for the last 22 years. Which can be done all super highway at 70 mph and wide boulevard traffic on the CBR250R for $1.80, or 80% back country highways with city back streets on the PCX150 for $1.70 or Ebike for 1.6KWhr or $0.25. A 24s stack of Amp20 cells should just make it even if I have to dig with some peddling up the hills.
.
Long range is a 4-500 mile trip to Americade or AMA Vintage Days for camping every year. Endurance would be 1,700 miles in 2 days to visit family in Denver if I ever get the chance. |
|
|
|
|
The Following 2 Users Say Thank You to sendler For This Useful Post:
|
|
|
02-23-2013, 01:54 AM
|
#69 (permalink)
|
|
EcoModding Apprentice
Join Date: Aug 2011
Location: Maine
Posts: 105
Thanks: 8
Thanked 55 Times in 38 Posts
|
Thank you very much for the links sendler, the wiring wiki should help dispel some of the unfathomable mysteries within that hub heh - those drop out plates/torque arms are tempting... on the other hand should I need them it'd behoove me to fabricate my own as they'd fit my somewhat unusual drop outs better, heck if it comes to that I may cut them off entirely to make thicker & stronger drop outs, fortunately I've access to such basic machining tools, both TIG & MIG as well so I can avoid "bolt-on" accessories & just simplify things with a complete replacement, but I'll keep that link handy just in case
It seems I'd forgotten just how mean a four smoker can sound - this 49cc Lifan has defo got some attitude! After hooking everything up, cautiously pouring maybe a quarter gallon of fuel in the tank, then triple checking for leaks & overflow I hadta make this little vid so I wouldn't be out in my shop revving it all the time, giggling maniacally;
MVI_3141 - YouTube
...bear in mind it's not as loud as it seems, the cam being right behind it & indoors no less. I may still make an additional baffle tube for the exhaust (distance rides in comfort), but I may not need to after all, we'll see I s'pose.
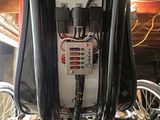
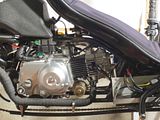
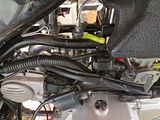
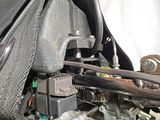
Aside from makin' vroomie sounds for real at last, I did attend to a bunch more little things as well (before the vroom noises, but who's counting) - again mostly boring, unpic-worthy things & yep you guessed it, more wiring. A few more sending units, temp & tach and cutting some heat guards - naturally none of it being nearly as simple as it could have been lol
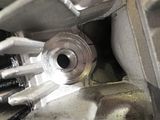
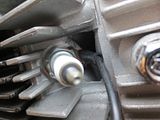
There's a coupla different ways to wire the tachometer, I chose the more "professional" route of adding a blade connector & attaching the pickup directly to the coil (rather than plug wire wrapping etc)... this had the interesting effect of pointing out one of my mistakes as in the process I dislodged a bullet connector within the harness & lost all spark. Way-too-long later, once I figured out where & what the problem was, I added 1/2" to that wire then went through & crimped every bullet connector to be sure - they'll not come apart as easily now, but that's the point I s'pose heh
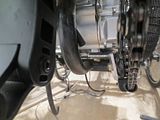
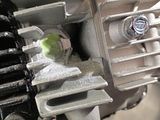
The temp sender turned out to have a surprise for me as well, as the area on the head around where the spark plug goes is stepped with machined ridges that prevent the sender from sitting flat, which ofc means the plug wouldn't seat. So out came the dremel again, it'd been a while... I think it missed me lol
As for the heat shields... they're not absolutely necessary, I've seen this same engine in kiddie four-wheelers with wiring just as close & no guards at all... but I figured better safe than sorry as I don't like the long-term effects of radiant heat on the wire's insulation, connectors & I don't wish to find out if the LED & other assorted relays can put up w/it, not to mention another layer between my sweaty back and the motor can't hurt *shrug* The plastic cable-tie is just a temporary measure to keep things in place during fitting BTW;
     |
|
|
|
|
02-25-2013, 03:20 AM
|
#70 (permalink)
|
|
EcoModding Apprentice
Join Date: Aug 2011
Location: Maine
Posts: 105
Thanks: 8
Thanked 55 Times in 38 Posts
|
This weekend started off with an uninspiring but needful shop cleaning... again /sigh
What with the milk crates & coffee cans filled with randomness everywhere, the tangled bits of wire, snipped cable tie ends, lil gobs of solder, piles of not-quite-what-I-needed parts & pieces, random schematic printouts, scattered tools and other whatsits, not to mention all the tracked in filth & debris from Mongo doing service as a winter beater - it really was at the point that getting to the taddy to work on it was as much work as working on it is >.<
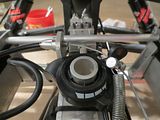
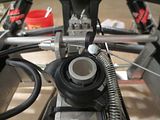
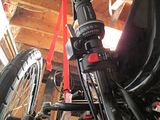
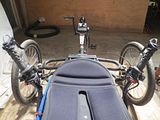
So, as a "reward" for my efforts I promised myself that once the shop floor was clean again, I could play a bit w/the taddy, instead of tinkering I'd block it up on the floor, run an exhaust tube outside & just sit on the thing, trying out all the controls "live" including engine(s) start & run as well as shifting both pedal power & jackshafted four stroke, then full acceleration while trying to keep everything synchronized (pedal/electric/ICE trigger throttles & twist shifters) - not just playing as it turned out as I learned that although these double fistfuls of control assemblies seem complicated, they are in fact not bad at all - they take a bit of getting used to & it'd be easier with some load on the engines/pedals (spins up far too fast w/o it), but all in all I'm quite pleased, the only faults I found during the simulated runs were that I need to swap the ICE start/run switch & the main lighting switch assembly as I can't reach the ICE throttle to give it a bit during a cold start & that ofc I need to adjust the indexing on the rear derailleur... minor points really.
Other'n that I'm very happy with the controls, I seemed to adapt to them quickly & other than the cold ICE start everything's easy to reach w/o letting go;
& here's another lil vid, some gear runs w/just the ICE and showing I haven't got the indexing quite right yet ofc lol;
motorized recumbent tadpole gear indexing & shifting demo - YouTube
...and if you're wondering why I'm not just doin' laps in the parking lot, there is this to contend with ATM heh;

Last edited by BarelyAWake; 02-25-2013 at 03:37 AM..
|
|
|
|
|