02-10-2011, 09:27 PM
|
#81 (permalink)
|
|
T-100 Road Warrior
Join Date: Apr 2008
Location: The Woodlands, TX
Posts: 1,921
Thanks: 3,502
Thanked 1,395 Times in 968 Posts
|
Quote:
Originally Posted by RobertSmalls

BZP, that's an interesting way to use the bottom of the template. Just make sure that people don't align the template like that and think they can draw inferences about the top of the car.
We should attach instructions to the template, because it's not intuitive how it should be used.
|
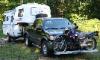
Well...there wasn't a real way to keep the rest of the template the same and still check the bottom side out. Here's what the new template looks like over my T-100 aero cap...unloaded. Obviously...it changes when the bed gits loaded down. 

|
|
|

|
 Today Today
|
|
|
|
 Other popular topics in this forum...
|
|
|
|
|
02-11-2011, 05:59 PM
|
#82 (permalink)
|
|
Master EcoModder
Join Date: Jan 2008
Location: Sanger,Texas,U.S.A.
Posts: 16,534
Thanks: 24,520
Thanked 7,438 Times in 4,818 Posts
|
intuitive
Quote:
Originally Posted by RobertSmalls
Incidentally, the two values are pretty similar for the Insight. GVWR makes sense. For designs for my own use, I'll use the greatest load I expect to see, whether that's above the GVWR or not.
BZP, that's an interesting way to use the bottom of the template. Just make sure that people don't align the template like that and think they can draw inferences about the top of the car.
We should attach instructions to the template, because it's not intuitive how it should be used.
|
Looks like I blew it! I tried very hard to make the template simple to use.There is only one criteria which must be respected in order to use it.
I'll go back as I can and review the text and see what I can do.I appreciate the feedback. |
|
|
|
|
02-11-2011, 06:11 PM
|
#83 (permalink)
|
|
Left Lane Ecodriver
Join Date: Aug 2008
Location: Buffalo, NY, USA
Posts: 2,257
Thanks: 79
Thanked 287 Times in 200 Posts
|
Phil,
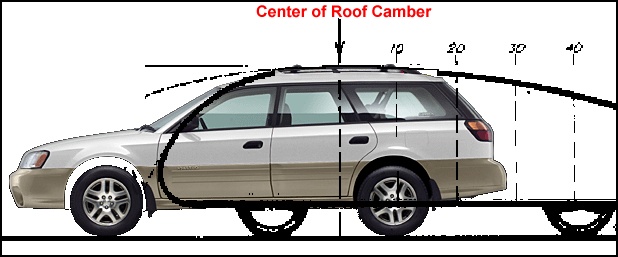
The part that's not intuitive (or at least that makes me cringe every time I see it done wrong) is how to align the template with the roof of the car:
1. Align the ground planes in the images of both the template and the car.
2. Scale the template until its height matches the car's.
3. Slide the template forward or backward to align the "0" on the template with the apex of the car's roof.
Maybe it would be over-engineering, but I'd type these instructions, in small letters, right in to the image of the template.
|
|
|
|
|
02-11-2011, 06:25 PM
|
#84 (permalink)
|
|
Master EcoModder
Join Date: Jan 2008
Location: Sanger,Texas,U.S.A.
Posts: 16,534
Thanks: 24,520
Thanked 7,438 Times in 4,818 Posts
|
right in
Quote:
Originally Posted by RobertSmalls
Phil,
The part that's not intuitive (or at least that makes me cringe every time I see it done wrong) is how to align the template with the roof of the car:
1. Align the ground planes in the images of both the template and the car.
2. Scale the template until its height matches the car's.
3. Slide the template forward or backward to align the "0" on the template with the apex of the car's roof.
Maybe it would be over-engineering, but I'd type these instructions, in small letters, right in to the image of the template.
|
Robert,that's a good recommendation and I'll do it asap.Thanks! It's difficult to get into others moccasins so the feedback really helps. |
|
|
|
|
02-11-2011, 06:35 PM
|
#85 (permalink)
|
|
Pokémoderator
Join Date: Dec 2007
Location: Southern California
Posts: 5,864
Thanks: 439
Thanked 532 Times in 358 Posts
|
RobertSmalls -
Quote:
Originally Posted by RobertSmalls
Phil,
The part that's not intuitive (or at least that makes me cringe every time I see it done wrong) is how to align the template with the roof of the car:
1. Align the ground planes in the images of both the template and the car.
2. Scale the template until its height matches the car's.
3. Slide the template forward or backward to align the "0" on the template with the apex of the car's roof.
Maybe it would be over-engineering, but I'd type these instructions, in small letters, right in to the image of the template.
|
But isn't the apex or center of camber effected by where the downslope of the overlay touches the rear roofline of the car? :
I have been thinking that this would make a great Ecomodder iPhone app. The user provides a good side view of the car, inputs the ground and the apex of the car, let the app auto-scale the overlay, and then slide the overlay from side-to-side with your fingers.
I doubt there'd be any $ to be made, but it would be good advertising for EM.
CarloSW2 |
|
|
|
|
02-11-2011, 07:27 PM
|
#86 (permalink)
|
|
Recreation Engineer
Join Date: Dec 2009
Location: Somewhere USA
Posts: 525
Thanks: 333
Thanked 138 Times in 103 Posts
|
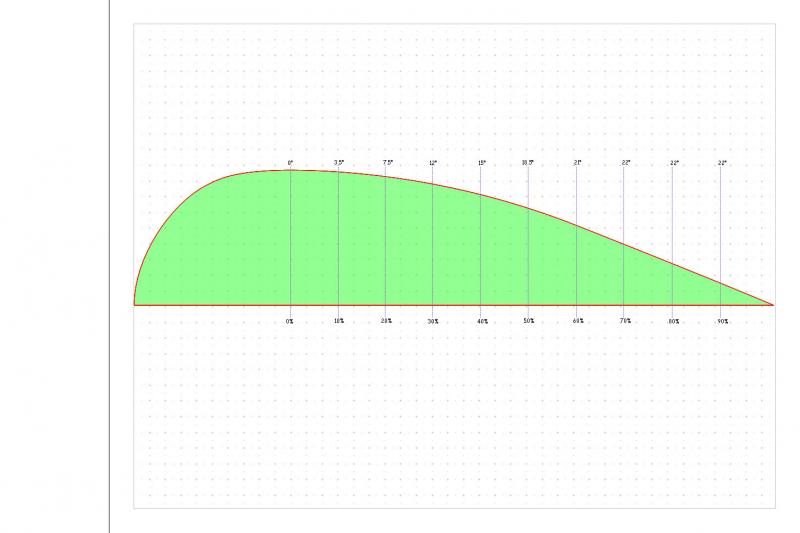
In the FWIW department, if I was trying to fit this template to a vehicle I might break it into 3 peices: one top and two bottoms. In addition to scaling height, users need to allow for wheelbase and overhang variations over a broad range of vehicles. The composite template looks cool, but the silhouette going to ground plane without wheels seems more mistake proof (poka-yoke to Toyota). Separate templates could be more useful. Members likely focus on one mod at a time anyway, so their visuals might be less confusing to others who miss dialog and take away wrong ideas from visuals. Food for thought?
|
|
|
|
|
02-11-2011, 07:28 PM
|
#87 (permalink)
|
|
Left Lane Ecodriver
Join Date: Aug 2008
Location: Buffalo, NY, USA
Posts: 2,257
Thanks: 79
Thanked 287 Times in 200 Posts
|
cfg,
You are correct.
3. Slide the template forward or backward as desired. Cut away everything above the template with a sawzall, and fill everything below the template.
KB, Poka-Yoke was exactly what I had in mind in #83. 
But for the lower half of the template:
1. Align the ground planes in the images of both the template and the car.
2. Scale the template until its wheelbase matches the car's. No part of the car may extend below the template when loaded to its max weight.
Yep, I write op sheets on the weekends too. ")
Last edited by RobertSmalls; 02-11-2011 at 07:34 PM..
|
|
|
|
|
02-11-2011, 07:42 PM
|
#88 (permalink)
|
|
Recreation Engineer
Join Date: Dec 2009
Location: Somewhere USA
Posts: 525
Thanks: 333
Thanked 138 Times in 103 Posts
|
Simpler
Quote:
Originally Posted by RobertSmalls
cfg,
You are correct.
3. Slide the template forward or backward as desired. Cut away everything above the template with a sawzall, and fill everything below the template.
KB, Poka-Yoke was exactly what I had in mind in #83.
But for the lower half of the template:
1. Align the ground planes in the images of both the template and the car.
2. Scale the template until its wheelbase matches the car's. No part of the car may extend below the template when loaded to its max weight.
Yep, I write op sheets on the weekends too. |
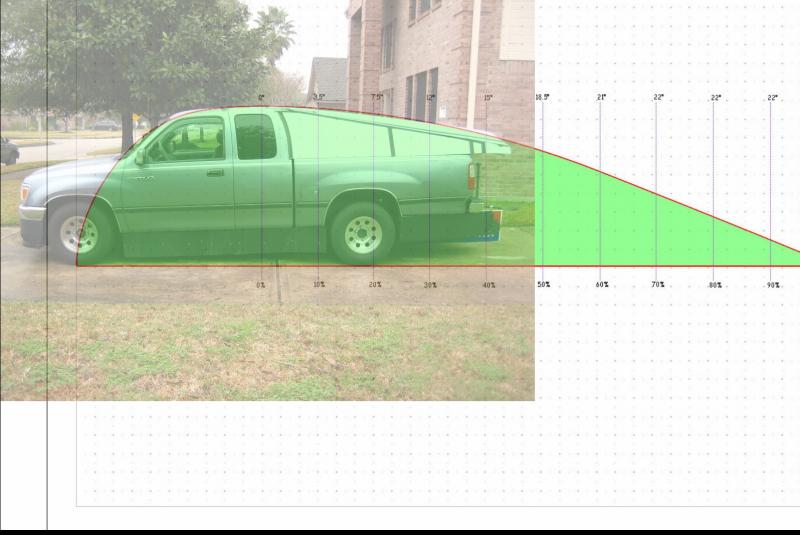
Robert, ref pix from this post.


|
|
|
|
|
02-11-2011, 09:27 PM
|
#89 (permalink)
|
|
Left Lane Ecodriver
Join Date: Aug 2008
Location: Buffalo, NY, USA
Posts: 2,257
Thanks: 79
Thanked 287 Times in 200 Posts
|
Bob,
People will still take the teardrop and try to align it with the back of their truck's cab and the top of the tailgate. Instructions, in words, are needed.
Besides, the latest drawing steers you in the right direction, with a buildable design that's worth emulating.

While I had photoshop open, I took some measurements. Assuming 24" tires, the car in the template is 56" tall, or 1.05 Insights. The distance from the front bumper to the 80% mark is 18', or 1.11 Accords. I like it. |
|
|
|
|
02-12-2011, 12:00 AM
|
#90 (permalink)
|
|
T-100 Road Warrior
Join Date: Apr 2008
Location: The Woodlands, TX
Posts: 1,921
Thanks: 3,502
Thanked 1,395 Times in 968 Posts
|

Those images were generated using Merge.
Now that I've traced the template and made it into a simple drawing object, it's much easier to scale and overlay the template using OpenOffice Draw. Since it's an object, I was able to make the filled in area transparent thus making it easier to align on top of yer piccie.
Picasa, OpenOffice, and Merge are all free programs.
Using Picasa, straighten the piccie (if needed). I use Picasa because it doesn't distort the pixels.
Using OpenOffice Draw, open the aero template file.
Change view to Master.
Import car piccie and size proportionately (using the shift key).
Close Master view.
Using yer mouse, align the drawing object and re-size proportionately (using the shift key and drag any side/corner).
Change zoom view (Ctrl+ mouse wheel) and (with Picasa running in the background) take a screen shot (Alt+Print Screen). **This has a much better resolution than using the OpenOffice Draw export function.
Using Picasa, Save a Copy will make a copy from the BMP file to a JPG and then you can upload it. 
Again...if you want the OpenOffice Draw file, send me a PM. It will have aerohead's piccie and both of my traces.
Here's the VW with the new overlay in a screen cap of OpenOffice Draw...

Saturn SW2 Wagon...

Here's my T-100 with the overlay using a screen cap of OpenOffice...

Last edited by BamZipPow; 02-12-2011 at 01:28 PM..
|
|
|
|
|