Go Back   EcoModder Forum > EcoModding > Aerodynamics
Register Now
 Register Now
 

Reply  Post New Thread
 
Submit Tools LinkBack Thread Tools
Old 09-25-2012, 05:45 PM   #11 (permalink)
Master EcoModder
 
freebeard's Avatar
 
Join Date: Aug 2012
Location: northwest of normal
Posts: 27,547
Thanks: 7,731
Thanked 8,546 Times in 7,035 Posts
For fit and finish, it's hard to beat aluminum [no pun].

The shot bag and hammers will produce compound curves, but then you'll want an English wheel and planishing hammer.

You can do a lot with simple curves and a bead roller. This is a different part of the car, but shows what can be done:
Building Bomber Seats

  Reply With Quote
The Following User Says Thank You to freebeard For This Useful Post:
christofoo (10-02-2012)
Alt Today
Popular topics

Other popular topics in this forum...

   
Old 10-01-2012, 01:00 AM   #12 (permalink)
Master EcoModder
 
christofoo's Avatar
 
Join Date: Mar 2012
Location: Salt Lake City
Posts: 292

00C - '00 Toyota Corolla
90 day: 43.54 mpg (US)
Thanks: 147
Thanked 190 Times in 73 Posts
This is what I got done. I ran out of time and didn't do the air dam. (Anyways I need to get a ramp at the end of my driveway.)

Sorry this doesn't have much to do with my thread topic. This is just the temporary fix until I decide what is optimal.

Before, pipe insulation lower grill block, no upper grill block:


After, clear acrylic upper grill block, coroplast partial lower grill block (you'd think the best location for air intake is center-bottom):

I ran out of black paint and was dismayed by how bad the dark gray coroplast looked. Surprisingly, my wife tolerated it, at least temporarily.

I hope this car will make an interesting build thread if I dig into it this winter.
Attached Thumbnails
Click image for larger version

Name:	2012-09-28 v0 blocks.jpg
Views:	94
Size:	64.5 KB
ID:	11578   Click image for larger version

Name:	2012-09-29 v1 blocks.jpg
Views:	96
Size:	65.2 KB
ID:	11579  

Last edited by christofoo; 10-01-2012 at 12:43 PM..
  Reply With Quote
Old 10-02-2012, 03:35 AM   #13 (permalink)
Master EcoModder
 
freebeard's Avatar
 
Join Date: Aug 2012
Location: northwest of normal
Posts: 27,547
Thanks: 7,731
Thanked 8,546 Times in 7,035 Posts
Well, since you're asking for advice...

With black you have gloss black, satin black and flat black. A lot of the mismatch you see isn't the color as much as the gloss. You might do better to make the bumper satin black instead of trying to get a gloss black on the coroplast.

To my eye, in the picture the top edge of the two pieces doesn't look straight and aligned. The pieces could have straight edges and not be held flat against the bumper. Use at least twice as many fasteners, with color-matched heads. And you could lap the pieces in behind the license plate and conceal that edge.

All that comes from too many years of wandering around in custom car shows. You need to get some buy-in from your wife. Have her paint the screwheads or something. Then she can take pride in it.
  Reply With Quote
Old 10-02-2012, 05:01 AM   #14 (permalink)
Smeghead
 
Join Date: Oct 2009
Location: South Central AK
Posts: 933

escort - '99 ford escort sport
90 day: 42.38 mpg (US)

scoobaru - '02 Subaru Forester s
90 day: 28.65 mpg (US)
Thanks: 32
Thanked 146 Times in 97 Posts
stack and glue some Blue board insulation with the general shape of what you are after, use a rasp to remove everything that does not look like your new aero shape. Bondo then paint.

Or ribs out of ply some stringers out of some thin wood. Look up the Stewarts process for aircraft covering.
__________________

Learn from the mistakes of others, that way when you mess up you can do so in new and interesting ways.

One mile of road will take you one mile, one mile of runway can take you around the world.
  Reply With Quote
Old 10-02-2012, 01:15 PM   #15 (permalink)
Master EcoModder
 
euromodder's Avatar
 
Join Date: Jul 2010
Location: Belgium
Posts: 4,683

The SCUD - '15 Fiat Scudo L2
Thanks: 178
Thanked 652 Times in 516 Posts
Mmmm. I like the top picture better - the one with the horizontal tubular blocking - as it's far less obvious.

I'd put a blocking plate or so in the cavity - not over it, as that is so obviously different.
Another option is to fill in the cavity, make it flush, and respray / wrap if it has to look really decent.
__________________
Strayed to the Dark Diesel Side

  Reply With Quote
Old 10-02-2012, 02:50 PM   #16 (permalink)
Master EcoModder
 
Join Date: Jun 2008
Location: NorCal
Posts: 451
Thanks: 1
Thanked 40 Times in 26 Posts
Chris, IMO what you need to look into are the time-tested methods used boatbuilders and racecar body builders.

I have been working with a vacuform vedor for about 12 years or so, Empire West in Graton CA. I have a fair amount of experience with what works, and what doesn't. Large parts like bumper facias or airdams are a non-starter I'm afraid. The materials that lend themselves to vacuforming are not very strong. The tooling cost for experimenting on something that large would be enormous.

Passing the 'wife fit-n-finish test' isn't going to happen with coroplast or riveting together a bunch of plastic or aluminum sheet. Not unless you use those materials to form an foundation, then mix up a bucket of body filler like Bondo, stand back an throw it at the foundation, let it cure, and file/grind/sand away everything that doesn't look like the finished product. Like doing sculpture.

On the other hand, there are plenty of good books that describe the basics of building airdams, fenders, etc from fiberglass, aluminum, steel, but it's not something one just 'dabbles' in. Developing those skills is like learning to be a cabinet maker... it takes hours and hours of actual doing it. Dealing with a little fiberglass is one thing, but living with it for 18 months on a long-term project is another.

There is a great book by Ron Fornier on one-off automotive metal shaping, and some youtube videos you should look at:

20 years ago, 'body kits' for the lower half of cars were all the rage. Fiberglass parts, or sometimes higher-end moulded urethane, were purchased by the DIYer, bonded or riveted on, filled and smoothed, painted to match. I see no reason the same manufacturing techniques that that industry used couldn't also be employed to manufacture boat tails, front bumper facias, and side skirts aimed at better fuel economy, instead of the now out of fashion 'boy-racer/boulevard cruiser' styling.
  Reply With Quote
The Following 2 Users Say Thank You to metromizer For This Useful Post:
christofoo (10-02-2012), MetroMPG (10-02-2012)
Old 10-02-2012, 03:33 PM   #17 (permalink)
Master EcoModder
 
christofoo's Avatar
 
Join Date: Mar 2012
Location: Salt Lake City
Posts: 292

00C - '00 Toyota Corolla
90 day: 43.54 mpg (US)
Thanks: 147
Thanked 190 Times in 73 Posts
metromizer replied while I was typing this - totally on point. I was surprised that you say that these materials will not work for large scale items. I believe AndrewJ used 1/8" ABS for his bumper / air dam, although I realize ABS is not the best for vacuum forming compound curves, in this case he formed a simple curve. I would think that a mold could be made for 1/8" PETG with ribs to strengthen the flat sections, or something else could be used to provide some framing. I could even imagine vacuum forming a second piece with crossed ribs as a framing component. Vacuum equipment had indeed scared me away from considering vacuum forming for a first attempt, but I think if it were a viable approach for short-runs I could make my own 3'x6' vacuum table and overhead oven. It doesn't seem like it would be all that expensive or difficult (40 hours maybe?), and I thought it would be feasible, but you could easily convince me otherwise. Certainly I know it isn't a tried-and-true approach for bodywork or aircraft, so I can imagine being wrong.

ref: http://ecomodder.com/forum/showthrea...amics-312.html

=================================================

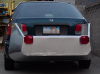
euromodder, I do agree that the "before" is better looking but I seriously doubt the aero is as good. My hypermiling was on local TV earlier this summer, it included a frontal shot of the car and no one even noticed the mod. But all front-end work should be aimed at moving air over or around rather than through the cooling and under the car (as well as smoothing sharp transitions if needed), so the upper grill block should be first priority, since the drag difference in the two paths available here is largest (straight over the car vs through the cooling and then under the car). In addition, you can't tell from the picture, but the pipe insulation didn't fully close the gap and there were several messy openings. I was hoping for a few % improvement with the pipe insulation, but the change never blipped my mileage logs (not proof admittedly). The "after" looks significantly more aerodynamically sound to me, although aesthetically messy on the lower grill in this incarnation (and I still see an aero mess for the airflow toward the radiator that could be improved).

Freebeard, your comments echo my own thoughts. Wait till you see v2 (although this car is out of town with my wife and kids, so you will indeed have to wait).

bestclimb, I saw that foam method, it's good, but I've got some other things I want to try first. Er... maybe...

I'm going to be doing the Corolla v2 front-end next. The Corolla issues are not the same, specific enough I'm going to start a build thread for it and show designs before I start, assuming I decide it's actually going to move forward this week.

================================================== =

Back on the primary topic (although these are all related issues): metromizer mostly had the type of reply I was looking for weighing practicality of various methods. Don't get me wrong, all the other comments have been helpful and have improved my own ability to judge, but anyone who can offer experienced judgement, i.e. fiberglass vs aluminum sheet forming or vs thermoplastic methods, is golden.

Certainly context matters; individual mods favor specific methods. I.e. I'm (tempted) to conclude that: Vacuum forming on short-run production is the highest "total value" method for wheel skirts. (I'm also imagining more crude thermoforming might be possible for proof-of-concept.) But that doesn't apply to tail, bumper or louvered Kamm fabrication. I should end up with a matrix of optimal methods for each mod.

It's about time for me to just jump in and try stuff. At some point that has to be done. I'm not afraid to make my own missteps, and report back when I have results.

Last edited by christofoo; 10-02-2012 at 04:11 PM.. Reason: needed a smiley
  Reply With Quote
Old 10-02-2012, 06:53 PM   #18 (permalink)
Master EcoModder
 
aerohead's Avatar
 
Join Date: Jan 2008
Location: Sanger,Texas,U.S.A.
Posts: 15,852
Thanks: 23,907
Thanked 7,199 Times in 4,637 Posts
Thermoplastics

I was given a tour at a local thermoplastics company decades ago.
Electric ovens heated pre-treated ABS which was attached to a framework.
When the plastic began to yield,it was rapidly moved over a vacuum table which held hollow,perforated wood tooling.
The frame was quick-clamped and full vacuum applied immediately until the ABS was fully seated on the tooling.
The frame was then de-clamped and lifted off the tooling,then ABS separated from it's frame,and sent to a router station where it was trimmed to final form.
The expense was in the oven,and tooling which was fabricated by a master tool-maker off site.
I did locate a manufacturer in the Dallas area who was willing to rent his facility for off-hours production.
Only limited -volume production would justify the costs.

__________________
Photobucket album: http://s1271.photobucket.com/albums/jj622/aerohead2/
  Reply With Quote
The Following User Says Thank You to aerohead For This Useful Post:
christofoo (10-02-2012)
Reply  Post New Thread


Thread Tools


Powered by vBulletin® Version 3.8.11
Copyright ©2000 - 2024, vBulletin Solutions Inc.
Content Relevant URLs by vBSEO 3.5.2
All content copyright EcoModder.com