Go Back   EcoModder Forum > EcoModding > Aerodynamics
Register Now
 Register Now
 

Reply  Post New Thread
 
Submit Tools LinkBack Thread Tools
Old 04-16-2009, 12:29 AM   #1 (permalink)
EcoModding Apprentice
 
QuickLTD's Avatar
 
Join Date: Apr 2009
Location: Tampa, Florida
Posts: 188

Flying Brick - '96 Pontiac Bonneville SE
90 day: 23.57 mpg (US)
Thanks: 1
Thanked 15 Times in 8 Posts
Send a message via AIM to QuickLTD Send a message via Yahoo to QuickLTD
Aero Modding 96 Bonneville

Ok here goes..
I will address these more as I plan and complete each. Taking into account Florida heat.
1, Driving light relocation
2, Partial/Full lower grille block
3, Front under tray/pan
4, Upper grille block
5, Rear under tray/pan

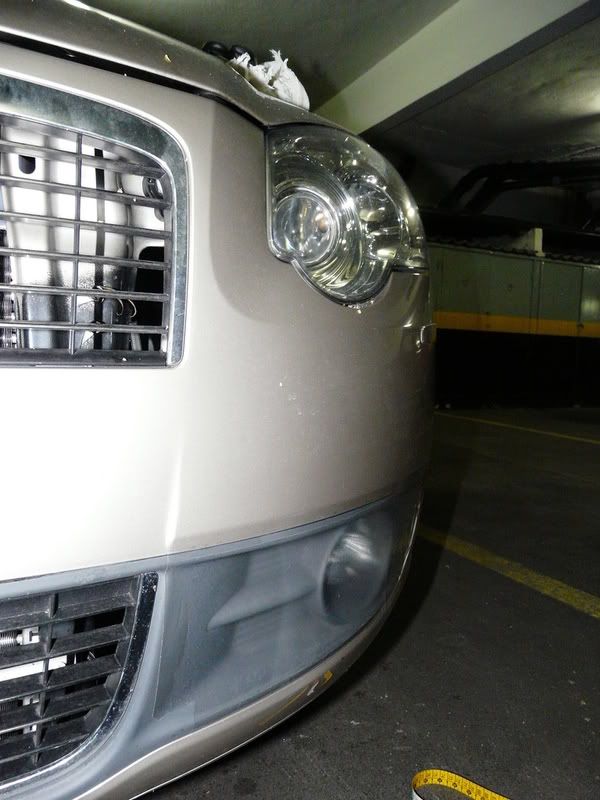
This one is not mine (same color). It was a good picture to give you an idea of what I am working with.


First up: Relocating my driving lights. I dont expect to see any gains from this one it is more for my head and a place to start. I didnt know how I was going to approach this since even the factory delete plugs mount in the same location as the lights. What I discovered was that there is a channel cut in the bumper cover along the top of the driving light mouting pocket. I can make a simple extension and "push" the lights up an inch and a half to the edge of the mounting pocket. This will make it flush on the outside, bottom and much closer on the inside. Then I will close off the remaining channel. I really want to keep the lights so this might be a best of both worlds solution.


I should have the finished pictures by this weekend

Glad to be here and finally get started!
Dean


Last edited by QuickLTD; 04-16-2009 at 12:45 AM..
  Reply With Quote
Alt Today
Popular topics

Other popular topics in this forum...

   
Old 04-16-2009, 12:40 AM   #2 (permalink)
Moderate your Moderation.
 
Join Date: Nov 2008
Location: Troy, Pa.
Posts: 8,919

Pasta - '96 Volkswagen Passat TDi
90 day: 45.22 mpg (US)
Thanks: 1,369
Thanked 430 Times in 353 Posts
Welcome to EM!

You could simply cut out some plexi and put it in front of the DL lenses... new cars are doing this already, as I saw yesterday on a 2009 Ford something or other. Simpler solution that doesn't really require modding.

Usually, if you try to explain to someone else how you're going to do your mod, then have them explain it back to you, and what comes back to you is exactly what you said, although in different words, then the mod is about as easy as it gets.

But if you try explaining to someone that they would have to make a bracket, drill holes, move/realign something, etc.. then it becomes "work" which many are not willing to do.

If you want to find out about the gains of the DL cover before changing anything, just use tape!
__________________
"żʞɐǝɹɟ ɐ ǝɹ,noʎ uǝɥʍ 'ʇı ʇ,usı 'ʎlǝuol s,ʇı"

  Reply With Quote
Old 04-16-2009, 02:09 AM   #3 (permalink)
Pokémoderator
 
cfg83's Avatar
 
Join Date: Dec 2007
Location: Southern California
Posts: 5,864

1999 Saturn SW2 - '99 Saturn SW2 Wagon
Team Saturn
90 day: 40.49 mpg (US)
Thanks: 439
Thanked 530 Times in 356 Posts
QuickLTD -

This sounds like the plexi-cover-mod that Christ was suggesting :

http://ecomodder.com/forum/showthrea...i-do-7729.html


CarloSW2
__________________

What's your EPA MPG? Go Here and find out!
American Solar Energy Society
  Reply With Quote
Old 04-16-2009, 08:21 AM   #4 (permalink)
EcoModding Apprentice
 
QuickLTD's Avatar
 
Join Date: Apr 2009
Location: Tampa, Florida
Posts: 188

Flying Brick - '96 Pontiac Bonneville SE
90 day: 23.57 mpg (US)
Thanks: 1
Thanked 15 Times in 8 Posts
Send a message via AIM to QuickLTD Send a message via Yahoo to QuickLTD
I thought of that but the I have two issues. The edges of the mounting pockets are very thin in comparison to the vehicle that cfg83 posted and the lights are not sealed from the back against the bumper cover. Dirt would accumulate quickly in my specific case.. Florida is like a giant sandbar. I do like how that turned out though.
Dean
  Reply With Quote
Old 04-16-2009, 04:17 PM   #5 (permalink)
Driving the TurboWeasel
 
Join Date: Mar 2009
Location: Steuben County, NY
Posts: 459
Thanks: 14
Thanked 18 Times in 17 Posts
Your car is identical to mine mechanically. I'll be doing a front tray soon.

Also, try sealing the gaping hood gaps in the front with weatherstripping. It's a few more square feet blocked off that way. And a cleaner engine bay!
__________________
2012 Chevrolet Cruze Eco 6MT
  Reply With Quote
Old 04-16-2009, 09:10 PM   #6 (permalink)
EcoModding Apprentice
 
QuickLTD's Avatar
 
Join Date: Apr 2009
Location: Tampa, Florida
Posts: 188

Flying Brick - '96 Pontiac Bonneville SE
90 day: 23.57 mpg (US)
Thanks: 1
Thanked 15 Times in 8 Posts
Send a message via AIM to QuickLTD Send a message via Yahoo to QuickLTD
The Bonnevilles came from the factory with one from the radiator support to the front crossmember and an underbody lip to direct air into the radiator. My car had neither by the time I got it So I intend on improving the design.. I all glad all those mounting holes are predrilled LOL
  Reply With Quote
Old 04-17-2009, 09:58 PM   #7 (permalink)
EcoModding Apprentice
 
QuickLTD's Avatar
 
Join Date: Apr 2009
Location: Tampa, Florida
Posts: 188

Flying Brick - '96 Pontiac Bonneville SE
90 day: 23.57 mpg (US)
Thanks: 1
Thanked 15 Times in 8 Posts
Send a message via AIM to QuickLTD Send a message via Yahoo to QuickLTD
Ok, I decided to do my partial rear pan while I am under the car this weekend. What I want to do it use the mufflers heat sheild as the front mount and the extra holes in the bumpercover for the rear. I intend to extend the length of the front mounting points an inch and a half so I dont have that backwards angle as seen in the second picture. The muffler does not drop below the body work it is just the camera angle. Also, That pocket you see back there goes up almost a foot so im thinking a lot of turbulence.


P.S. A big thank you to my Ex-wife who just opened her own real estate brokerage and donated her old aluminum signs (12) to the cause.. Sturdy and lightweight.
  Reply With Quote
Old 04-18-2009, 12:35 AM   #8 (permalink)
Driving the TurboWeasel
 
Join Date: Mar 2009
Location: Steuben County, NY
Posts: 459
Thanks: 14
Thanked 18 Times in 17 Posts
Your car is a lot cleaner underneath than mine. The whole area back there is filthy and rusty. The only nearby source is from the rear wheels, so that lends credence to your turbulence theory.
__________________
2012 Chevrolet Cruze Eco 6MT
  Reply With Quote
Old 04-18-2009, 02:55 AM   #9 (permalink)
EcoModding Apprentice
 
QuickLTD's Avatar
 
Join Date: Apr 2009
Location: Tampa, Florida
Posts: 188

Flying Brick - '96 Pontiac Bonneville SE
90 day: 23.57 mpg (US)
Thanks: 1
Thanked 15 Times in 8 Posts
Send a message via AIM to QuickLTD Send a message via Yahoo to QuickLTD
Yeah I am lucky to have a car that has never left Florida.. BTW I found out the 92 Bonneville has a CD of 36. 1992 was the first year for this body style. They changed the front bumper cover and grille on the SE model a few times before they settled on the one I have. The 92 had a flatter bumper cover and a more upright grill compared to point on mine. I am sure they did it for looks but a pointer beak cant hurt...

  Reply With Quote
Old 04-19-2009, 11:46 PM   #10 (permalink)
EcoModding Apprentice
 
QuickLTD's Avatar
 
Join Date: Apr 2009
Location: Tampa, Florida
Posts: 188

Flying Brick - '96 Pontiac Bonneville SE
90 day: 23.57 mpg (US)
Thanks: 1
Thanked 15 Times in 8 Posts
Send a message via AIM to QuickLTD Send a message via Yahoo to QuickLTD
All done. This was really easy to do. The mount that attaches to the bumper has a lip and I set the new depth with that lip. Drill two holes per side and thats it. It's subtle change but the pictures don't do this justice. The lower bumper looks more aggressive and is more pleasing to the eye in my opinion. The only thing I need to do is center them a bit more. The holes are not round out towards the front. Sorry about the dirty car but I dont want to risk a $500 fine for washing it on the wrong day. We are in a big draught here. I didnt get to the tray I unexpectedly had to play mechanic on a friends car today. I will get it done this week.

Before and after


Was 3.5 inches onthe big side, now 2 inches and flush around the outside. I used sticky backed foam weather stripping around the lenses and some of the aluminum I have to fill in the channel over the lights.


I decided If I knew someone who was good at cutting aluminum sheet I would cover the light pockets permanently after looking around down there yesterday.

  Reply With Quote
Reply  Post New Thread


Similar Threads
Thread Thread Starter Forum Replies Last Post
Easy Aero Fix? (Modding a pickup?) DifferentPointofView Aerodynamics 53 04-13-2012 05:46 PM
Chevy Cobalt (E85) Bonneville speed record (aero mods) MetroMPG Aerodynamics 16 06-15-2009 03:50 PM
Aero modding a 4x4 CDNTacoma Aerodynamics 5 04-09-2009 10:13 PM
Kit for aero modding Prius Cd Aerodynamics 10 03-17-2008 05:59 PM
New user intro and pick-up aero modding Blackbird Aerodynamics 4 01-28-2008 12:06 PM


Powered by vBulletin® Version 3.8.11
Copyright ©2000 - 2024, vBulletin Solutions Inc.
Content Relevant URLs by vBSEO 3.5.2
All content copyright EcoModder.com