Go Back   EcoModder Forum > EcoModding > Aerodynamics
Register Now
 Register Now
 

Reply  Post New Thread
 
Submit Tools LinkBack Thread Tools
Old 09-12-2012, 01:06 AM   #21 (permalink)
Aero Deshi
 
ChazInMT's Avatar
 
Join Date: Jan 2010
Location: Vero Beach, FL
Posts: 1,065

MagMetalCivic - '04 Honda Civic Sedan EX
Last 3: 34.25 mpg (US)
Thanks: 430
Thanked 668 Times in 357 Posts
Can you make it a "45°" thing and then sand it?

Thusly?


  Reply With Quote
Alt Today
Popular topics

Other popular topics in this forum...

   
Old 09-12-2012, 01:11 AM   #22 (permalink)
Master EcoModder
 
freebeard's Avatar
 
Join Date: Aug 2012
Location: northwest of normal
Posts: 27,698
Thanks: 7,776
Thanked 8,585 Times in 7,069 Posts
Assume 1" material; then if the inner radius is 3" the outer radius is 4", difference in circumference is ~6 1/4". Around a 90° corner the difference is ~1 1/2", so 1.5 divided by the width of each cut gives you the number of cuts, spread across 1/4 of the inner circumference — 4 1/2".

...approximately.

Last edited by freebeard; 09-12-2012 at 01:15 AM.. Reason: for completness
  Reply With Quote
Old 09-12-2012, 11:30 AM   #23 (permalink)
EcoModding Apprentice
 
turbothrush's Avatar
 
Join Date: Nov 2008
Location: Canada
Posts: 133

2 x wrecked vx - '92 Honda Civic Vx
Team Honda
90 day: 62 mpg (US)
Thanks: 119
Thanked 54 Times in 30 Posts
a8 . Great job so far. Have you considered skinning your shell lengthwise. That way if you had access to a tablesaw you cut your kerfs with that. At any rate to get a 3" radius you will need to cut deep enough so that only about 1/4 " of foam remains and for the spacing use freebeards formula. I found that the foam has a slight natural bend to it so you need to use that to your advantage.

The idea in theory is have the spacing so that after bending to the 3" radius the kerfs will will be closed on the inside. I found that in reality that if after bending you have kerf openings they can be filled with epoxy/micro mix and the fiberglass cloth can be layed directly into that mix . On the nose of my camper which is 2" foam bent to a 2 3/4' radius I used this method and it worked great.

If you decide to cut the kerfs on a tablesaw you should make a simple throatplate splitter.I will post a pic later of one I made. Hope this helps
  Reply With Quote
Old 09-12-2012, 12:19 PM   #24 (permalink)
B.O. Zen
 
Join Date: Feb 2009
Location: Folsom, CA
Posts: 208

Pickup - '99 Toyota Tacoma 2wd, Regular Cab, Short Bed
90 day: 34.62 mpg (US)
Thanks: 130
Thanked 140 Times in 59 Posts
Ok, cool... I'll have to approx double the number of cuts I'm making, and go a little deeper to get to the 1/4" depth.

I thought about going lengthwise, but decided it would probably be easier to go horizontally and blocksand along the length. We'll see... I don't have a tablesaw, so don't worry about the throatplate splitter.

New stuff tonight, probably!
__________________
  Reply With Quote
Old 09-13-2012, 02:28 AM   #25 (permalink)
B.O. Zen
 
Join Date: Feb 2009
Location: Folsom, CA
Posts: 208

Pickup - '99 Toyota Tacoma 2wd, Regular Cab, Short Bed
90 day: 34.62 mpg (US)
Thanks: 130
Thanked 140 Times in 59 Posts
Well, I had a couple more tries at getting the bend in the foam to work, but kept breaking it... might be cause I couldn't really cut clean grooves w/ the dremel. :/ Anyway, the new strategy will be laying the panels lengthwise, letting them overlap at the corners, and just sanding in the curve like Chaz suggests.

No new pics today, but I put the rest of the bracing in between each x-section for the shell and should be ready to cut & screw on the top and side panels using the alternate method in the next couple of days.
__________________
  Reply With Quote
Old 09-14-2012, 10:32 AM   #26 (permalink)
EcoModding Apprentice
 
turbothrush's Avatar
 
Join Date: Nov 2008
Location: Canada
Posts: 133

2 x wrecked vx - '92 Honda Civic Vx
Team Honda
90 day: 62 mpg (US)
Thanks: 119
Thanked 54 Times in 30 Posts
a8 Well I guess a tablesaw is better for the job of cutting the kerfs. If your going with Chazmt's method (and you may already know this) you can just cut the foam with a saw and then sneak up to your line with homemade sled like this and get a perfect angle. This is one for 90 degrees but with a simple spacer you can make any angle you want.Click image for larger version

Name:	Picture 151.jpg
Views:	1066
Size:	29.4 KB
ID:	11498

Just in case someone is interested in what can be done if they have a tablesaw and at the risk of going too far on your thread I thought I would post a few more pics.

1" foam around a coffee mug ( 1 3/4" radius )
Click image for larger version

Name:	Picture 150.jpg
Views:	1287
Size:	27.0 KB
ID:	11499
Click image for larger version

Name:	Picture 152.jpg
Views:	1241
Size:	32.4 KB
ID:	11500

Throat plate splitter
Click image for larger version

Name:	Picture 153.jpg
Views:	1153
Size:	28.3 KB
ID:	11501

Last edited by turbothrush; 09-14-2012 at 10:55 AM.. Reason: more pics
  Reply With Quote
The Following 3 Users Say Thank You to turbothrush For This Useful Post:
a8ksh4 (09-20-2012), ChazInMT (09-14-2012), HHOTDI (12-13-2012)
Old 09-14-2012, 12:47 PM   #27 (permalink)
B.O. Zen
 
Join Date: Feb 2009
Location: Folsom, CA
Posts: 208

Pickup - '99 Toyota Tacoma 2wd, Regular Cab, Short Bed
90 day: 34.62 mpg (US)
Thanks: 130
Thanked 140 Times in 59 Posts
I cut the side panels for the shell last night. Started by tracing the top profile onto a side piece. Then offset the line down 1" so that I could lay the top panel over top of the side panels.


Copied to other side:


And then glued a second strip of foam along the top of each side panel so that I could sand far enough into them to get the curve I want. The pic isn't so good, but you can see the glue coming out along the curved top of each panel:


I'm going to be out of town all weekend, so next update, attaching side panels and top, will be next Monday. Happy Friday!
__________________
  Reply With Quote
The Following 3 Users Say Thank You to a8ksh4 For This Useful Post:
ChazInMT (09-14-2012), slowmover (09-14-2012), turbothrush (09-14-2012)
Old 09-15-2012, 02:15 PM   #28 (permalink)
EcoModding Apprentice
 
turbothrush's Avatar
 
Join Date: Nov 2008
Location: Canada
Posts: 133

2 x wrecked vx - '92 Honda Civic Vx
Team Honda
90 day: 62 mpg (US)
Thanks: 119
Thanked 54 Times in 30 Posts
Excellent. So essentially you will have 2" or so of foam but just where you are going to sand your radius right? Also it looks to me from the pics that you screwed the pieces together until the glue set. Is this the case?
Thanks for posting

Last edited by turbothrush; 09-15-2012 at 04:25 PM..
  Reply With Quote
Old 09-15-2012, 03:44 PM   #29 (permalink)
Master EcoModder
 
freebeard's Avatar
 
Join Date: Aug 2012
Location: northwest of normal
Posts: 27,698
Thanks: 7,776
Thanked 8,585 Times in 7,069 Posts
With 2" of material you can only get ~1" radius without weakening the edge. But you could cut blocking out of you scrap and glue it on the inside and get whatever radius is required.
  Reply With Quote
Old 09-19-2012, 03:39 AM   #30 (permalink)
B.O. Zen
 
Join Date: Feb 2009
Location: Folsom, CA
Posts: 208

Pickup - '99 Toyota Tacoma 2wd, Regular Cab, Short Bed
90 day: 34.62 mpg (US)
Thanks: 130
Thanked 140 Times in 59 Posts
@ turbothrush - Yah, I cut two inch wide strips of foam to layer and back up the corner. I would lay glue in zig-zags where pieces of foam overlap and then screw them together to dry...


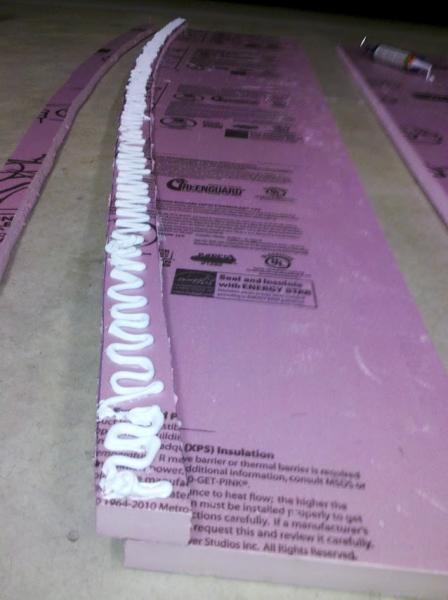
This glue works pretty good... When joining the pieces, it's difficult to use enough screws to get a good seal, but if I go along w/ my hands and squeeze the glue out along the entire edge of both pieces, they don't separate afterwards. The glue joints also sand well once two pieces of foam board are joined together... When I sand across a glue joint, it tends to ball up before the pieces separate, so the joint stays steady and solid.

Per freebeard, I may not have made the corner foam thick enough... I glued an extra layer of foam on yesterday to add some thicknessm, but I might still need to add some spray foam to the inside before I lay the inside layer of fiberglass. We'll see how rigid it feels after doing the outside layer.

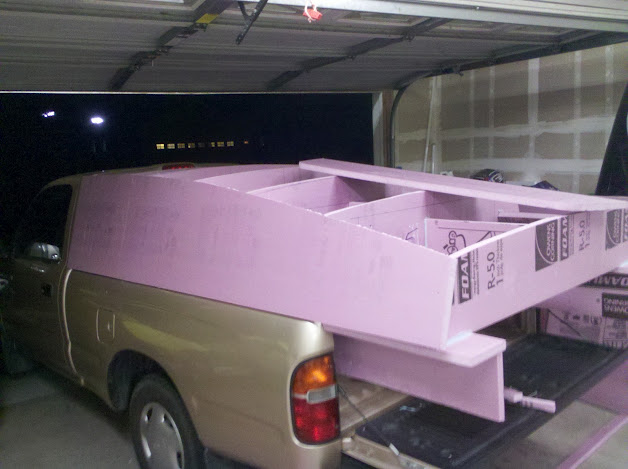
Sooo... good progress today! I cut notches in the x-sections to let me lay the sides in tight:


Can see where the corners are going to need to be radiused from the cab to back:


Both sides affixed w/ some screws:


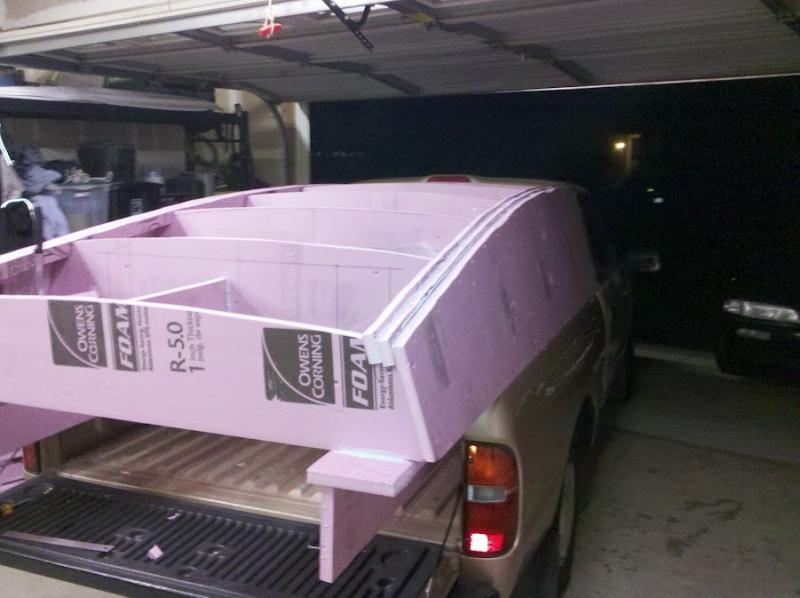
Sanding flush so that I can glue on a top layer of foam that will be cut through at the corners to make a smooth transition from top to sides and from cab on back... (LOL if this looks like crap when I go at it w/ sandpaper later this week...)


Both sides sanded flush w/ the top profile so I can glue top panels on and then radius the top->side corners... tomorrow or later this week!


the top surface is spherical... so I'm wondering how many pieces I'll need to get the foam to lay smoothly... Ideally, I'd use two pieces, joined along the middle from cab to tailgate. I think the foam has enough flex to do this. Soon we will know!!!

__________________

Last edited by a8ksh4; 09-19-2012 at 03:57 AM..
  Reply With Quote
The Following 6 Users Say Thank You to a8ksh4 For This Useful Post:
BamZipPow (09-02-2013), ChazInMT (09-19-2012), HHOTDI (12-13-2012), RandomFact314 (04-09-2013), slowmover (09-21-2012), turbothrush (09-19-2012)
Reply  Post New Thread


Powered by vBulletin® Version 3.8.11
Copyright ©2000 - 2024, vBulletin Solutions Inc.
Content Relevant URLs by vBSEO 3.5.2
All content copyright EcoModder.com