07-10-2011, 07:17 PM
|
#41 (permalink)
|
|
OCD Master EcoModder
Join Date: Dec 2007
Location: Eastern CT, USA
Posts: 1,936
Thanks: 431
Thanked 396 Times in 264 Posts
|
Lessons Learned
OK.
Have now drilled all 16 lug nuts, and have epoxied a nut into one of them. I claim to have learned a few things along the way.
1)
When your buddy who has a drill press starts inventing jigs to guarantee hitting the center punch in dead center on the lug nut cap, don't. Unless maybe he's a skilled machinist. In my case, I did much better than his jigs and schemes, by carefully eyeballing for the center of the lug nut cap, and giving it one good whack with a small-diameter punch. Follow up with one or two more hits to make a good impression. To find the spot: Eyeball across two opposite points of the hex corners, and then across another two opposite points. And of course just look down at it to verify you do have the center.
2)
If using a drill press, align nut under bit so that when bit comes down and makes contact, it does not [need to] bend to follow where your punch is. If the bit angles over, let it back up and move the nut to where the bit will be.
What I'm trying to say is, assuming you have the punch mark in the right spot, you ALSO need to line up the nut under bit so the bit comes right down into the punch mark. Due to the nut's domed top, the bit will wander off if you don't drop it right into the punch dip point.
3) EPOXYING THE INNER NUT
I had a couple false starts on this today. Finally got one nut in there well.
My idea to load epoxy onto the surface of nut where it will meet the inner cap failed miserably. I figured it would mash against the inside of the cap and set, but it all just came apart. I only waited about 25 minutes before pulling the screw out, but I think the problem was not enough epoxy and not in the right places, and too much anti-seize all over everything.
Here's what did work for me:
Definitely give all threads a coating of anti-seize, otherwise you'll likely not get it apart.
I positioned the nut where it belongs, held in place by a screw going through the cap, and a nut on the outside, hand tightened. Then "load" epoxy into the cap area via the main lug nut opening - the threads. The screw has to go fully through the nut and extend towards the lug nut's large opening. That's so the screw leaves a clear path through the hardened epoxy.
I put the loaded-up lug nut between two boards (1x3's), held against two flats of the lug nut by a clamp. Cap side down so the drippy epoxy stayed where I want it.
And, I waited a whole hour to make sure the epoxy had time to set, before I tried to get the screw out. It was good. This epoxy reaches full strength in 24 hours so I'm not rushing to put stress on the epoxy.
At this rate, it will take me about two weeks to do all 16 lug nuts. I hope to do them in sets of four now that I think I've figured out how to do it.
__________________
Coast long and prosper.
Driving '00 Honda Insight, acquired Feb 2016.


Last edited by brucepick; 04-08-2012 at 07:51 AM..
|
|
|

|
|
The Following 2 Users Say Thank You to brucepick For This Useful Post:
|
|
 Today Today
|
|
|
|
 Other popular topics in this forum...
|
|
|
|
|
07-10-2011, 07:37 PM
|
#42 (permalink)
|
|
Pokémoderator
Join Date: Dec 2007
Location: Southern California
Posts: 5,864
Thanks: 439
Thanked 532 Times in 358 Posts
|
brucepick -
Quote:
Originally Posted by brucepick

Nice drawing, cfg83!
What are those black plastic lug nut things? A Saturn brand item, or GM, or ?? I likely will stay with my (already) drilled out HX lug nuts but I think the plastic ones might be useful for some EcoModders.
|
Those came with the Saturn. They are for holding the center cap on the alloy wheels. They are also used with steel wheels to hold the wheel covers on. You can find matching thread but non-black ones in auto parts stores like PepBoys. In the auto parts stores they are usually grey, not black.
And yes, stay with what works for you car.
CarloSW2 |
|
|
|
|
07-11-2011, 11:08 AM
|
#43 (permalink)
|
|
Deadly Efficient
Join Date: Jun 2008
Location: Goshen, Indiana
Posts: 1,234
Thanks: 134
Thanked 176 Times in 91 Posts
|
brucepick
Your experience sounds very close to what I went through. Except, I used JB-Weld instead of epoxy, and I stuck the curing lugs into holes punched in a cardboard box.
Getting the nuts glued into the lugnuts is definitely the most fiddly part of the project. Drilling the pizza pans and mounting them goes a LOT quicker!
__________________
-Terry
|
|
|
|
|
07-12-2011, 10:46 PM
|
#44 (permalink)
|
|
OCD Master EcoModder
Join Date: Dec 2007
Location: Eastern CT, USA
Posts: 1,936
Thanks: 431
Thanked 396 Times in 264 Posts
|
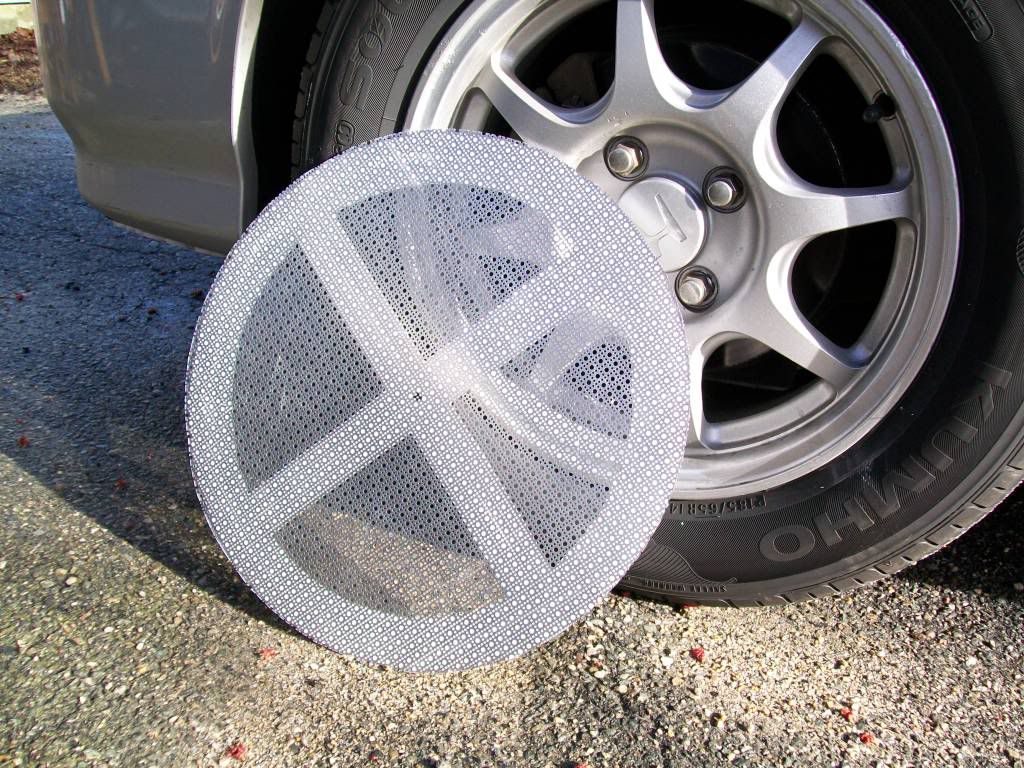
I think it's time I show a pic of my wheel covers.
Outside is perforated aluminum from Home Depot.
Back side is coroplast.
Glued together with silicone sealant glue.
I still don't have even one of them on the car yet. Got one small nut installed in a lug nut cap so far.
__________________
Coast long and prosper.
Driving '00 Honda Insight, acquired Feb 2016.
Last edited by brucepick; 08-07-2011 at 07:09 PM..
|
|
|
|
|
08-07-2011, 07:21 PM
|
#45 (permalink)
|
|
OCD Master EcoModder
Join Date: Dec 2007
Location: Eastern CT, USA
Posts: 1,936
Thanks: 431
Thanked 396 Times in 264 Posts
|
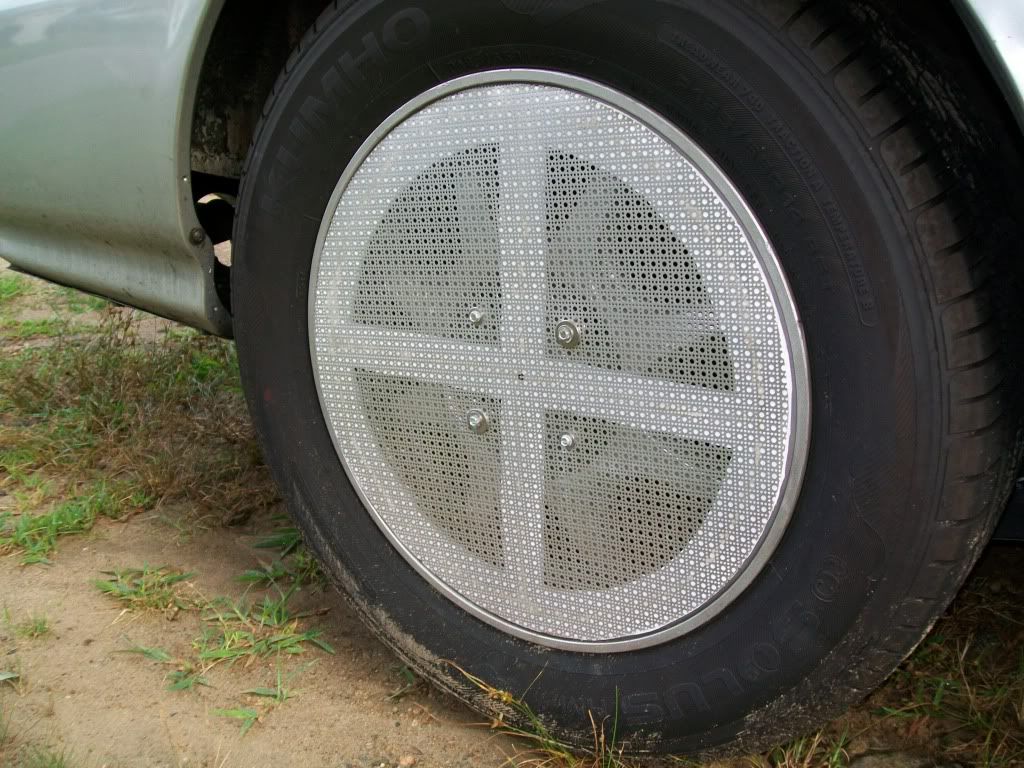
Finally, I have them installed. Here's a pic of one.
The "X" shaped backing is coroplast. Glued to the perforated aluminum with 100% silicone glue. Unfortunately the discs aren't perfectly flat so they bow away from the wheel rim a bit on two or three wheels. Not too bad though, certainly nowhere near the maximum width of the tire cross section.
All disc attachment screws have outer washers, but two of them shown here have oversize washers due to one of the holes in aluminum became much too large. It needed an oversize washer, and to keep the wheel balanced I added a matching washer 180º opposite.
Screw type: I estimate that pan-head phillips screws would be most more aerodynamic than hex heads. However phillips screws would require pushing in on the screwdriver which could potentially pop the epoxy'd nut off the inside of the lug nut. So I went with hex head screws (#8x32). That way there's no pressure on the screw head, just the turning action.
All mounting hardware is stainless except for the screws. Could not find them in stainless. I expect to find that before too long and likely will replace them with stainless.
__________________
Coast long and prosper.
Driving '00 Honda Insight, acquired Feb 2016.
|
|
|
|
|
The Following User Says Thank You to brucepick For This Useful Post:
|
|
|
08-07-2011, 08:33 PM
|
#46 (permalink)
|
|
Lurking Around
Join Date: Jun 2008
Location: Nova Scotia, Canada
Posts: 39
Thanks: 13
Thanked 1 Time in 1 Post
|
Wow I took the time to read through this entire thread as I have been gone from Ecomodder for a while, and there is a lot of great information in here. Thanks to those who have posted pics to show what they are doing, it helped me out a lot.
Now I have to get mine done, after the costly out of province inspection of course!
__________________

|
|
|
|
|
08-12-2011, 08:13 PM
|
#47 (permalink)
|
|
OCD Master EcoModder
Join Date: Dec 2007
Location: Eastern CT, USA
Posts: 1,936
Thanks: 431
Thanked 396 Times in 264 Posts
|
Added note on the perforated aluminum wheel covers -
They weren't perfectly flat, and in some places would "float" away from the rim. I fixed that with double stick foam "tape". That stuff is very durable, is also used to stick molding and other doodads on the outside of vehicles. I'm still able to pull the wheel covers away to check and top off tire pressure - it just requires some new foam afterwards.
Of course if you try this build, it's best to laminate the coroplast + aluminum as flat as you possibly can. But foam tape isn't bad stuff to work with.
__________________
Coast long and prosper.
Driving '00 Honda Insight, acquired Feb 2016.
|
|
|
|
|
09-04-2011, 01:50 PM
|
#48 (permalink)
|
|
Ultimate Fail
Join Date: Feb 2008
Location: Austin,Texas
Posts: 3,585
Thanks: 2,872
Thanked 1,121 Times in 679 Posts
|
So can I just drill straight into the nut using a self tapping screw and nothing else ?
Using some long self tapping screws, it seems like all you would need would be a spacer in the back of the dish and a couple of washers around the top of the screw.
It's too simple that way though of course right ?
|
|
|
|
|
09-04-2011, 02:00 PM
|
#49 (permalink)
|
|
Deadly Efficient
Join Date: Jun 2008
Location: Goshen, Indiana
Posts: 1,234
Thanks: 134
Thanked 176 Times in 91 Posts
|
The shell around the lugnut is quite thin. I don't think there's enough "meat" for a self-tapping screw to bite into and hold.
__________________
-Terry
|
|
|
|
|
The Following User Says Thank You to Tango Charlie For This Useful Post:
|
|
|
04-06-2012, 05:32 PM
|
#50 (permalink)
|
|
Master EcoModder
Join Date: Oct 2009
Location: Midwest
Posts: 337
Thanks: 4
Thanked 37 Times in 21 Posts
|
Quote:
Originally Posted by cfg83
brucepick -
I think it depends on the back side of the lug nut cap. If the nut can lie flat and flush on the back side of the lug nut cap, then I think you are ok.
I used a no-epoxy design in mine where the T-Nut spikes just "grab" the inside of the plastic lug nut :
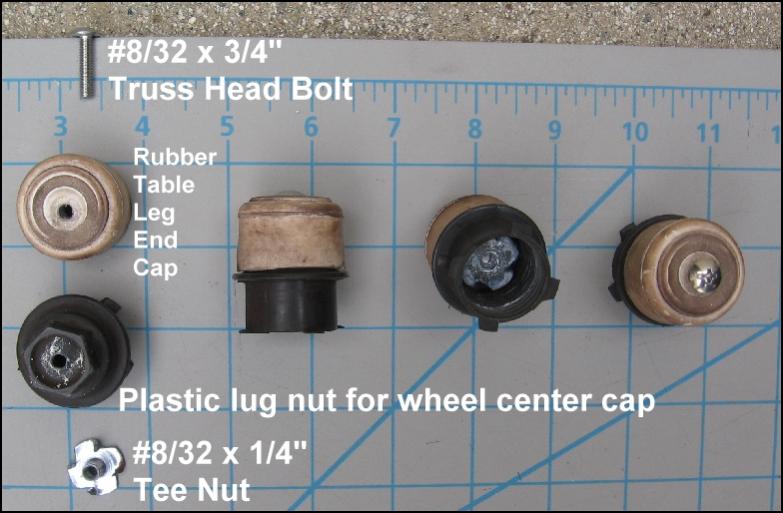
Here is a cross-section view :
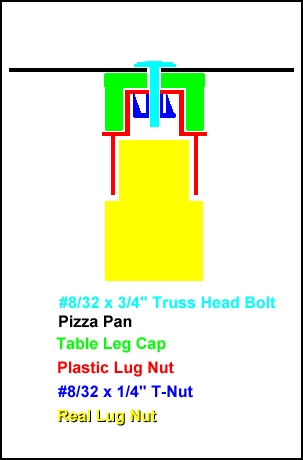
However, this requires that I screw the bolt onto the plastic lug nut *before* I take the lug nut off. Otherwise the T-Nut will fall out when I take off the plastic lug nut.
CarloSW2 |
How well do those plastic lug nut caps hold onto the lug nuts? Also when you take them off, do you unscrew each of the 4 screws and then take the plastic caps off, or just pry the tray and plastic caps off as one unit?
And finally, where the heck can I buy some?
Last edited by steffen707; 04-07-2012 at 10:10 AM..
|
|
|
|
|