 01-18-2011, 11:32 PM
|
#31 (permalink)
|
|
NightKnight
Join Date: Dec 2008
Location: Placerville, CA
Posts: 1,596
Thanks: 317
Thanked 316 Times in 188 Posts
|
Quote:
Originally Posted by Tango Charlie

What size nuts and bolts did you use? I can't fit 1/4-20 nuts into my lug nuts, and I'm a little hesitant to go smaller. How many miles have you got on your discs now?
|
Hi TC -
I'm using #8-32 nuts, which just fit inside the lug nuts.
I have over 4,500 miles on my first cover (I attached one to my left front wheel first and drove around with it for a while just to make sure it'd actually stay on). I was initially worried about the robustness as well, but after 4+ months and 4,500+ miles (on freeways as well as back roads with potholes), even the first I attached is still solid. I think it helps that the disc itself is plastic (relatively lightweight) and that the edges of the disc fit just inside the edge of the wheel (so that any vertical impact is absorbed both by by the edge of the wheel as well as the nuts & bolts). The pix in my first post show how the disc fits inside the wheel edge.
__________________

|
|
|

|
|
The Following User Says Thank You to NachtRitter For This Useful Post:
|
|
 Today Today
|
|
|
|
 Other popular topics in this forum...
|
|
|
|
 01-18-2011, 11:36 PM
|
#32 (permalink)
|
|
NightKnight
Join Date: Dec 2008
Location: Placerville, CA
Posts: 1,596
Thanks: 317
Thanked 316 Times in 188 Posts
|
Quote:
Originally Posted by Cd

This could certainly be in the running for ' project of the month '.
What a clever way to cover wheels while keeping the original wheels intact !
I have a question regarding using oversized pizza pans.
My wheels are the pimpin' 13 " variety. It's hard to find that size. If I go with a 15" pan, it would make contact with the sides of the tires.
How much space should there be for tire flex ?
|
Mine are 13" as well... the 14" serving tray I got works almost perfectly. I just sanded the edge (since I got a plastic tray, I can do that) a little to have the tray fit just inside the edge of the wheel rim. As well, with the plastic tray, you won't get rust.
__________________

|
|
|

|
 01-18-2011, 11:43 PM
|
#33 (permalink)
|
|
NightKnight
Join Date: Dec 2008
Location: Placerville, CA
Posts: 1,596
Thanks: 317
Thanked 316 Times in 188 Posts
|
Quote:
Originally Posted by Niner

I tried following this method and ran into some problems...
1) Don't skip the anti-seize on the smaller bolt you use to hold the nut straight. The epoxy may bond better to the threads than the bolt did to the head, and then you end up with an impossible-to-remove bolt.
|
Absolutely true!! 
Quote:
Originally Posted by Niner

2) Don't skip putting the lug nuts back onto anti-seized bolts - otherwise if you get epoxy on the threads, you now have to scrape that away.
|
Ya, I wasn't quite as careful with this either... fortunately I was able to use a breaker bar to crank the lug nut on & off the wheel studs of the car until the epoxy was cleared.
Quote:
Originally Posted by Niner

3) The metal caps can actually be popped off the lug nuts, which makes positioning and epoxying the nuts far, far easier. Just put a smaller bolt into the lug nut, put the nut on your vice, and tap it out.
|
Cool! Hadn't tried that. Did you epoxy the caps back on then?
Quote:
Originally Posted by Niner

4) If using Walmart pizza pans, give them a good coat of paint - after two weeks of snow and salt, my covers are showing an odd pattern of rust.
|
One of the reasons I went with a plastic tray instead...
Quote:
Originally Posted by Niner

However! Between some epoxy and some poor welding attempts, I did get all 4 wheels of my xA covered with 16" pizza pans (on 15" wheels). The bolts give them a big advantage - you can use the exact same setup between two sets of rims (if they're the same size).
|
Awesome! Post a link to some pix; I'd love to see the final result!
__________________

|
|
|

|
 01-21-2011, 03:53 PM
|
#34 (permalink)
|
|
EcoModding Lurker
Join Date: Sep 2010
Location: Ovid MI
Posts: 45
Thanks: 2
Thanked 8 Times in 5 Posts
|
Quote:
Originally Posted by NachtRitter

Cool! Hadn't tried that. Did you epoxy the caps back on then?
|
No, I just tapped them back into place with a ball peen hammer. It's a pretty tight fit and I can't imagine them being pulled out by the bolts.
I am planning on pulling off the covers and getting them primed and painted this weekend, so I'll try to get some pics of the work. You'll have to excuse the weld quality, though... I really should have gotten some lighter wire.
__________________

|
|
|

|
 02-06-2011, 10:29 AM
|
#35 (permalink)
|
|
halos.com
Join Date: Oct 2009
Location: Oklahoma City, OK
Posts: 528
Thanks: 385
Thanked 94 Times in 80 Posts
|
Quote:
Originally Posted by Cd

I've got a dumb question, but I'll ask anyways to get the answer from those of you with more intelligence.
How does drilling the lug nuts affect the strength of the nut ?
I would worry that it may split over time.
I'm very impressed with the simplicity of it all, but just had to ask.
|
Cd, I'll try a reply, as my truck has lug bolts, not caps. As I recall, when you drill a bolt, it still retains about 90% of its strength...with less weight?! This is part of my thoughts for my wheels. My truck has 20" alloys, and I have only found 20" pizza pans. I've tried some 20.5" corroplast, but only used adhesive backed velcro to hold them on my wheels. I keep losing the left front wheel cover. They (2 so far) are somewhere between here and Oklahoma City.  |
|
|

|
 04-28-2011, 04:44 PM
|
#36 (permalink)
|
|
EcoModding Lurker
Join Date: Apr 2011
Location: Augusta, GA
Posts: 3
Thanks: 0
Thanked 0 Times in 0 Posts
|
Love the way you did this! good job.
|
|
|

|
 07-02-2011, 06:16 PM
|
#37 (permalink)
|
|
OCD Master EcoModder
Join Date: Dec 2007
Location: Eastern CT, USA
Posts: 1,936
Thanks: 431
Thanked 396 Times in 264 Posts
|
Suggestion please. I'm doing this for my HX rims.
I have the holes drilled in the lug nut caps. The flat wheel covers are ready for drilling for the 8x32 screws.
I'm considering skipping the washer that would go between the 8x32 nut and the back side of the lug nut cap. I figure that way I can load epoxy onto the nut where it will meet the lug nut cap; the nut should end up embedded in a glob of epoxy. Any stress load of the nut against the cap would be spread across the surface of the cap by the hardened epoxy - correct? And plenty epoxy should end up surrounding the small nut's hex.
If I put a washer in between the small nut and the lug nut cap I'm not sure where the epoxy will set up a good grip on the small nut. What do you think?
The flat wheel covers are ready for mounting. Made from perforated sheet aluminum with coroplast backing glued on. The coroplast stiffener backing is cut out to leave "spokes" so some air can get through the aluminum perforations.
__________________
Coast long and prosper.
Driving '00 Honda Insight, acquired Feb 2016.


Last edited by brucepick; 07-02-2011 at 09:12 PM..
|
|
|

|
 07-04-2011, 12:40 PM
|
#38 (permalink)
|
|
halos.com
Join Date: Oct 2009
Location: Oklahoma City, OK
Posts: 528
Thanks: 385
Thanked 94 Times in 80 Posts
|
Bruce, I think you could skip the washers if there is enough surface area from the nut to spread the load across the inside of the cap. However, if they are plastic then I think you'd want to use the washers to increase the surface area. This will reduce the pressure peak(s) from torque on the bolt/nut.
For using the epoxy, if you use the washers and are worried about grip, I suggest you use a little bit of toilet paper on the epoxy and surfaces--as a composite type glue job. Get the pieces into position, spread the epoxy where you want it, then dab the tp into place. Make sure it gets wet w/epoxy. I have used this to repair a few things...such as my cellphone body.
|
|
|

|
 07-04-2011, 01:16 PM
|
#39 (permalink)
|
|
Pokémoderator
Join Date: Dec 2007
Location: Southern California
Posts: 5,864
Thanks: 439
Thanked 532 Times in 358 Posts
|
brucepick -
Quote:
Originally Posted by brucepick

Suggestion please. I'm doing this for my HX rims.
I have the holes drilled in the lug nut caps. The flat wheel covers are ready for drilling for the 8x32 screws.
I'm considering skipping the washer that would go between the 8x32 nut and the back side of the lug nut cap. I figure that way I can load epoxy onto the nut where it will meet the lug nut cap; the nut should end up embedded in a glob of epoxy. Any stress load of the nut against the cap would be spread across the surface of the cap by the hardened epoxy - correct? And plenty epoxy should end up surrounding the small nut's hex.
If I put a washer in between the small nut and the lug nut cap I'm not sure where the epoxy will set up a good grip on the small nut. What do you think?
The flat wheel covers are ready for mounting. Made from perforated sheet aluminum with coroplast backing glued on. The coroplast stiffener backing is cut out to leave "spokes" so some air can get through the aluminum perforations.
|
I think it depends on the back side of the lug nut cap. If the nut can lie flat and flush on the back side of the lug nut cap, then I think you are ok.
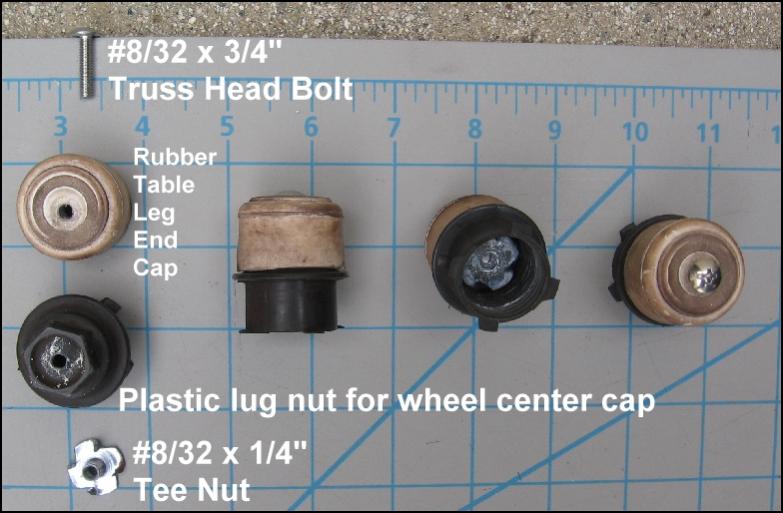
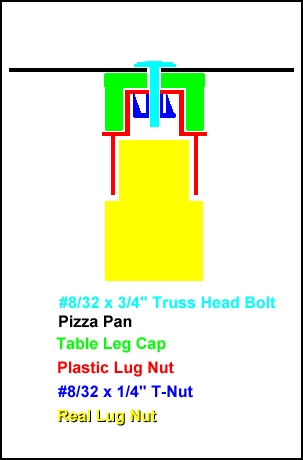
I used a no-epoxy design in mine where the T-Nut spikes just "grab" the inside of the plastic lug nut :

Here is a cross-section view :

However, this requires that I screw the bolt onto the plastic lug nut *before* I take the lug nut off. Otherwise the T-Nut will fall out when I take off the plastic lug nut.
CarloSW2 |
|
|

|
 07-04-2011, 03:41 PM
|
#40 (permalink)
|
|
OCD Master EcoModder
Join Date: Dec 2007
Location: Eastern CT, USA
Posts: 1,936
Thanks: 431
Thanked 396 Times in 264 Posts
|
Nice drawing, cfg83!
What are those black plastic lug nut things? A Saturn brand item, or GM, or ?? I likely will stay with my (already) drilled out HX lug nuts but I think the plastic ones might be useful for some EcoModders.
Quote:
Originally Posted by cfg83

brucepick -
I think it depends on the back side of the lug nut cap. If the nut can lie flat and flush on the back side of the lug nut cap, then I think you are ok.
I used a no-epoxy design in mine where the T-Nut spikes just "grab" the inside of the plastic lug nut :
...
However, this requires that I screw the bolt onto the plastic lug nut *before* I take the lug nut off. Otherwise the T-Nut will fall out when I take off the plastic lug nut.
CarloSW2
|
__________________
Coast long and prosper.
Driving '00 Honda Insight, acquired Feb 2016.


|
|
|

|
|