Go Back   EcoModder Forum > EcoModding > Aerodynamics
Register Now
 Register Now
 

Reply  Post New Thread
 
Submit Tools LinkBack Thread Tools
Old 06-24-2013, 03:06 AM   #51 (permalink)
Aero Deshi
 
ChazInMT's Avatar
 
Join Date: Jan 2010
Location: Vero Beach, FL
Posts: 1,065

MagMetalCivic - '04 Honda Civic Sedan EX
Last 3: 34.25 mpg (US)
Thanks: 430
Thanked 668 Times in 357 Posts
I was just looking at your pics again trying to figure out what you meant about the 3rd rib thing, and I believe you should leave it as is, you want the edge to soften as you go and I think going too soft too soon would maybe make the sides too fast. What you have looks great.

How ever.....it could be the camera angle, but, it looks like the 1st rib is a bit above your cab making it stick up a bit. If this is the case, it is not good, if anything, you want the 1st rib to be a bit below your cab. Being above will trip the air up just as it is wanting to start going down the back of your cap, this will not be a smooth thing to have happen and I think it would have less than optimal results on the function of your cap. You definitely want the first rib even or slightly below the back of your cab everywhere. The fix looks easy, just cut out what you need to and add a straight coupling to lower it. If the cab bows up from the sides to the middle, you may want to bend the top of the first rib to match the shape.

  Reply With Quote
Alt Today
Popular topics

Other popular topics in this forum...

   
Old 06-24-2013, 10:26 AM   #52 (permalink)
Master EcoModder
 
Join Date: May 2010
Location: Illinois
Posts: 475

Oh Deer - '03 Ford Ranger XL
90 day: 33.97 mpg (US)
Thanks: 55
Thanked 91 Times in 72 Posts
Thanks Chaz. The 1st rib is sitting a bit high but it is because it is hung up on the 3rd brake light. I was in a hurry getting it from the test bed to the daily driver and didn't "fine tune" anything. The screws from the center coupling are hitting the top of the brake light and holding it up a bit. A little rotation on the coupling and it should fit. If not then I'll have to make a little bend. The cab does taper (dome?) a bit and maybe trying to match that will help the brake light situation also. Once I get the shape right then I will have to try and "skin" it temporarily in cardboard to try my hand at tuft testing. I'll have to search for a thread on here for the proper technique to do this. Placement of tufts, better materials to use, speed, how to video, and of course how the heck to post the results.

I may leave the 3rd rib like it is for now. I see your point about tapering too soon. a gradual taper would probably be better. The cab is at about 72° from vertical and I tapered the ribs 72°(to match the cab)/69°/66°/63°/60°(at tailgate) from front to back.
  Reply With Quote
Old 06-25-2013, 09:30 AM   #53 (permalink)
MPGuino Supporter
 
t vago's Avatar
 
Join Date: Oct 2010
Location: Hungary
Posts: 1,807

iNXS - '10 Opel Zafira 111 Anniversary

Suzi - '02 Suzuki Swift GL
Thanks: 828
Thanked 708 Times in 456 Posts


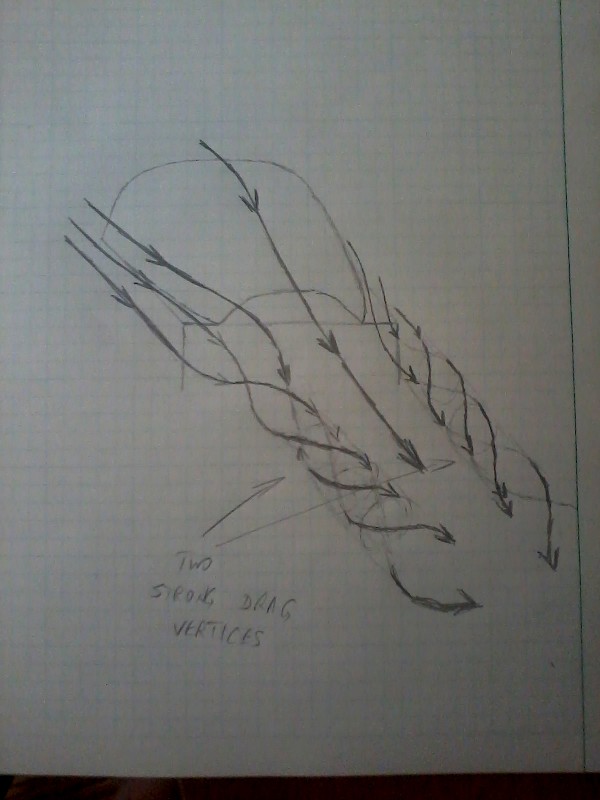
That's really close to an ideal aerocap shape, I think. Drag vortex generation ought to be minimal.

Edit: This is what I mean. I saw this phenomenon occur with my version 2 aerocap. This is why it'd be better to blend in the rear of the aerocap with the rear of the truck bed and go for a more rounded rear, instead of doing any tapering.


How are you going to secure your aerocap to your bed? I was trying to design something along the lines of a hood hinge, before my version 3 aerocap design process got sidetracked.


The idea was to have the top edge of the cap clear the truck cab, before the hinge allowed the cap to move forward as it opened up, just like a hood.

Last edited by t vago; 06-25-2013 at 10:00 AM.. Reason: Added diagram
  Reply With Quote
The Following 2 Users Say Thank You to t vago For This Useful Post:
aerohead (06-29-2013), ChazInMT (06-25-2013)
Old 06-25-2013, 10:21 AM   #54 (permalink)
Master EcoModder
 
Join Date: May 2010
Location: Illinois
Posts: 475

Oh Deer - '03 Ford Ranger XL
90 day: 33.97 mpg (US)
Thanks: 55
Thanked 91 Times in 72 Posts
I don't use the bed space very much anymore so I don't need as much access to it. I keep a Rubbermaid truck box in there that sits inside the bed rather than on the side rails.

I'm trying to fashion a sliding mechanism that allows me to slide the cap rerward about 30". That's short of half the bed length, but will allow me access to the truck box. I keep an extra change of clothes,jumper cables, rain gear,and a small toolbox with basic hand tools and replacement headlights and other miscellaneous lamps and fuses. It's gotten me out of trouble and tickets more than once. If I need anything from the rear portion of the bed I can just stretch and reach in from the back.

The "slider" works in my head and so far on paper but we'll have to see how it works in reality.
  Reply With Quote
Old 06-25-2013, 01:49 PM   #55 (permalink)
Master EcoModder
 
aardvarcus's Avatar
 
Join Date: Apr 2012
Location: Evensville, TN
Posts: 676

Deep Blue - '94 GMC Suburban K2500 SLE
90 day: 23.75 mpg (US)

Griffin (T4R) - '99 Toyota 4Runner SR5
90 day: 25.43 mpg (US)
Thanks: 237
Thanked 580 Times in 322 Posts
You may consider using roller ball bearing drawer slides used for cabinet drawers, for example “Grass 650mm Full Extension Ball Bearing Drawer Slides” are available for $15 a pair, and they open 25+ inches. Two sets of those on the bed rails would be a sturdy attachment, and then just provide a catch to keep it shut while driving. A padlock type of clasp to hold it closed may be a good idea, it would keep the curious minds away.
  Reply With Quote
Old 06-28-2013, 09:22 AM   #56 (permalink)
Master EcoModder
 
Join Date: May 2010
Location: Illinois
Posts: 475

Oh Deer - '03 Ford Ranger XL
90 day: 33.97 mpg (US)
Thanks: 55
Thanked 91 Times in 72 Posts
The slider seems to work like I had envisioned in mock up. Now I have to make it a more permanent installation. Once I get that done I'll post some pics of it. It's pretty "neanderthal" but I was going for something simple and using materials I am familiar with.

T-vago...when I get around to tufting this thing is there a way that I could show the areas you show in your drawings? Maybe a long streamer (6 foot or so) in each rear corner?
  Reply With Quote
Old 06-28-2013, 10:00 AM   #57 (permalink)
MPGuino Supporter
 
t vago's Avatar
 
Join Date: Oct 2010
Location: Hungary
Posts: 1,807

iNXS - '10 Opel Zafira 111 Anniversary

Suzi - '02 Suzuki Swift GL
Thanks: 828
Thanked 708 Times in 456 Posts
Quote:
Originally Posted by hat_man View Post
The slider seems to work like I had envisioned in mock up. Now I have to make it a more permanent installation. Once I get that done I'll post some pics of it. It's pretty "neanderthal" but I was going for something simple and using materials I am familiar with.

T-vago...when I get around to tufting this thing is there a way that I could show the areas you show in your drawings? Maybe a long streamer (6 foot or so) in each rear corner?
You could use rain-soaked highways to show the presence of any vortices. That's what I had done. They show up really well at 60 MPH or so.
  Reply With Quote
Old 06-28-2013, 03:41 PM   #58 (permalink)
Master EcoModder
 
Join Date: May 2010
Location: Illinois
Posts: 475

Oh Deer - '03 Ford Ranger XL
90 day: 33.97 mpg (US)
Thanks: 55
Thanked 91 Times in 72 Posts
I was going to try and temporarily skin it with cardboard so I could make changes if I needed to. Don't know how that will hold up at 60mph in the rain. LoL

__________________
If nice guys finish last, are you willing to pay the price to finish first ?


  Reply With Quote
Reply  Post New Thread


Powered by vBulletin® Version 3.8.11
Copyright ©2000 - 2024, vBulletin Solutions Inc.
Content Relevant URLs by vBSEO 3.5.2
All content copyright EcoModder.com