Edit: I wouldn't have posted this if I had analyzed my data properly in the first place. ...which is publication bias. How much much does the likelihood of posting increase as the improvement magnitude increases? Food for thought...
At least next time I'll know how to do it right.
If anyone wants to look at my coast-down spreadsheet, it's an OpenOffice file in the attached zip file (EM server doesn't allow .ods files). I think it's pretty groovy.
============================
I actually decided once that I would not mod my 89 Corolla, considering how little I drive it (like 1,000-1,500 miles a year). Somehow I got amnesia and started modding it before I remembered my own injunction. Apparently no car is safe when my family is out of town.
")
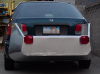
This is somewhat Aerocivic inspired - most EM front-end mods consist of air dams and grill blocks, but I felt like the 89 had a particularly poor nose shape to start with (newer models are generally better than this). So I thought it would be good to lower the point of stagnation, smooth the transition to the hood, and block some of the air going to the grill at the same time.
My other design criteria here is to keep it brutally simple. This is an old car, I might not have it 3 years from now, and the mods just aren't going to see a ton of use (well, probably - maybe I'll love it more as it gets better).
Step 1: Bend some metal strips into a frame

Step 2: Pop-rivet coroplast onto frame. I note that steel was not a good choice. Aluminum drills much faster and also won't rust. But I had a bunch of steel strips lying around for some forgotten project.
Step 3: Paint, drill and tap for screws to attach license plate (required in Utah).
Step 4: Zip tie onto car.


This car has a carburetor (no FE instrumentation), so I did a coast-down from 40 to 25 MPH. Since I already had the bullnose on the car when I started, I decided to shake things up and do B-A-B testing, that way I'd only have to remove and reinstall the mod once. I used my GPS (smartphone) to record data, and I processed the data in my own spreadsheet.

Average of all B runs: 0.326
Average of all A runs: 0.358
Improvement -9.7%
Unfortunately, there are some significant caveats for my data. For one thing, I've never been successful in getting a curve fit to give me a reasonable differentiation between Crr and Cd - meaning I have never measured Crr. Instead, I just assume it is 0.012, because I think it's a reasonable number and I think it puts my Cd numbers in the ball-park. But more importantly for this test, I was consistent.
The real problem is I think the error bars on my methodology are large. That should be evident looking at that bar graph. Run A1 in particular had some GPS drop-outs and the resulting choppiness in my chart makes it subject to interpretation. It would be best to drop that test and redo it. Unfortunately - I'm not going to.
In all, when I claim a 10% drag reduction, there is a large error bar that should go with the claim. My gut feel is that my coast-down results are not too far off, but this really isn't hard proof, folks.
I have some improvements I might try on this, even though I've already over-modded:
1) Close the sides. Additionally, I think if I put square sides to enclose it, I imaging extending the sides forward to create a barrier between the air flowing up over the bullnose and the air flowing off to either side. Right now there is probably turbulence around the sides.
2) Duct a cooling inlet from the bullnose to the lower grill.
3) Maybe add another frame member to stiffen the top edge (this would also reduce the chance of my framing members puncturing the radiator in a fender-bender), then add a large weatherstrip or foam tape to close off the upper grill.


 Today
Today