 09-27-2015, 01:32 PM
|
#81 (permalink)
|
|
Master EcoModder
Join Date: Apr 2012
Location: Evensville, TN
Posts: 676
Thanks: 237
Thanked 580 Times in 322 Posts
|
I could tell everyone the diamond pattern acts like vortex generators. 
The smooth side down will be slightly harder to mount, but for skid plate purposes it would be better to have it smooth rather than textured on the bottom. I know you are joking about the oooh diamond plate thing, but honestly I don't want the typical pickup truck-diamond plate stereotypical look. I'm much more used to getting "what the heck is that" attention, I wouldn't know what to do if I got the "I like you got's you lots of shiny on that pickup" attention.
Yeah current plan is to mount a few integrated supports where I have big spans (such as near the center of the underbelly between the frame) , but I want all the panels to mount with quickly removable bolts for ease of removal for maintenance or repairs.
|
|
|

|
|
The Following User Says Thank You to aardvarcus For This Useful Post:
|
|
 Today Today
|
|
|
|
 Other popular topics in this forum...
|
|
|
|
|
09-27-2015, 06:01 PM
|
#82 (permalink)
|
|
Master EcoModder
Join Date: Aug 2012
Location: northwest of normal
Posts: 29,165
Thanks: 8,279
Thanked 9,041 Times in 7,472 Posts
|
Quote:
|
I know you are joking about the oooh diamond plate thing, but honestly
|
Thanks, I can never tell if people think I'm joking. Which I am. All the time. |
|
|
|
|
09-28-2015, 08:26 AM
|
#83 (permalink)
|
|
Master EcoModder
Join Date: Apr 2012
Location: Evensville, TN
Posts: 676
Thanks: 237
Thanked 580 Times in 322 Posts
|
Yesterday I was able to remove all four fender flares from the Tacoma. I had to be extra careful removing them because I didn’t want to damage them as I may need to reinstall them one day. They each mount with 5-6 screws which are easy to remove, but then also 8-9 clips into square holes in the sheet metal of the truck, these were much more tricky. After removal, I had to wash ten years worth of dust and dirt off that was stuck behind the flares.
Once clean, I had to deal with the 8-9 large square holes in the truck sheet metal. I had decided to use push in plastic clips, and had to special order some large clips from NAPA since the holes are so large. The clips fit well, but once they are in all the way they are loose because they are designed to hold two things together, and don’t get tight against one thin layer of sheet metal. I am thinking of sourcing some plastic washers that fit the ribs of the clips and putting them on the back side of the loose clips, as that would tighten them up. Anyway attached are some pictures of the process and results.
You can see from the pictures that the plastic front bumper had a different type of clip, which my plugs don’t fit. I have some high quality self-adhesive reflective tape, which I am thinking of strategically putting some tape pieces on the front bumper to hide the holes but also make the truck more visible. The black reflective tape I have would largely blend in well with the black plastic bumper. I am trying to think of a good way to do this without making it look obvious that I am just putting it here and there to hide something.
I spent quite a bit of time crawling around under my truck measuring for my belly pan, and made some reasonably accurate diagrams of the different sections. Since the belly pan is impending, I went ahead and removed my air dam. I can tell the truck doesn’t handle quite as well with the air dam missing, and I also noted my electric fans kicked on sooner than they previously did, meaning the air dam was helping to force air through the radiator. I need to get some black coroplast to make my front grill to radiator duct. Add that to the to do list.


 |
|
|
|
|
The Following 3 Users Say Thank You to aardvarcus For This Useful Post:
|
|
|
09-28-2015, 09:04 AM
|
#84 (permalink)
|
|
lurker's apprentice
Join Date: May 2008
Location: the Perimeter
Posts: 942
PlainJane - '12 Toyota Tacoma Base 4WD Access Cab 90 day: 20.98 mpg (US)
Thanks: 504
Thanked 226 Times in 173 Posts
|
I've wondered what it might look like without the huge black plastic pieces. Its not bad at all. Except for the big holes. 
I'll be interested to hear what it does for fuel economy, although it sounds like you are making multiple changes at once so it might be tough to tell what does what. |
|
|
|
|
10-01-2015, 11:11 PM
|
#85 (permalink)
|
|
Eco Bandwagoner
Join Date: Apr 2015
Location: Tucson
Posts: 9
Thanks: 2
Thanked 18 Times in 6 Posts
|
Duplicolor
I bet you could paint those plastic plugs with duplicolors Silver Streak Mica paint match to avoid having lots of black dots all over your fender
|
|
|
|
|
10-06-2015, 08:00 PM
|
#86 (permalink)
|
|
Master EcoModder
Join Date: Apr 2012
Location: Evensville, TN
Posts: 676
Thanks: 237
Thanked 580 Times in 322 Posts
|
Yeah, I hate to change several things at once, but life is so busy when I get a chance to make changes I have to capitalize on it.
I had considered priming and painting the plugs so they would blend in more, but I don't object to the black plug look and once again it all comes down to time.
I have been considering getting a welding remote spool gun for my welder so that I can weld aluminum. That would allow me much more design freedom for the belly pan. (I actually would use it more for other higher priority projects, using it on this would just be a side benefit.)
|
|
|
|
|
The Following 2 Users Say Thank You to aardvarcus For This Useful Post:
|
|
|
10-26-2015, 09:47 AM
|
#87 (permalink)
|
|
Master EcoModder
Join Date: Apr 2012
Location: Evensville, TN
Posts: 676
Thanks: 237
Thanked 580 Times in 322 Posts
|
I managed to start working on my aluminum underbody panels, and got started on the driver side step slider cover. I did end up getting a remote spool gun and after running some test beads on aluminum I have been welding the scrap pieces I bought together into one piece. The pieces I had already had some 90 degree bends in them, which were radiused not sharp, so I am maximizing their use. I got about 50% of the way done with the drivers side piece, the pictures are from when I was only about 30% done. They show the step/slider I am covering and illustrate the flat bottom piece. I will be covering part of the top as well, enough to step on, so there will be another radiused piece that will go on top, and they will both be cut off and welded together in the middle. The piece will slide on, and then bolt up from below in a few spots using rivnuts.
|
|
|
|
|
The Following 3 Users Say Thank You to aardvarcus For This Useful Post:
|
|
|
10-27-2015, 08:46 PM
|
#88 (permalink)
|
|
Master EcoModder
Join Date: Apr 2012
Location: Evensville, TN
Posts: 676
Thanks: 237
Thanked 580 Times in 322 Posts
|
So yesterday I restarted building a complete aeroshell bedcover for the Tacoma, to replace the half bedcover I have been using for a while. As for why…. good question. Really looking to get some dry storage in the bed of the truck the half shell does not offer. I had already made up the custom curved main foam piece a long time ago when I was going back and forth on the original bedcover project. I took that main piece and foam-glued some other scrap extruded polystyrene pieces together to make a slightly oversized foam hunk to carve the final contoured shape out of. Once I get it contoured, I will put fiberglass over the foam to make a lightweight but strong shell. The design will have two side windows and one opening window in the back, which I have not yet cut out. Here are some photos of the rough foam block.
|
|
|
|
|
The Following 2 Users Say Thank You to aardvarcus For This Useful Post:
|
|
|
10-27-2015, 09:47 PM
|
#89 (permalink)
|
|
Master EcoModder
Join Date: Aug 2012
Location: northwest of normal
Posts: 29,165
Thanks: 8,279
Thanked 9,041 Times in 7,472 Posts
|
I'd like to see you make up two gull-wing doors to fit behind your half-cap. Sort of like the back half of this (Ford Evos):
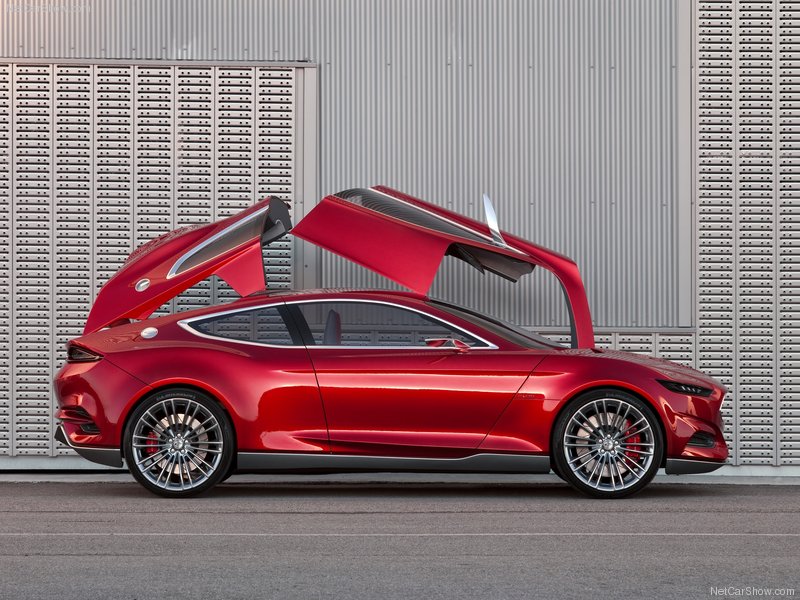
No pressure though. |
|
|
|
|
11-26-2015, 08:52 PM
|
#90 (permalink)
|
|
Master EcoModder
Join Date: Apr 2012
Location: Evensville, TN
Posts: 676
Thanks: 237
Thanked 580 Times in 322 Posts
|
Yeah, as cool as gull wing doors behind a half cap would be, that looks a little beyond my current skill level to pull off.
In other news, I got the drivers side aluminum step/slider/belly pan combo all welded up. Attached are a few photos of the completed product. I have test fitted it, and it fits nicely. Now I just need to drill out some holes for bolts, install rivet-nuts in the steel slider tubes, and bolt it all together.
In other news, I have had a few tanks without the half shell (pulled it off when I was mocking up the full shell) and without the air dam (pulled it off when measuring for the underbody panels). That plus the colder weather has hurt the fuel mileage recently. I will probably be putting them both back on until I get further along on finishing those two projects. Also it is amazing the difference in handling without the air dam, especially at highway speeds.
Last edited by aardvarcus; 11-26-2015 at 08:58 PM..
|
|
|
|
|
The Following User Says Thank You to aardvarcus For This Useful Post:
|
|
|


