Go Back   EcoModder Forum > EcoModding > Aerodynamics
Register Now
 Register Now
 

Reply  Post New Thread
 
Submit Tools LinkBack Thread Tools
Old 05-21-2011, 09:13 PM   #1 (permalink)
EcoModding Lurker
 
Join Date: Aug 2009
Location: Statesboro, GA, USA
Posts: 25

Rocinante - '19 GMC Canyon
Thanks: 9
Thanked 3 Times in 2 Posts
Smile Avalon V6 front wheel airdams

I started on front wheel airdams for my Avalon. The underbody is not totally hideous, but the front wheels and suspension parts need to be screened. The pics below were taken when I was assembling the passenger-side airdam; the driver's side is not very different, just reversed

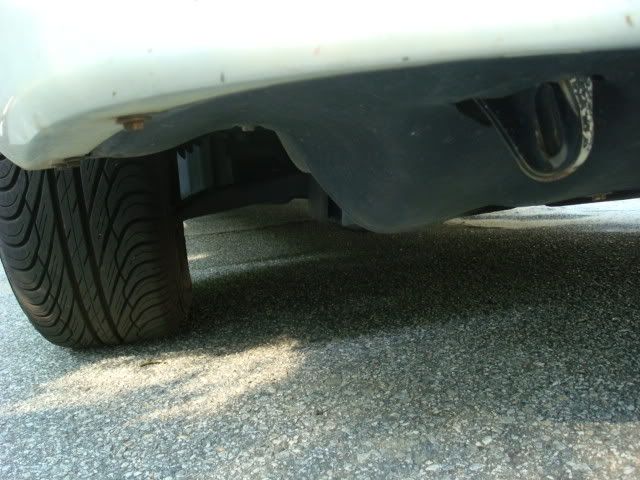
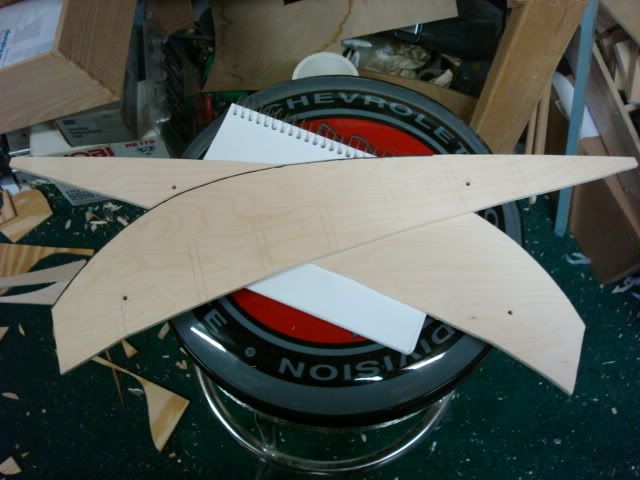
So, I searched the shop for 1/4" and 1/2" birch plywood, and some sheets of 1/32" balsa. I traced the outline of the bottom of the front-end plastic onto the 1/4" plywood...

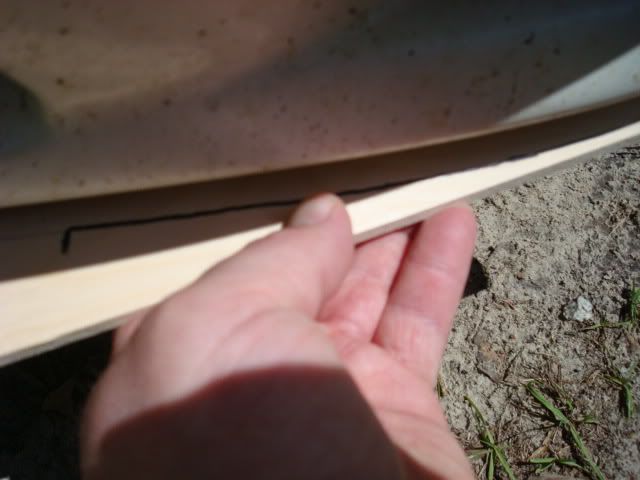
then cut out a right and a left, and then transferred that to the 1/2" ply, and cut out those 2 pieces, seen below. The skinny end of the 'swoosh' points towards the centerline of the car. Oh, almost forgot... I drilled holes to line up with existing trim mounting holes on the car, so I could use longer screws and bolt them up.

I wanted to allow 4" of ground clearance, so the airdams would need to be 5.75" high. Factoring in the 3/4" of plywood (1/2" top, 1/4" bottom), I cut six 5" high sections of 1"x1" poplar to use as columns between the upper and lower pieces:

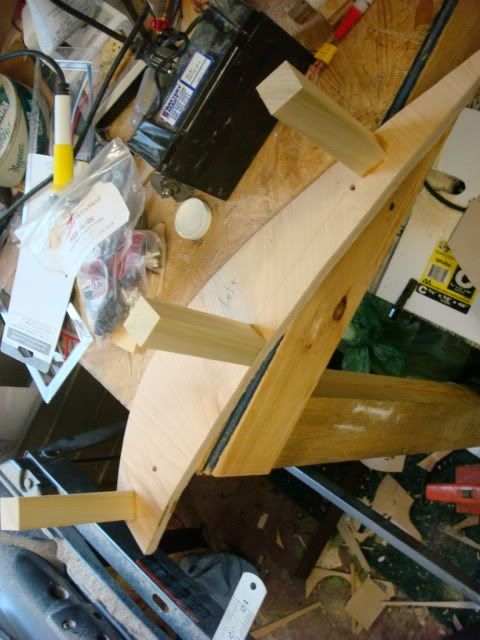
They were assembled upside-down:

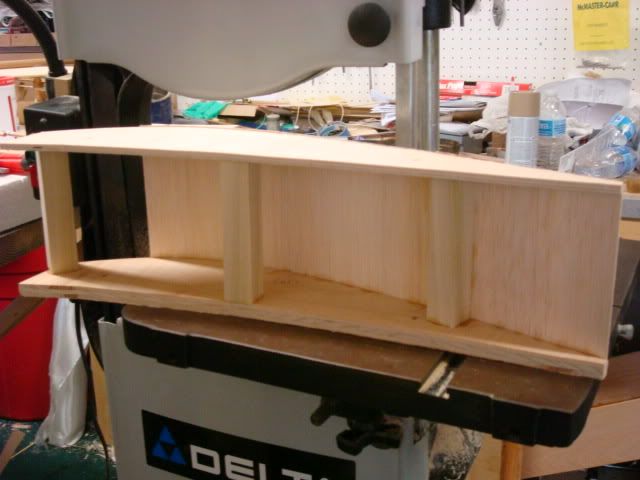
And then the 5.75" high sections of 1/32" balsa sheet were CA-glued to the frame; This is where it really started to look like something worth doing

These will be covered on the outside with a layer of medium glass cloth and 2 layers of very fine glass cloth, sanded like hell and painted as close as I can get to the right shade of white. The inside will get some reinforcing of the balsa and more layers of medium cloth. The ends of the columns will also get fiberglassed to the upper and lower plywood pieces. All exposed wood will be painted with West System epoxy (it's used to make boat hulls, so it's fully waterproof)(it's also what I have laying around the shop... score for no extra cash outlay!)

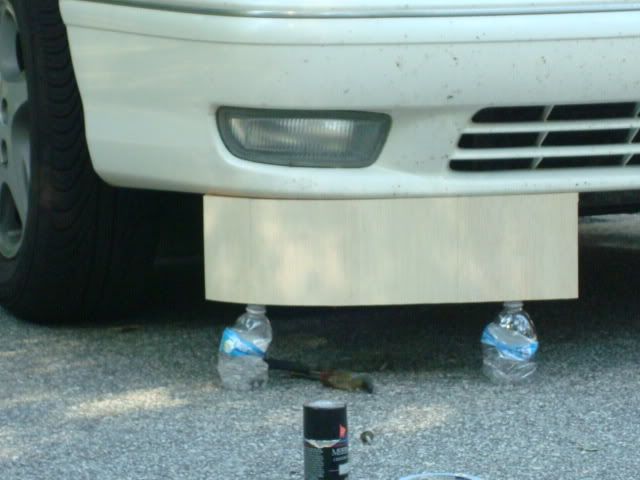
Just for giggles, I loosely fitted the passenger side airdam to the car, held up with high-tech, er, holders.


The airdam will be extended aft to blend with the wheelwell. This will happen tomorrow; more pics to follow. The top edge of the airdam that looks like it sticks out too far is not a mistake; I plan to extend the airdam upwards to cover the fog lamp inlet and part of the lower grille. The front edge of the airdam sticks out so that the material-yet-to-come can clear stuff above it, up to the lip on the bumper plastic below that chrome trim.


Last edited by tugboat; 05-21-2011 at 09:15 PM.. Reason: added part about drilling holes.
  Reply With Quote
Alt Today
Popular topics

Other popular topics in this forum...

   
Old 05-23-2011, 11:22 AM   #2 (permalink)
T-100 Road Warrior
 
BamZipPow's Avatar
 
Join Date: Apr 2008
Location: The Woodlands, TX
Posts: 1,920

BZP T-100 (2010) - '98 Toyota T-100 ext cab - 3.4L/auto SR5
Last 3: 24 mpg (US)

BZP T-100 (2011) - '98 Toyota T-100 ext cab - 3.4L/auto SR5
Last 3: 23.66 mpg (US)

BZP T-100 (2009) - '98 Toyota T-100 ext cab - 3.4L/auto SR5
Last 3: 19.01 mpg (US)

BZP T-100 (2012) - '98 Toyota T-100 ext cab - 3.4L/auto SR5
Last 3: 25.45 mpg (US)

BZP T-100 (2013) - '98 Toyota T-100 SR5
Last 3: 25.79 mpg (US)

BZP T-100 (2014) - '98 Toyota T-100 SR5
Last 3: 23.18 mpg (US)

BZP T-100 (2015) - '98 Toyota T-100 SR5
Last 3: 23.85 mpg (US)

BZP T-100 (2016) - '98 Toyota T-100 SR5
Last 3: 17.62 mpg (US)

BZP T-100 (2017) - '98 Toyota T-100 SR5
90 day: 20.78 mpg (US)

BZP T-100 (2018) - '98 Toyota T-100 SR5
90 day: 20.19 mpg (US)

BZP T-100 (2019) - '98 Toyota T-100 SR5

BZP T-100 (2020) - '98 Toyota T-100 SR5

2012 Scion iQ - '12 Scion iQ Base
Thanks: 3,479
Thanked 1,395 Times in 968 Posts
Send a message via ICQ to BamZipPow
Won't that git ripped off the first time you bump a curb or steep driveway?

You might want to consider using some conveyor belt cut down to size. It will be stiff enough to resist bending/flexing from the air flow but resilient enough to bumps/scrapes.

I've got a thread in here with a supplier and prices...I think it was around $0.17/pound fer the used stuff...plus shipping.
  Reply With Quote
Old 05-23-2011, 12:45 PM   #3 (permalink)
EcoModding Apprentice
 
Join Date: Apr 2011
Location: Houston
Posts: 228
Thanks: 0
Thanked 23 Times in 17 Posts
Very aggressive. Love the high-tech holders. I'm a little curious about clearance too.
  Reply With Quote
Old 05-23-2011, 01:40 PM   #4 (permalink)
Master EcoModder
 
Join Date: Feb 2008
Location: belgium
Posts: 663

vectra a - '95 Opel Vectra GLS
90 day: 37.51 mpg (US)
Thanks: 14
Thanked 61 Times in 44 Posts
ground clearance is going to be an issue, as much as i like what you are doing here, i think unless they're designed to take quite beating you'll soon damage them.

the closer you go to the wheels the lower you can go however ... so perhaps it's a combination of a modest airdam (1/3 or 1/2 ) of what you're going now, and tire dams about the size of your dams now, plus perhaps an intertray could get you the same effect. a quick check on some randome profiles show the average passenger car has an angle from the airdams edge to the base of the tires of about 30 degrees, so perhaps that helps to check of what you make is in the save zone.

you can always go lower, but keep in mind sooner or later these dams might hit something
__________________
aer·o·dy·nam·ics: the science of passing gass

*i can coast for miles and miles and miles*
  Reply With Quote
Old 05-23-2011, 08:03 PM   #5 (permalink)
EcoModding Lurker
 
Join Date: Aug 2009
Location: Statesboro, GA, USA
Posts: 25

Rocinante - '19 GMC Canyon
Thanks: 9
Thanked 3 Times in 2 Posts
I wasn't going to go any lower; I thought I'd read somewhere on here that the lowest recommended by some technical body or the other was 3" above ground. So I figured by going with 4" clearance that I'd be better off. The airdams (which aren't done yet) are in wood and balsa; after the many layers of fiberglass, they'd be pretty strong, but not strong enough to hit anything at speed! BUT, nothing is cast in stone, I can easily go with wheel dams further back, and blend them into the coverage I want to do to fill some of the gap in the wheelwell, which in turn I want to blend into the front wheel boattail. I'd rather throw out my work so far and go with the wheel airdams close to the wheel than bolt something to the car that could damage the car by grounding out too easily.

The back wheels will be getting their own airdams,boattails, and spats. An underbody pan would be a good idea, although I'm moving one step at a time as this is my daily driver.

I put pizza pans on the front wheels and it yielded a 1mpg increase on my 44 mile morning commute. I'll have time this coming weekend to get the rear wheels panned to complete the treatment, to say nothing of looking better
  Reply With Quote
Old 05-25-2011, 11:58 PM   #6 (permalink)
EcoModding Apprentice
 
XJguy's Avatar
 
Join Date: Jun 2010
Location: NY
Posts: 135
Thanks: 9
Thanked 43 Times in 24 Posts
Beautiful execution but I am afraid that will not last very long.
  Reply With Quote
Old 05-27-2011, 03:48 PM   #7 (permalink)
EcoModding Lurker
 
Join Date: Aug 2009
Location: Statesboro, GA, USA
Posts: 25

Rocinante - '19 GMC Canyon
Thanks: 9
Thanked 3 Times in 2 Posts
HAving a 4-day weekend to play with some mods, and having read the thoughts of you guys who have much more experience with such things... I went to Lowe's and bought some composite garden edging to make mini wheel dams with. I'm going to bolt it to the underbody such that it can deflect some air around the front wheels and suspension. It will NOT be quite so low as my elegant but impractical first attempt

I also got a sheet of coroplast to fab up the beginning of an underbody tray, starting at the bottom of the front bumper. Pics to follow.

I appreciate everyone who has given input so far, I think it'll help me avoid some mistakes that I would otherwise make on my own...
__________________
  Reply With Quote
Old 05-27-2011, 04:54 PM   #8 (permalink)
EcoModding Lurker
 
Join Date: Aug 2009
Location: Statesboro, GA, USA
Posts: 25

Rocinante - '19 GMC Canyon
Thanks: 9
Thanked 3 Times in 2 Posts
And while I'm wrenching, I'm replacing the bank 1, sensor 1 O2 sensor... SG gave me a P0135 error code. Hope replacing the sensor helps with mileage
__________________
  Reply With Quote
Old 05-27-2011, 05:09 PM   #9 (permalink)
EcoModding Apprentice
 
Join Date: Apr 2011
Location: Houston
Posts: 228
Thanks: 0
Thanked 23 Times in 17 Posts
Quote:
Originally Posted by tugboat View Post
I also got a sheet of coroplast to fab up the beginning of an underbody tray, starting at the bottom of the front bumper. Pics to follow....
Where did you get the coroplast? At Lowes? Where in the store was it?
  Reply With Quote
Old 05-27-2011, 06:18 PM   #10 (permalink)
EcoModding Lurker
 
Join Date: Aug 2009
Location: Statesboro, GA, USA
Posts: 25

Rocinante - '19 GMC Canyon
Thanks: 9
Thanked 3 Times in 2 Posts
The coroplast was in the aisle with the 'For Sale' signs... the largest piece they had was 36"x24". I think. I'm inside, having fled a thunderous downpour, and the coroplast and receipt are in the car.

__________________
  Reply With Quote
Reply  Post New Thread


Tags
aerodynamics, airdams, avalon


Powered by vBulletin® Version 3.8.11
Copyright ©2000 - 2024, vBulletin Solutions Inc.
Content Relevant URLs by vBSEO 3.5.2
All content copyright EcoModder.com