Go Back   EcoModder Forum > EcoModding > DIY / How-to
Register Now
 Register Now
 

Reply  Post New Thread
 
Submit Tools LinkBack Thread Tools
Old 01-03-2012, 09:37 PM   #321 (permalink)
MPG Militia HMV-25E80+A
 
JethroBodine's Avatar
 
Join Date: Mar 2011
Location: Vermont, USA
Posts: 823

FrankenJetta D - '90 Volkswagen Jetta GL
Boat tails and more mods
Diesel
TEAM VW AUDI Group
90 day: 64.35 mpg (US)
Thanks: 191
Thanked 144 Times in 98 Posts
Good to hear about the progress, Neil. I'm looking forward to seeing some more pics.

Have you looked into "drill saws"? I know you have a plan, but I have seen titanium bits fairly cheap with a large side cutting edge.

__________________


Quote:
It is always very amusing how our imagination is put to the test when overcoming reality. Redyaris
Boat tail project
How to gently bump start during EOC
  Reply With Quote
Alt Today
Popular topics

Other popular topics in this forum...

   
Old 01-04-2012, 08:35 AM   #322 (permalink)
Master EcoModder
 
NeilBlanchard's Avatar
 
Join Date: May 2008
Location: Maynard, MA Eaarth
Posts: 7,907

Mica Blue - '05 Scion xA RS 2.0
Team Toyota
90 day: 42.48 mpg (US)

Forest - '15 Nissan Leaf S
Team Nissan
90 day: 156.46 mpg (US)

Number 7 - '15 VW e-Golf SEL
TEAM VW AUDI Group
90 day: 155.81 mpg (US)
Thanks: 3,475
Thanked 2,950 Times in 1,844 Posts
The RotoZip up-spiral bits I have will cut all the way through a 1" foam sheet in one pass, so I need to layout all the sheets to know how many I need to buy.

Unfortunately, I've been told that XPS (extruded polystyrene) is rather bad for carbon dioxide output when it is made. I'll have to use it as long as possible to make up for this... And I would love to find a foam with similar physical properties to Dow (light blue) XPS but without the major downside.
__________________
Sincerely, Neil

http://neilblanchard.blogspot.com/
  Reply With Quote
Old 01-09-2012, 02:34 PM   #323 (permalink)
Master EcoModder
 
NeilBlanchard's Avatar
 
Join Date: May 2008
Location: Maynard, MA Eaarth
Posts: 7,907

Mica Blue - '05 Scion xA RS 2.0
Team Toyota
90 day: 42.48 mpg (US)

Forest - '15 Nissan Leaf S
Team Nissan
90 day: 156.46 mpg (US)

Number 7 - '15 VW e-Golf SEL
TEAM VW AUDI Group
90 day: 155.81 mpg (US)
Thanks: 3,475
Thanked 2,950 Times in 1,844 Posts
Question for folks who have worked with composites: I'd like to find a "greener" type of foam to use building CarBEN EV5. I was planning on Dow XPS but I found out it is just about the worst in terms of input energy so it has a very big "carbon footprint".

It needs to be fairly rigid, machinable, and I'm going to use 1" thick x 2' x 8' square edged sheets (not tongue & groove). If it is biodegradable then that is good as long as it is not water soluble.

If I cannot find something better, then I will use XPS (because I can't let perfection be the enemy of the good!) and the best / only place I have found it for sale is here at a place in Texas -- which seems like along ways to have it shipped to New England!):

FRP Shop - DOW Brand Extruded Styrofoam Insulation
__________________
Sincerely, Neil

http://neilblanchard.blogspot.com/
  Reply With Quote
Old 01-11-2012, 09:58 AM   #324 (permalink)
EcoModding Lurker
 
2009Prius's Avatar
 
Join Date: Jun 2010
Location: USA
Posts: 34
Thanks: 8
Thanked 2 Times in 2 Posts
I suppose the insulation foam boards sold at HomeDepot are not good enough for the car?
  Reply With Quote
Old 01-11-2012, 01:11 PM   #325 (permalink)
Master EcoModder
 
NeilBlanchard's Avatar
 
Join Date: May 2008
Location: Maynard, MA Eaarth
Posts: 7,907

Mica Blue - '05 Scion xA RS 2.0
Team Toyota
90 day: 42.48 mpg (US)

Forest - '15 Nissan Leaf S
Team Nissan
90 day: 156.46 mpg (US)

Number 7 - '15 VW e-Golf SEL
TEAM VW AUDI Group
90 day: 155.81 mpg (US)
Thanks: 3,475
Thanked 2,950 Times in 1,844 Posts
My local Home Depot does sell Owens Corning (pink) XPS 1" x 2' x 8' sheets, but they are tongue and groove edged, which means I lose some usable foam. It would be fine otherwise. I'm going to probably use the square edged sheets from the place in Texas, unless I can find a more local source.
__________________
Sincerely, Neil

http://neilblanchard.blogspot.com/
  Reply With Quote
Old 01-26-2012, 08:35 PM   #326 (permalink)
Master EcoModder
 
NeilBlanchard's Avatar
 
Join Date: May 2008
Location: Maynard, MA Eaarth
Posts: 7,907

Mica Blue - '05 Scion xA RS 2.0
Team Toyota
90 day: 42.48 mpg (US)

Forest - '15 Nissan Leaf S
Team Nissan
90 day: 156.46 mpg (US)

Number 7 - '15 VW e-Golf SEL
TEAM VW AUDI Group
90 day: 155.81 mpg (US)
Thanks: 3,475
Thanked 2,950 Times in 1,844 Posts
Here's a screen capture showing all the sections forward of the high point of the roof -- and showing the 2' x 8' foam sheet layouts above them. The 3D model in to the far lower right.


Now, I will start to do the same for the rearward portion of the chassis behind the high point of the roof. After I lay out all the sheets, I'll know how many foam sheets to order. :-)
__________________
Sincerely, Neil

http://neilblanchard.blogspot.com/
  Reply With Quote
Old 02-09-2012, 01:46 PM   #327 (permalink)
Master EcoModder
 
NeilBlanchard's Avatar
 
Join Date: May 2008
Location: Maynard, MA Eaarth
Posts: 7,907

Mica Blue - '05 Scion xA RS 2.0
Team Toyota
90 day: 42.48 mpg (US)

Forest - '15 Nissan Leaf S
Team Nissan
90 day: 156.46 mpg (US)

Number 7 - '15 VW e-Golf SEL
TEAM VW AUDI Group
90 day: 155.81 mpg (US)
Thanks: 3,475
Thanked 2,950 Times in 1,844 Posts
CarBEN EV5 drafting progress

This is a progress image of the drafting work I am doing in DataCAD 14 of the sections of CarBEN EV5, in preparation for generating the g-code to cut foam sheets with my PhlatPrinter 3 CNC machine.


__________________
Sincerely, Neil

http://neilblanchard.blogspot.com/
  Reply With Quote
Old 02-14-2012, 01:31 PM   #328 (permalink)
Master EcoModder
 
NeilBlanchard's Avatar
 
Join Date: May 2008
Location: Maynard, MA Eaarth
Posts: 7,907

Mica Blue - '05 Scion xA RS 2.0
Team Toyota
90 day: 42.48 mpg (US)

Forest - '15 Nissan Leaf S
Team Nissan
90 day: 156.46 mpg (US)

Number 7 - '15 VW e-Golf SEL
TEAM VW AUDI Group
90 day: 155.81 mpg (US)
Thanks: 3,475
Thanked 2,950 Times in 1,844 Posts
Here's a progress image of the drafting I'm doing on my CarBEN EV5:


All of the sections have now been smoothed and fleshed out; and then each section has the next section behind it copied overlaying it. This is so there is always an excess of material on all sections, so they can be smoothed just by carving with no filling needed. And the rear doors are laid out flat by cutting a section parallel through them -- they are in a slight angle, so they form a flat V.
__________________
Sincerely, Neil

http://neilblanchard.blogspot.com/
  Reply With Quote
The Following 2 Users Say Thank You to NeilBlanchard For This Useful Post:
JethroBodine (02-14-2012), Rokeby (02-14-2012)
Old 02-17-2012, 11:08 AM   #329 (permalink)
Master EcoModder
 
NeilBlanchard's Avatar
 
Join Date: May 2008
Location: Maynard, MA Eaarth
Posts: 7,907

Mica Blue - '05 Scion xA RS 2.0
Team Toyota
90 day: 42.48 mpg (US)

Forest - '15 Nissan Leaf S
Team Nissan
90 day: 156.46 mpg (US)

Number 7 - '15 VW e-Golf SEL
TEAM VW AUDI Group
90 day: 155.81 mpg (US)
Thanks: 3,475
Thanked 2,950 Times in 1,844 Posts
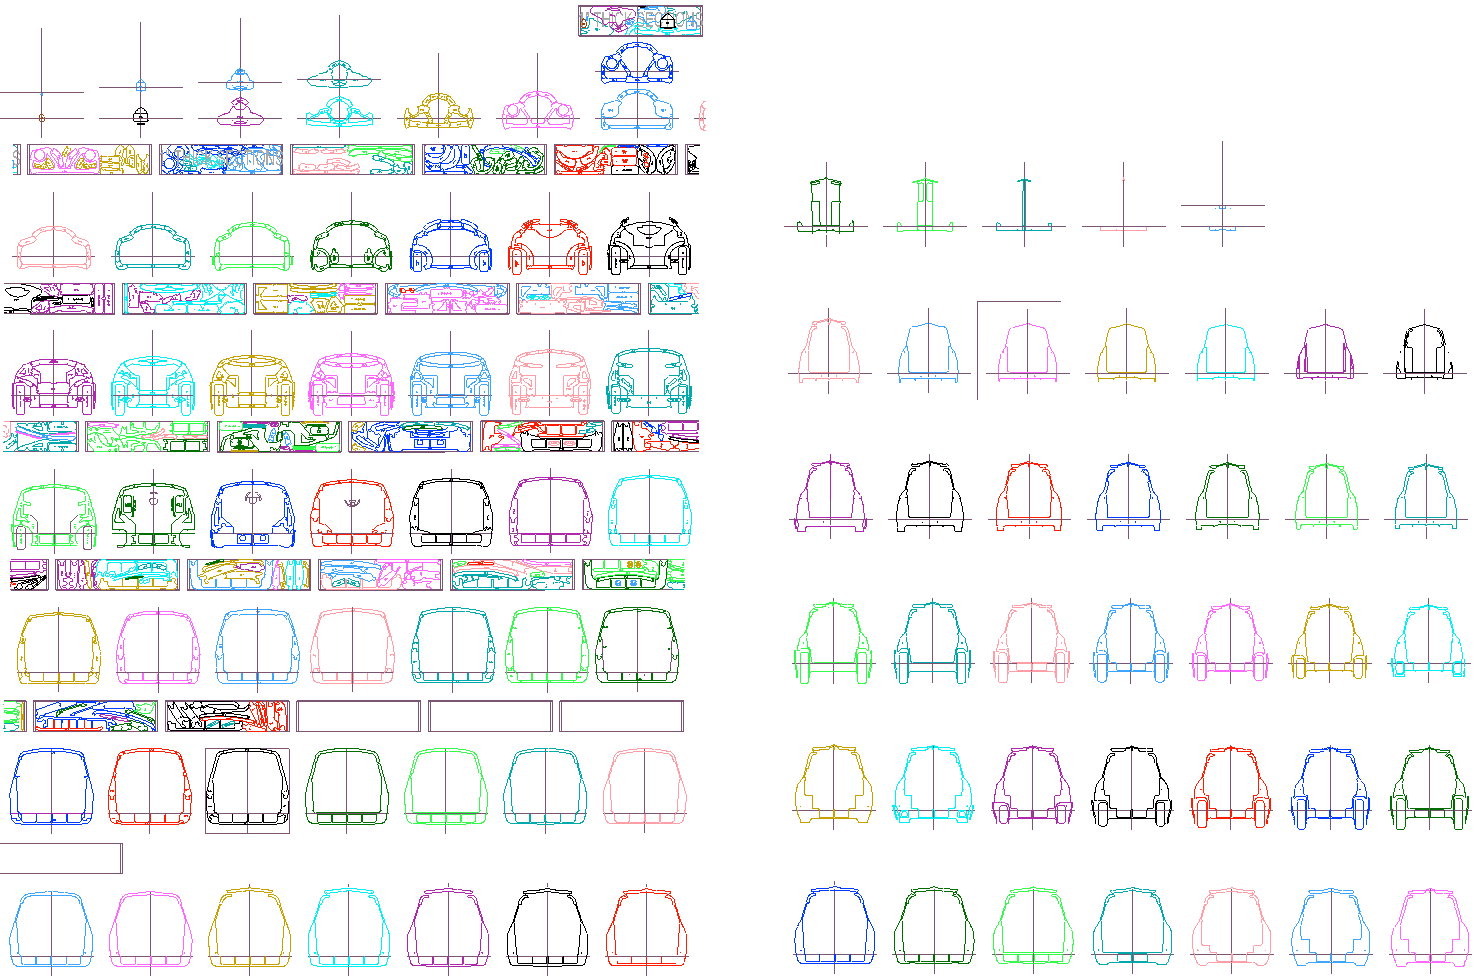
I've reached a benchmark on the drafting -- all the sections are drawn in their finished form. The next step will be to drawing the jigsaw joints and lay out the pieces on the 2'x8' foam sheets -- this will take a while!

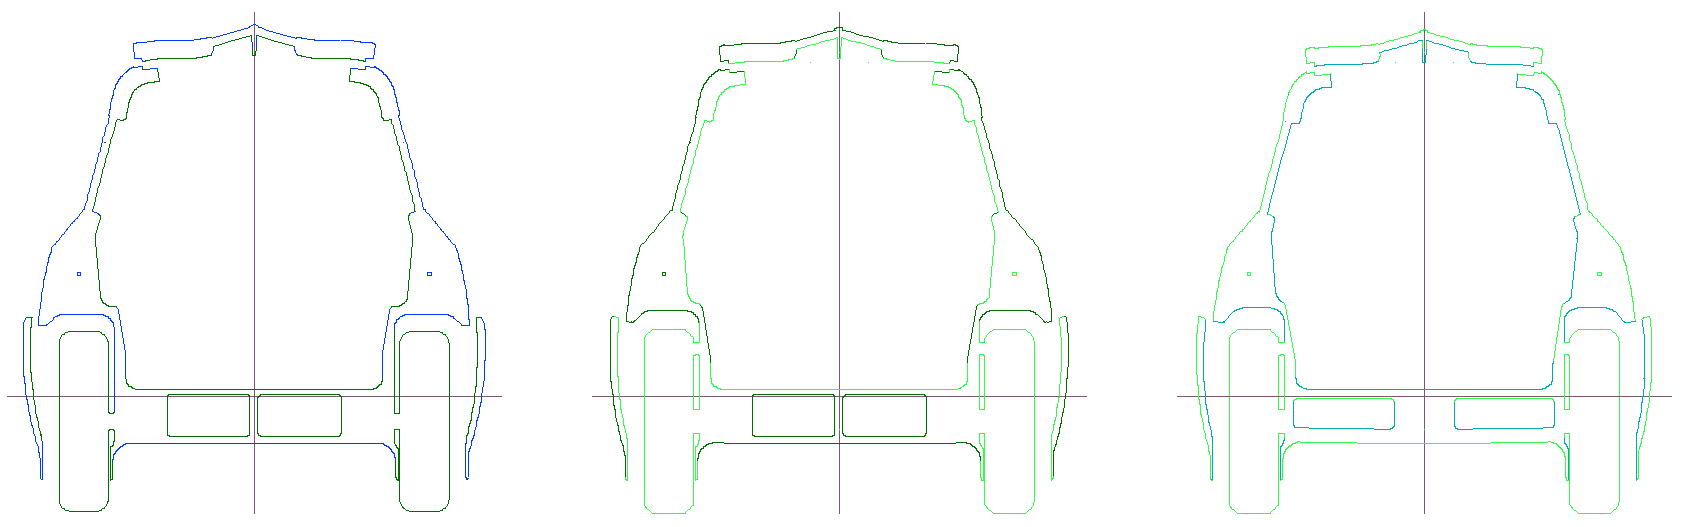
Here's a more detailed look at a sampling of the section starting just behind the high point of the roof moving back through the CarBEN EV5 chassis.


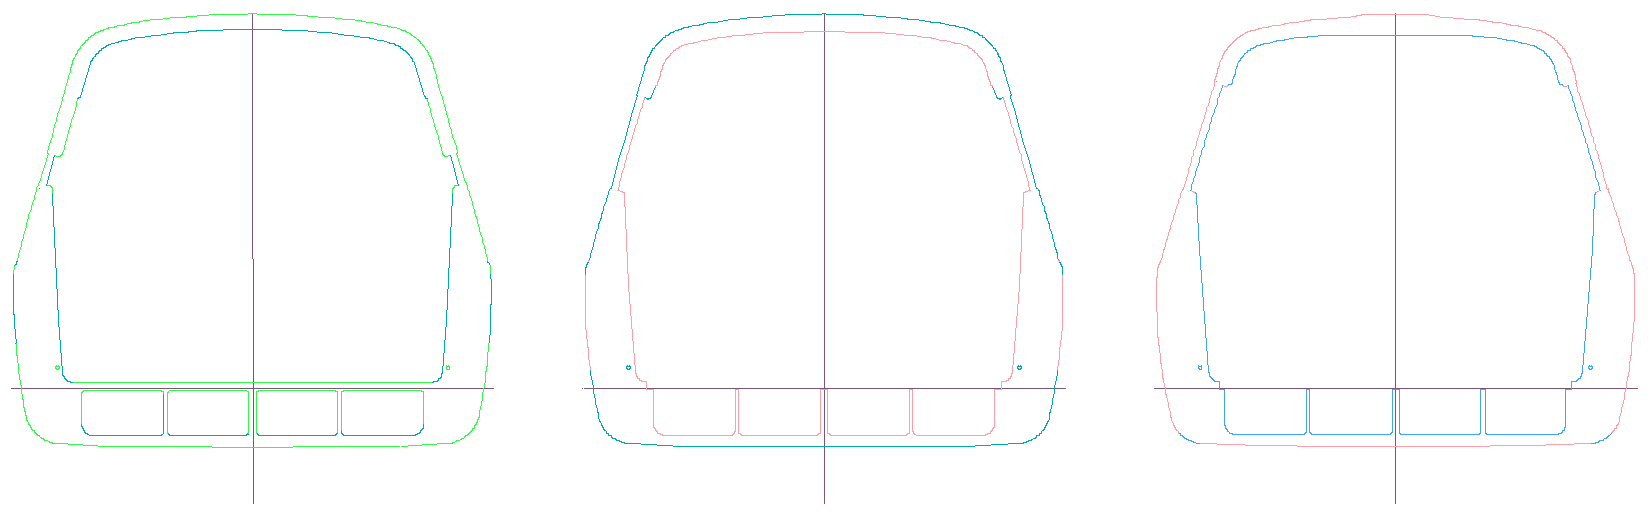
The different colors show the areas where the adjacent section behind adds material to the forward section. In other words, the tapered shape must have an excess of material -- because both the outside and the inside of the same taper.

I hope this makes sense.


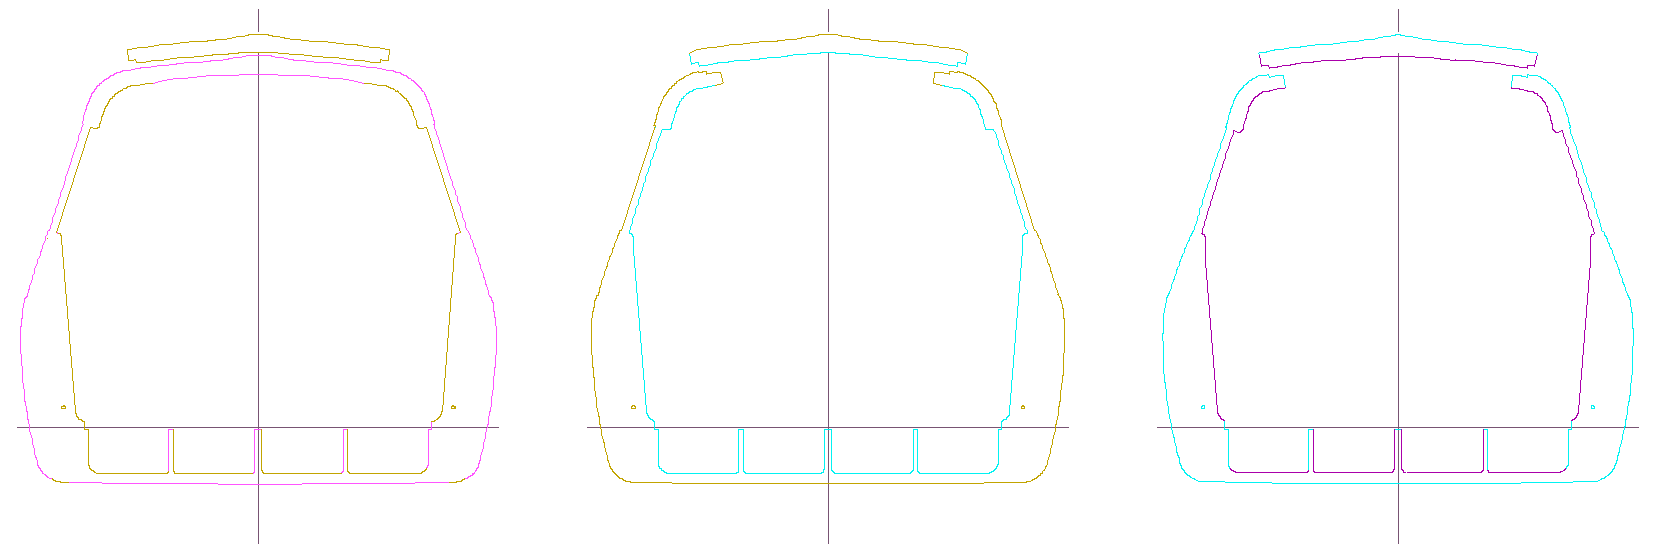
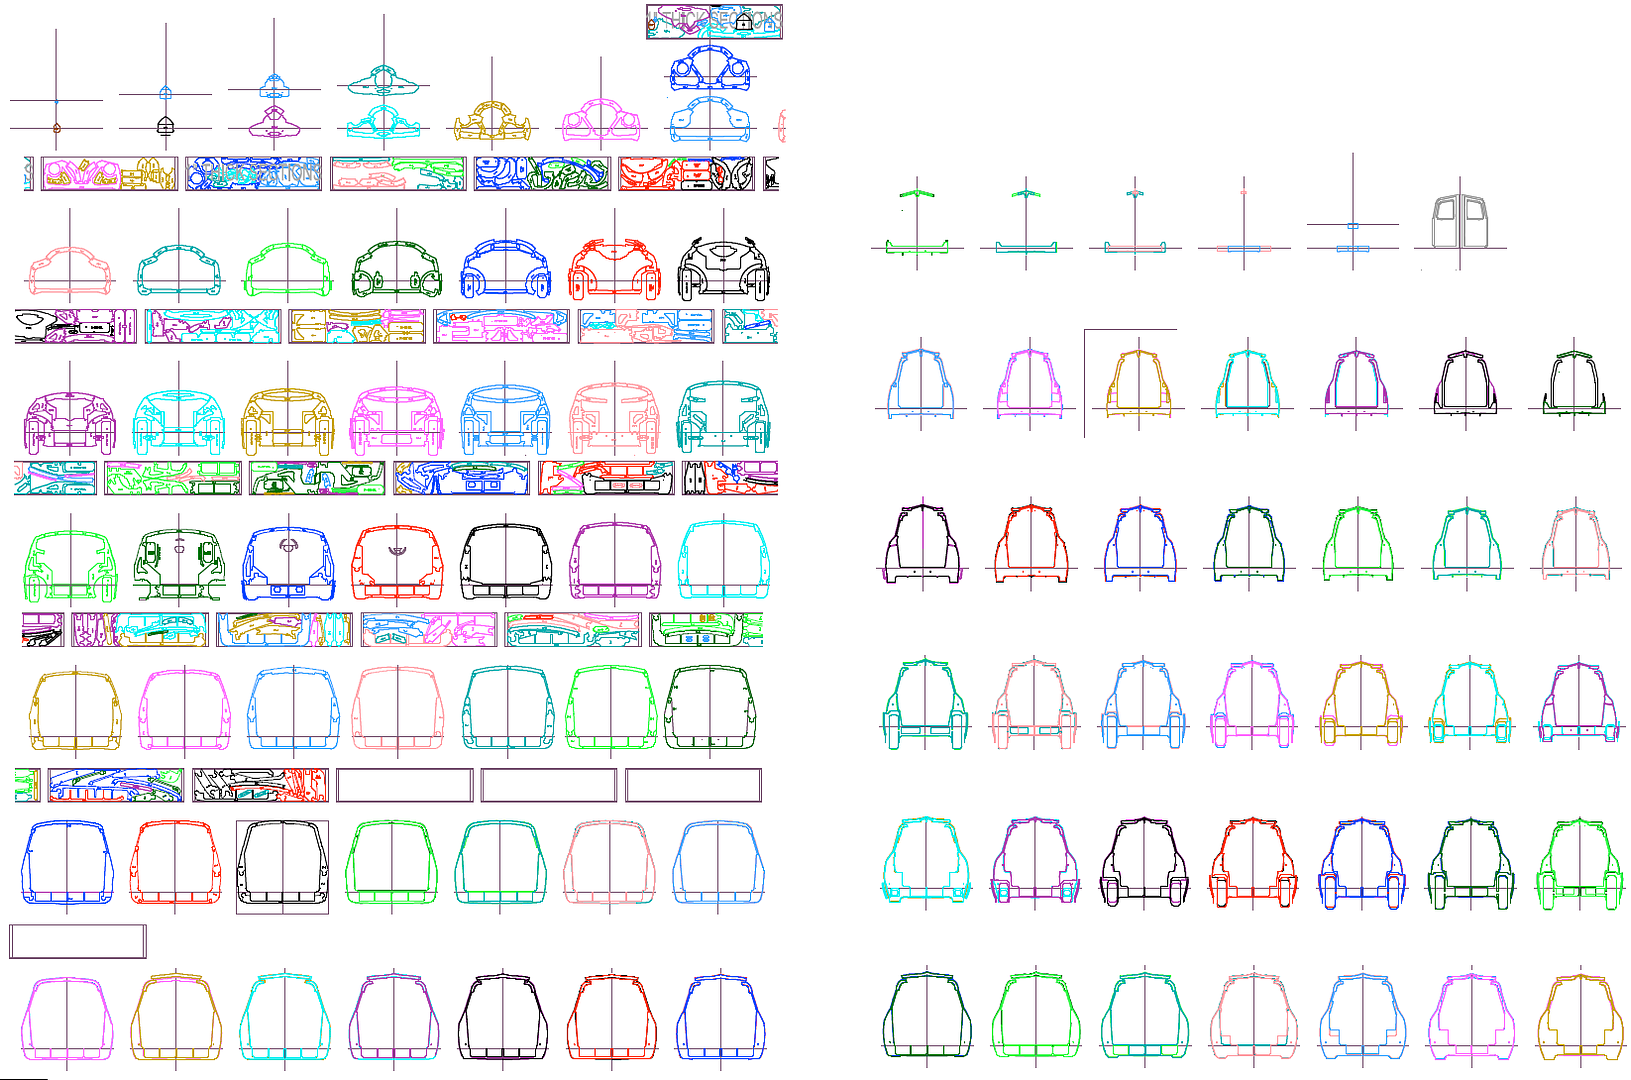
These are the sections at the top hinge of the hatch door. I've started the interlocking lip on the door and the opening that holds the seal and acts as a water gutter when the door is open.

Also, note the 1/2" diameter alignment dowel holes -- these are modeled straight through the entire model. As the chassis tapers, I added other alignment holes.


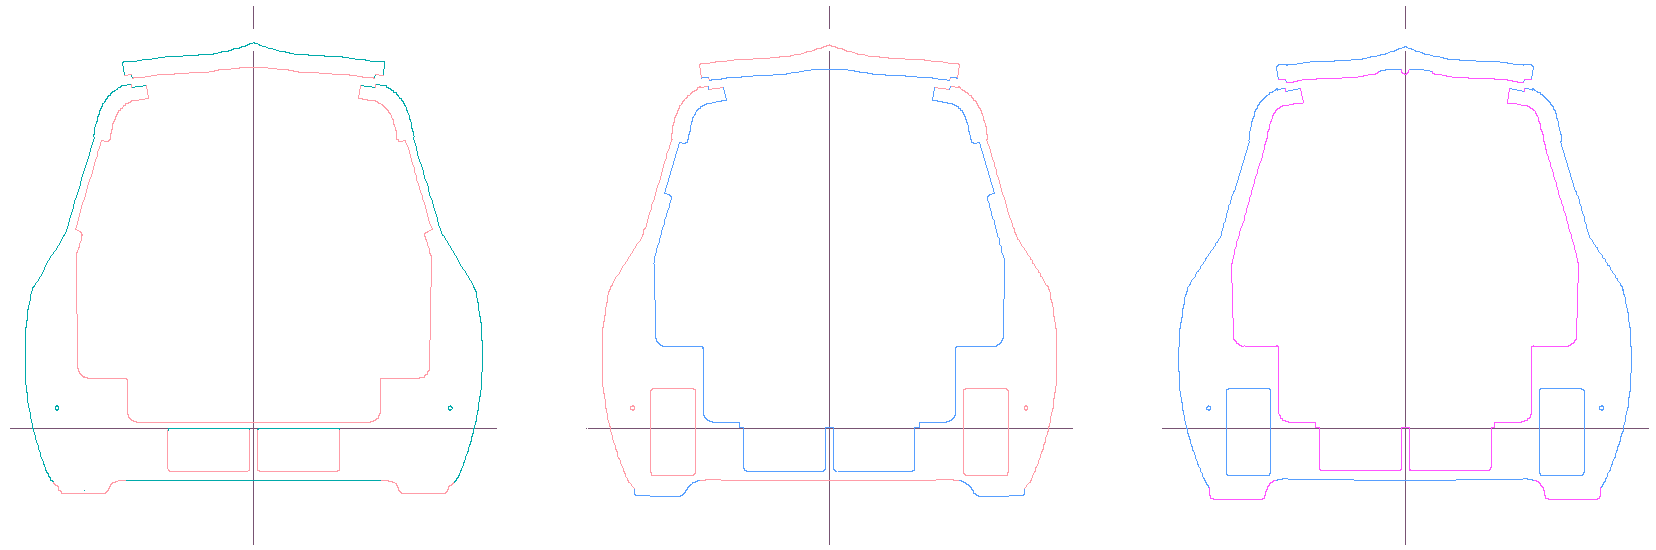
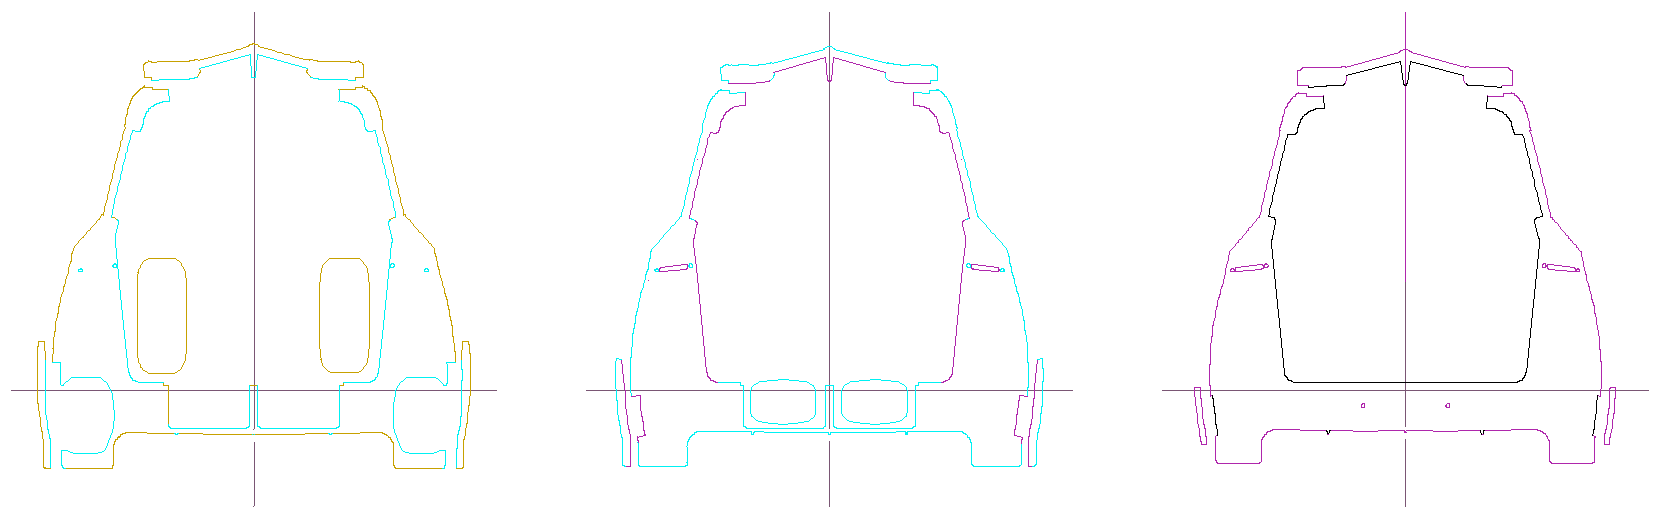
These sections show the transition in side windows -- the 'C' pillar that is just ahead of the rear wheels. I'm intending the have 2 layers of glazing on the side windows and the hatch and door windows, to provide more insulation.

The section on the right has the front top of the hatch windows, near the center.

The two center rectangles in the floor are the battery bays. The vertical rectangles on the center and right section are for the rear suspension; which is probably going to be a trailing swing arm(s).


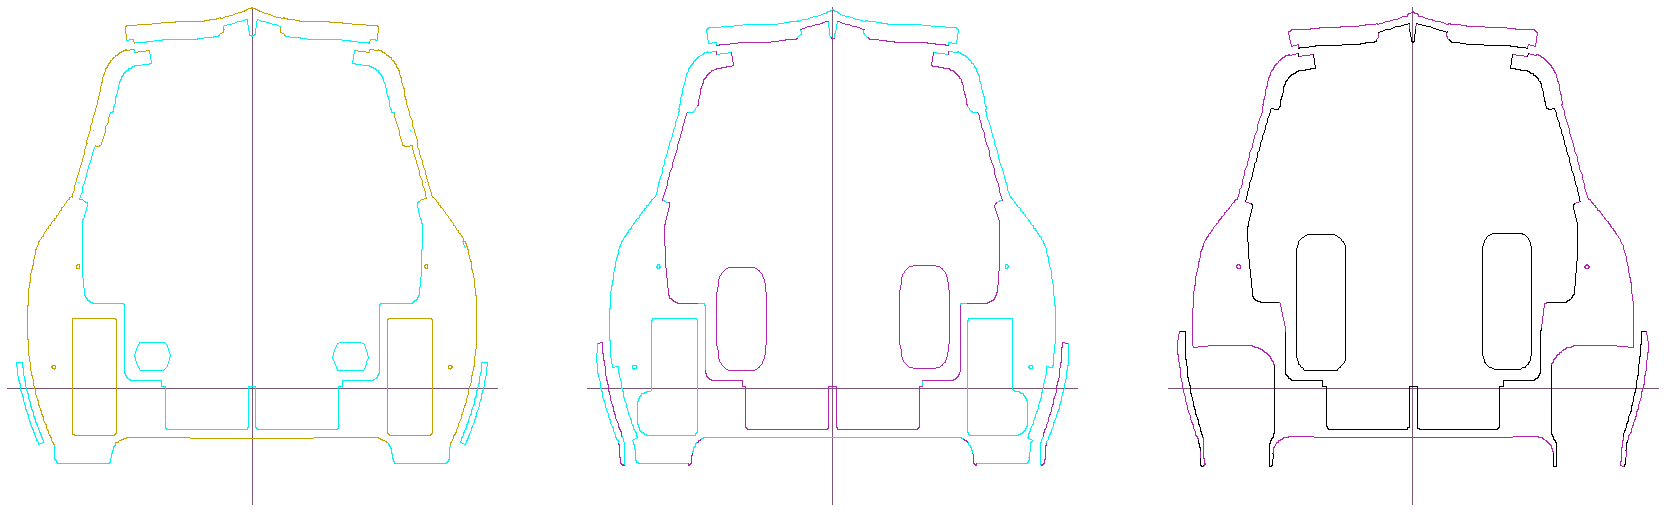
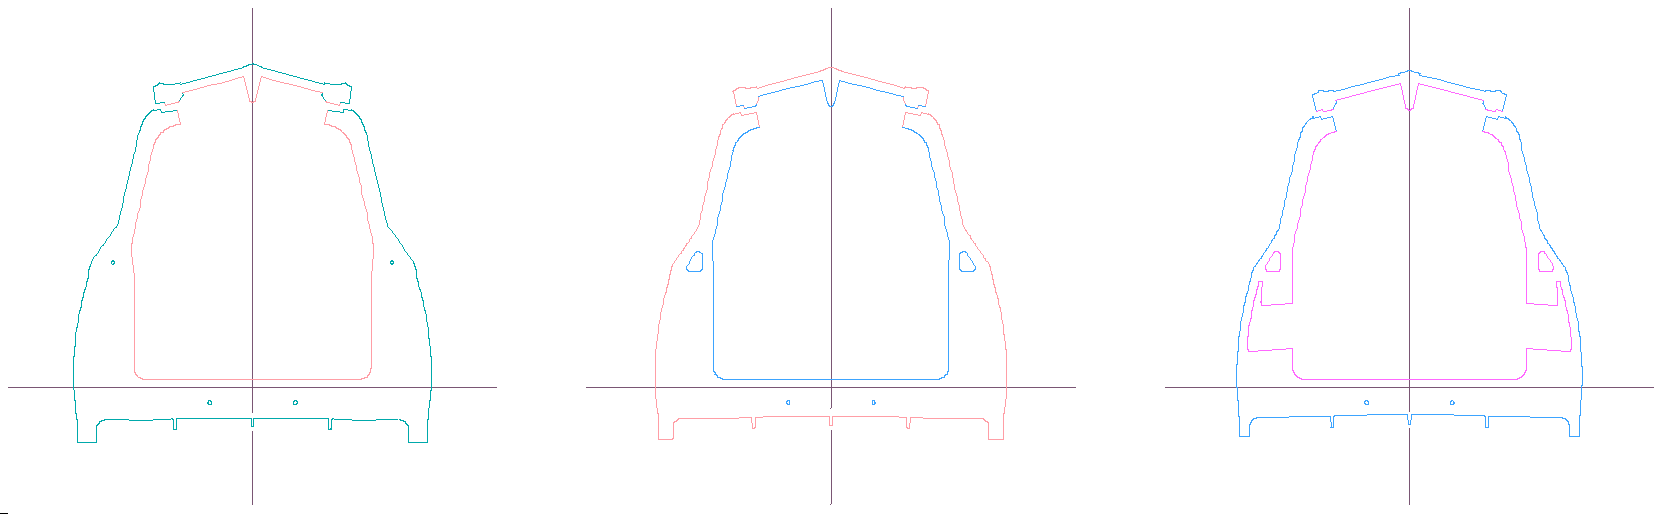
These section have the front pieces of the rear wheels and the wheel skirts. Notice the hatch window is getting wider the closer you get the back.

I moved the wheels to where they may fit more efficiently when cutting the foam. And the rear shock / spring units will probably be located here.


The rear wheels are attached to the chassis here, for the purposes of building the model so it can sit on the ground as the car will. After the chassis is (started?) to be fiberglassed, the wheels will be cut out and the suspension components can be designed and have the anchors affixed to the chassis.

The section on the right has voids for where a lateral link arm can be located. This will form a box beam across the floor between the rear wheels.


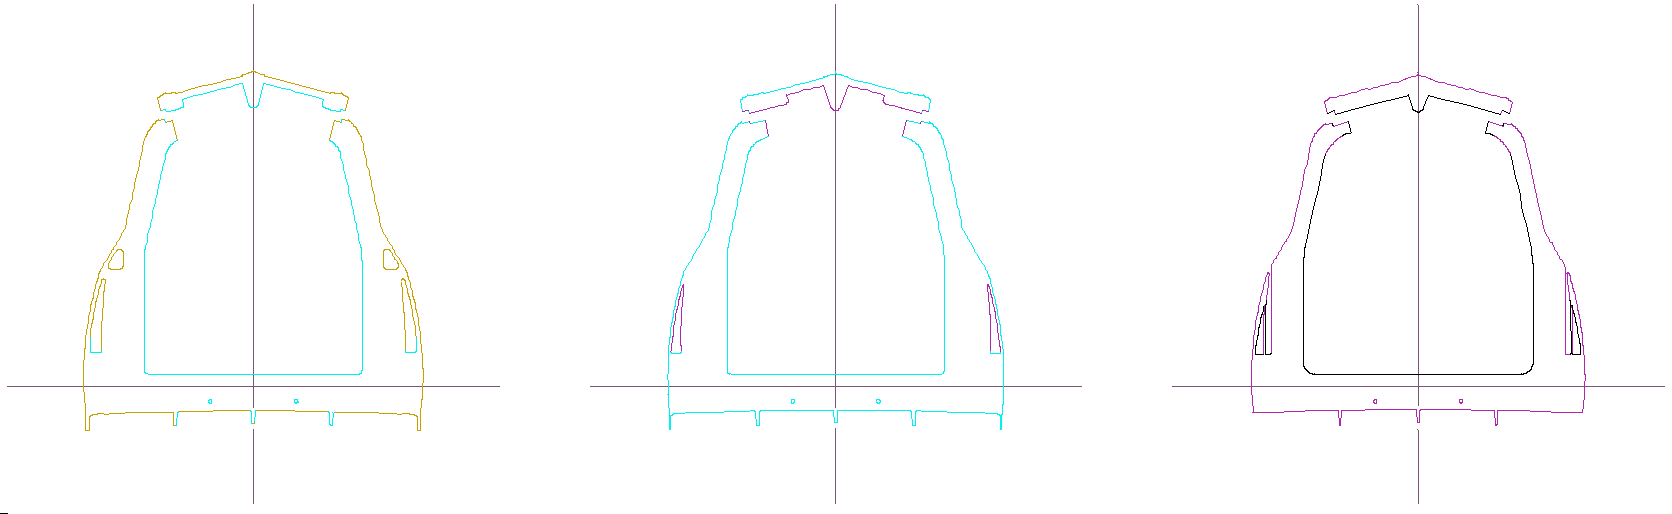
These sections are at the back of the rear wheels, and I moved them where they fit efficiently on the foam sheets.

I am hoping to be able to use the alignment holes as a wire chase, so I am cutting a connecting channel from the outer hols to the inner holes that pass through the section closer to the back.


These sections show the rear wheel strakes and the diffuser fins on the underside of the chassis. Also, I'm cutting a small area so the tail lights can be wired -- the small triangular holes at the "shoulder".

The rear exhaust air vents (that exit flush to the sides of the rear fenders) are shown in the section on the right.


These sections show the exhaust air vents and the end of the rear wheel strakes. Also, the hatch windows stops at this point.

This is the 'D' pillar and the outer edges of the rear bumper starts on the section on the right.


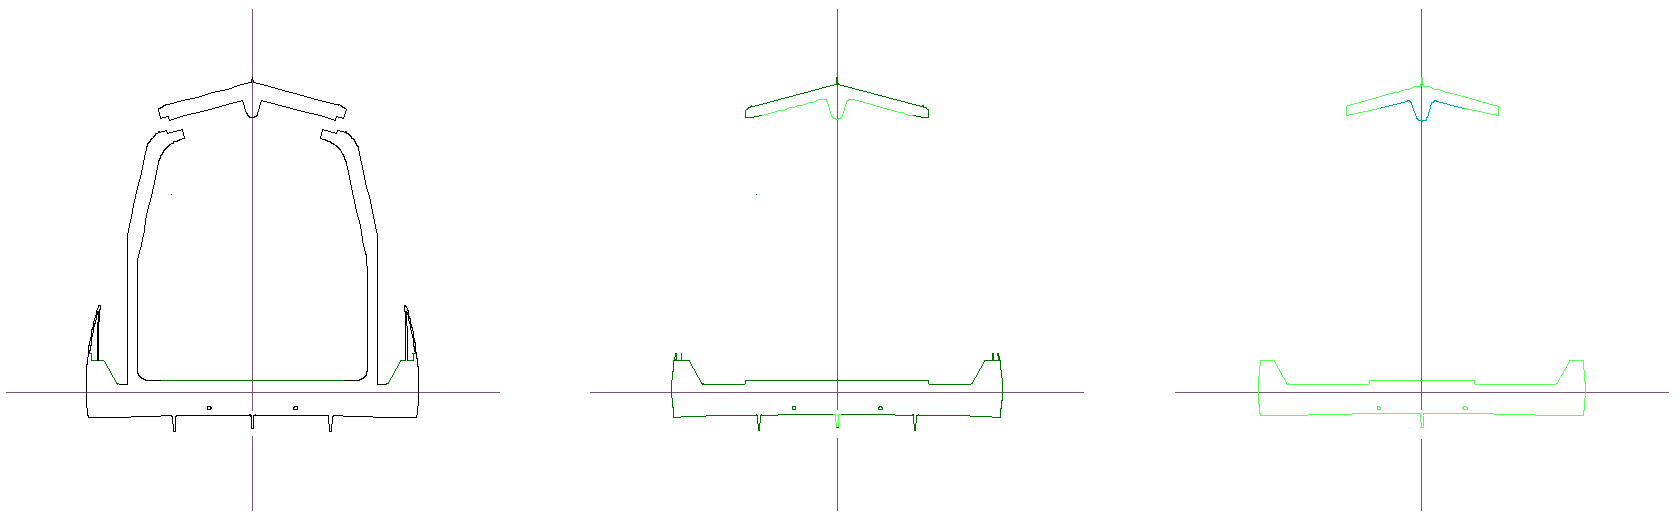
This is the very back of the chassis (nearly) and the section on the left has the rear door stops and the exhaust air vents. These are 1" thick sections because the taper on the very back is much "steeper".

The center rib on the hatch door will act as a supporting stop at the center of the rear doors. I also have added a small "dorsal" fin at the center of the hatch spine. This was not on the SketchUp model; though I hope to remake the SU model from these sections that is much smoother and much more complete as well with all of the interior voids included in the model.


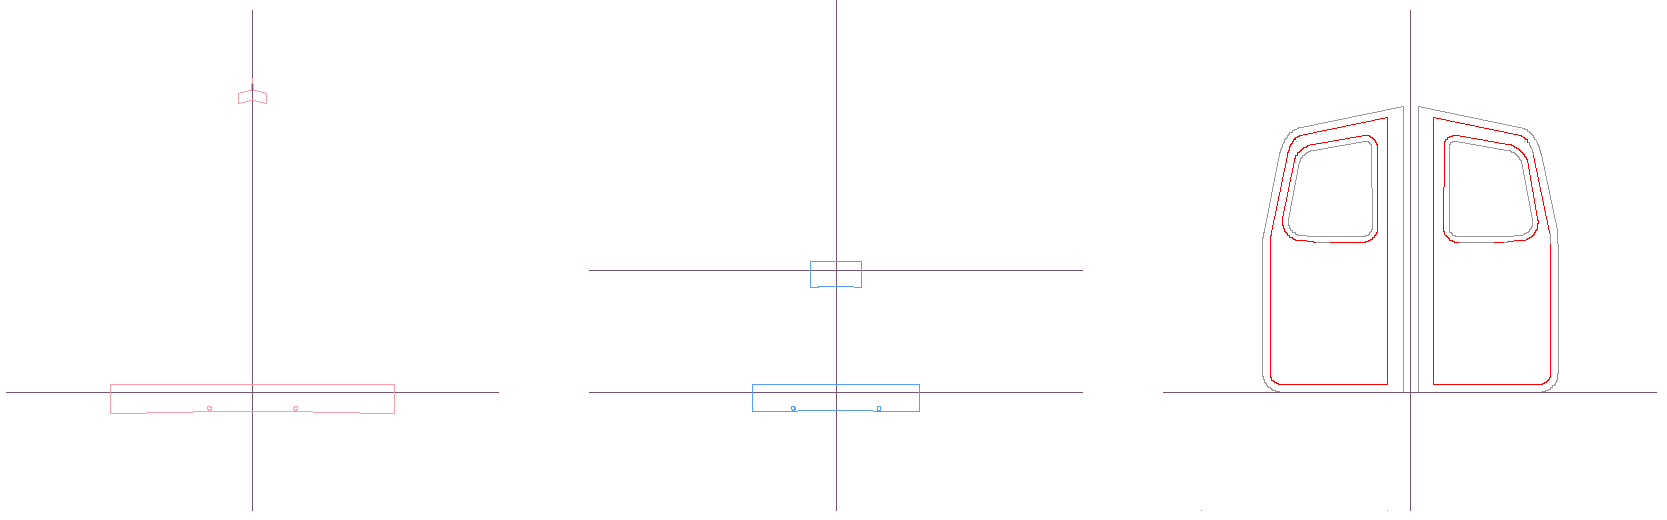
I cut sections parallel through the rear doors, so these are true size and I'll cut them from the flat foam sheets, avoiding an awkward bit of smoothing. The red lines are the actual edges of the doors and windows, and the gray lines are additional material so I can form the jambs.

The rear bumper and roof "spoiler" trailing edges are a very wide chevron, to match the way the rear doors close.
__________________
Sincerely, Neil

http://neilblanchard.blogspot.com/
  Reply With Quote
The Following User Says Thank You to NeilBlanchard For This Useful Post:
Rokeby (02-17-2012)
Old 02-17-2012, 03:58 PM   #330 (permalink)
EcoModding Learner
 
Join Date: Feb 2012
Location: Hendersonville, Tn
Posts: 63

nonikname - '99 Saab 9-5 2.3t
90 day: 33.71 mpg (US)
Thanks: 6
Thanked 8 Times in 7 Posts
Your design reminds me of this:


I like what you're doing.

__________________
1999 Saab 9-5 sedan 2.3t 5speed
2013 prius 3

Quote:
"God is a God who both created the universe, and also had a plan that included me as an individual human being. And that he has made it possible for me, through this series of explorations, to realize that. It is not just a philosophy, it is a reality of a relationship. "
Francis S Collins - director of the National Human Genome Research Institute
  Reply With Quote
Reply  Post New Thread


Powered by vBulletin® Version 3.8.11
Copyright ©2000 - 2024, vBulletin Solutions Inc.
Content Relevant URLs by vBSEO 3.5.2
All content copyright EcoModder.com