Go Back   EcoModder Forum > EcoModding > DIY / How-to
Register Now
 Register Now
 

Reply  Post New Thread
 
Submit Tools LinkBack Thread Tools
Old 10-03-2012, 10:04 PM   #1 (permalink)
Hakuna Matata
 
Join Date: Dec 2009
Location: Green Bay
Posts: 40

Avalon - '99 Toyota Avalon XLS
Thanks: 12
Thanked 26 Times in 11 Posts
DIY Easy Smooth Wheel Covers

This is a DIY guide for mounting a set of smooth wheel covers to a wheel. The vehicle being modded today is a '99 Chevy Blazer 4x4.

If you like this then see my clean DIY mirror delete guide. - http://ecomodder.com/forum/showthrea...ete-23608.html

Materials and tools needed:
  • 4- 16 inch smooth pizza pans (Size is adequate for 14'' or 15'' wheels)
  • 4- 3/8x1.5'' bolts
  • 4- 3/8 standard hex nuts
  • 4- 3/8 lock nuts
  • 16- 3/8 washers
  • 1- Tube of epoxy or strong adhesive

This also requires:
  • center punch
  • 3/8 drill bit
  • Drill
  • Standard ratchet set
  • Hammer
  • Small block of wood

First, gather the materials.


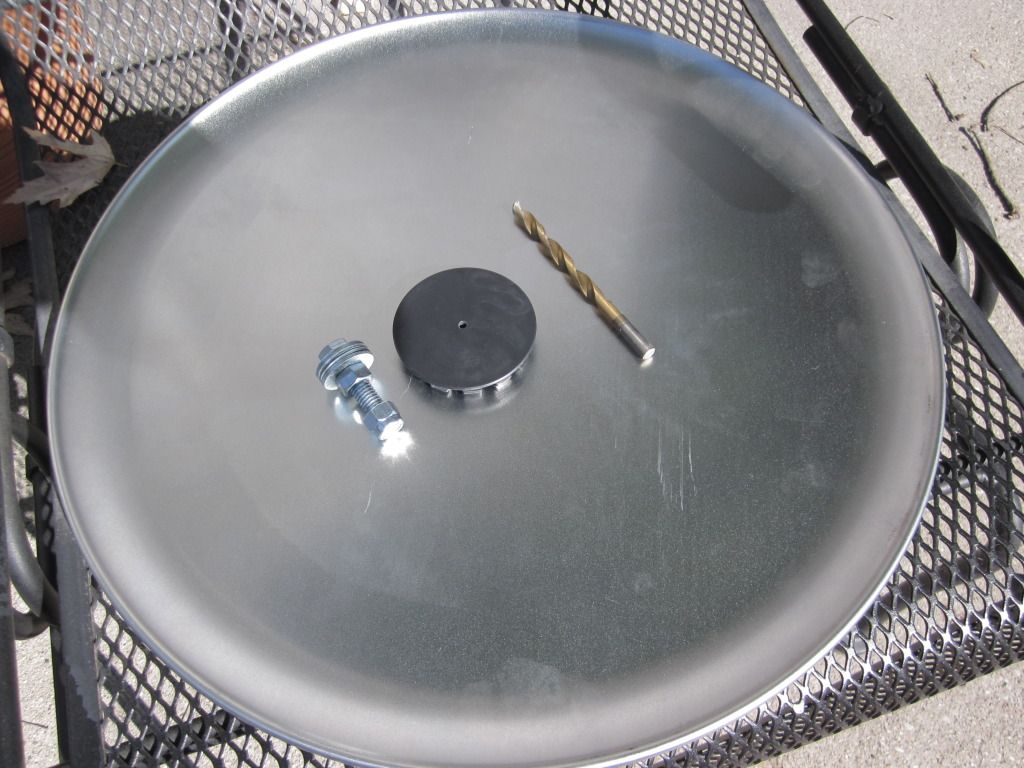
Next, we need to mark the center of the pizza pan.

I didn't have access to a compass large enough for this project, so I set a tape measure to 8'' from the outside edge, held a pencil against the metal edge at the center of the pan, and made several arcs from different quadrants of the pan.

Now take the hammer and center punch and make a mark in the center of the pan where the arcs intersect. This mark is to keep the drill bit from wandering and helps ensure the hole is centered.

With that done you can now drill the hole. Be sure to use a block of wood behind the pan while drilling.

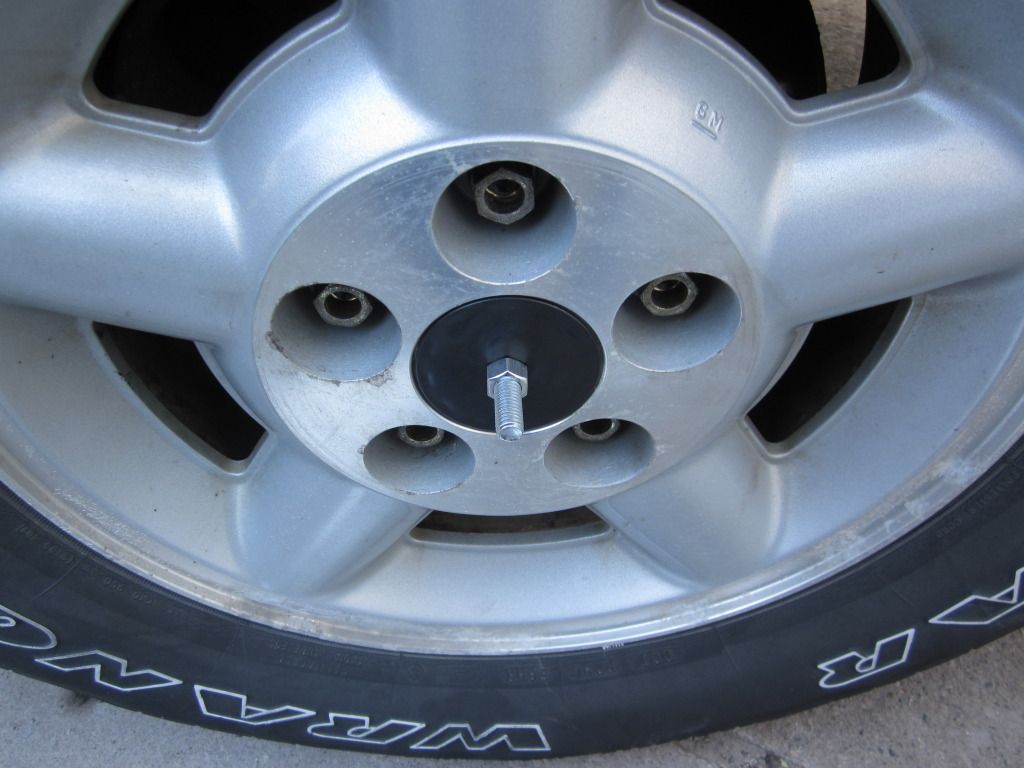
Now, we turn our attention to the wheels and mounting of the pan. This is specifically done with the wheels below as they are perfect for our modding. If you are creative you can employ a similar mounting method for almost any wheel with a plastic center cap.


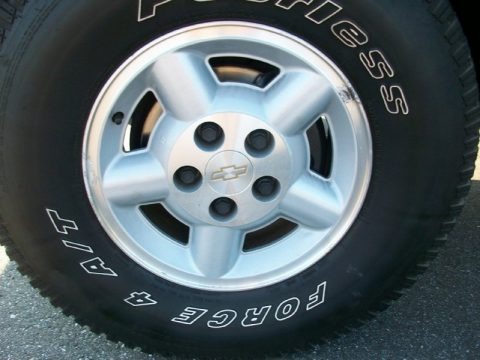
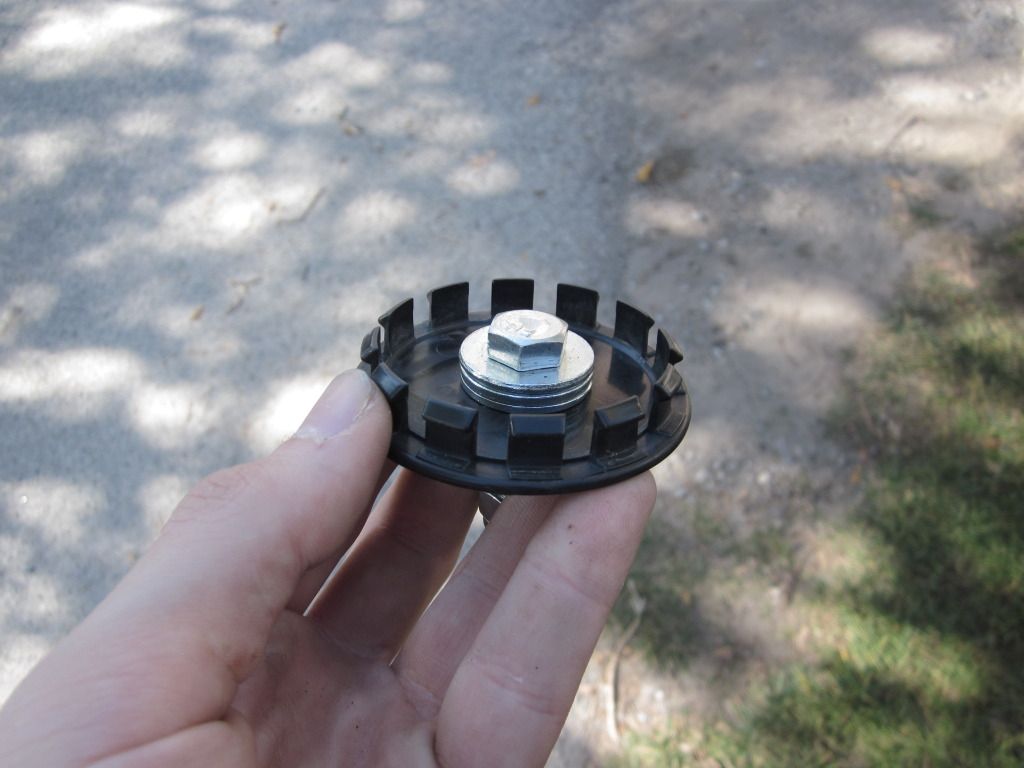
First, remove the plastic center cap. This may require some patience to avoid damaging the unit. If this is too difficult the wheel can be removed and the cap punched out from the backside.

My cap looks like this, and is an aftermarket blank replacement. Your cap may have a bow tie or logo on it.


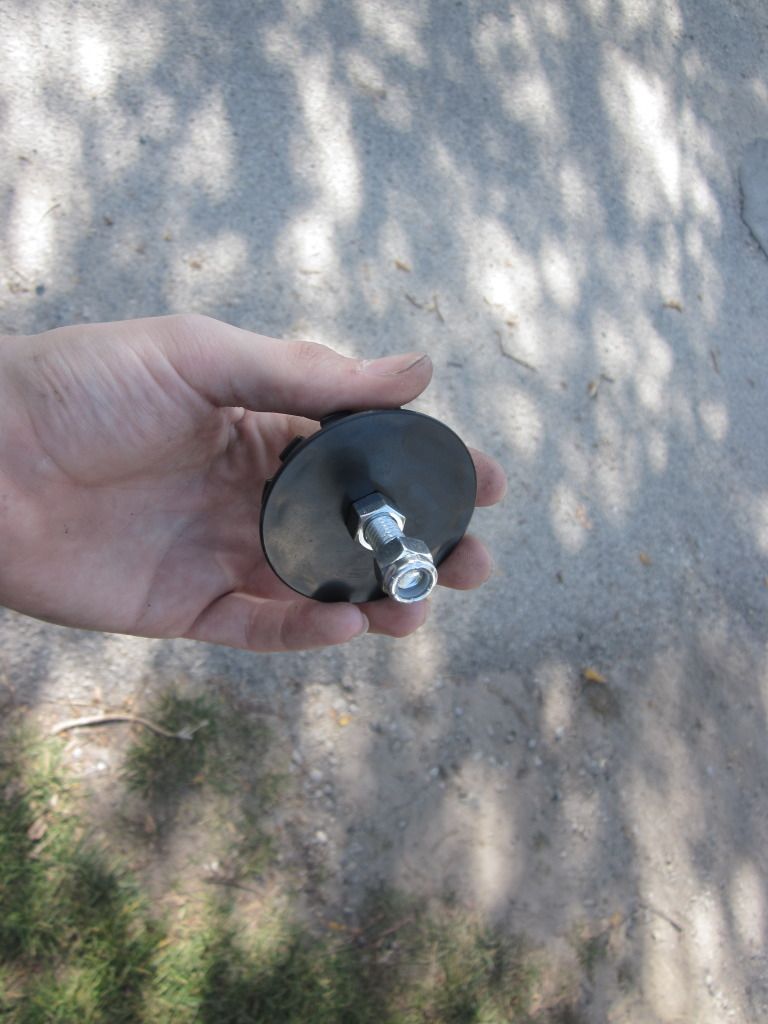
Now we find the center of this cap and drill another 3/8 hole.

With that done you can now place a bolt and washer through the hole on the back side of the cap. Next, place a washer and the standard nut on the front side; This effectively holds the bolt in place and spaces the wheel cover mounting plane out further.


Back side of the cap. This faces the axle. I had to use extra washers during mockup because my bolt had an unthreaded neck below the head. You may do the same if necessary.


Side view.


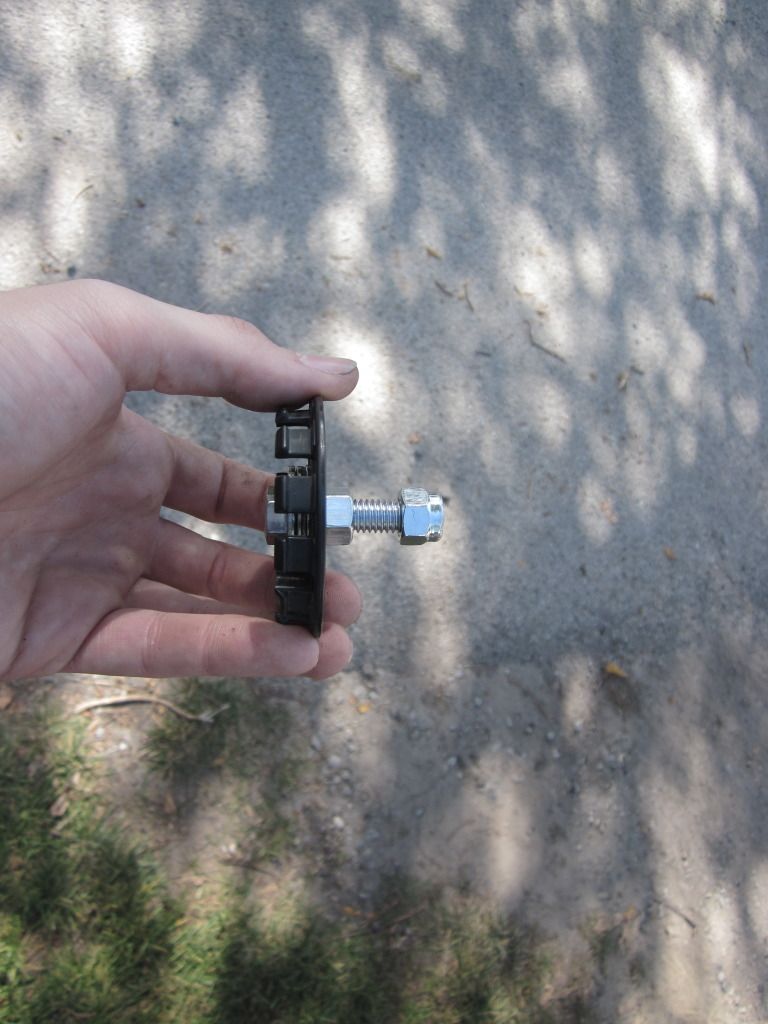
Front side. This faces out, away from the vehicle.


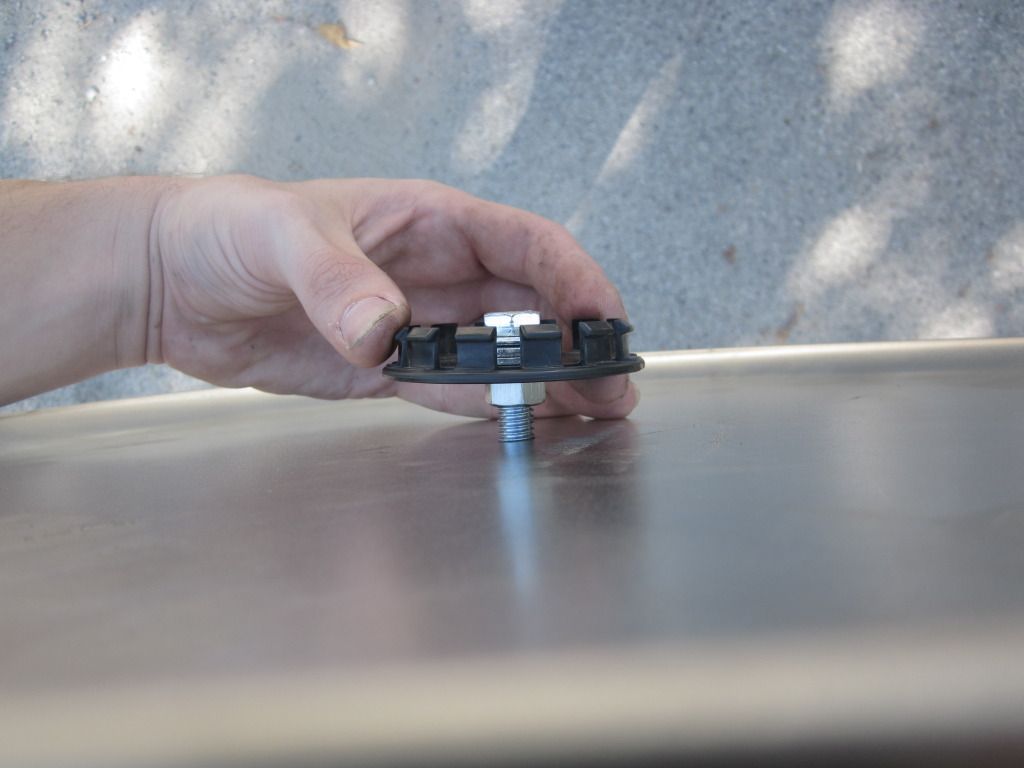
Now take the pan and the mounting stud and do a quick mock up on the vehicle. The pan may not sit flush with the wheel if you have wheel weights on the outer edge.

Does it fit snugly? Is it centered? Are you eager for better aero?

To secure the center cap in place we are going to need some type of adhesive. I chose to use a standard two part epoxy. Mix up the adhesive and apply a consistent coating to the inside radius of the cap mounting bore, then insert the cap.


At this point it is important we let the adhesive cure before moving on.

With the adhesive cured, now we place a washer on the mounting stud before the pan goes on. Next, slide the wheel cover over the stud with the rolled edge facing outwards. Place a washer on the front side of the pan and finish off with gently snugging the lock nut.
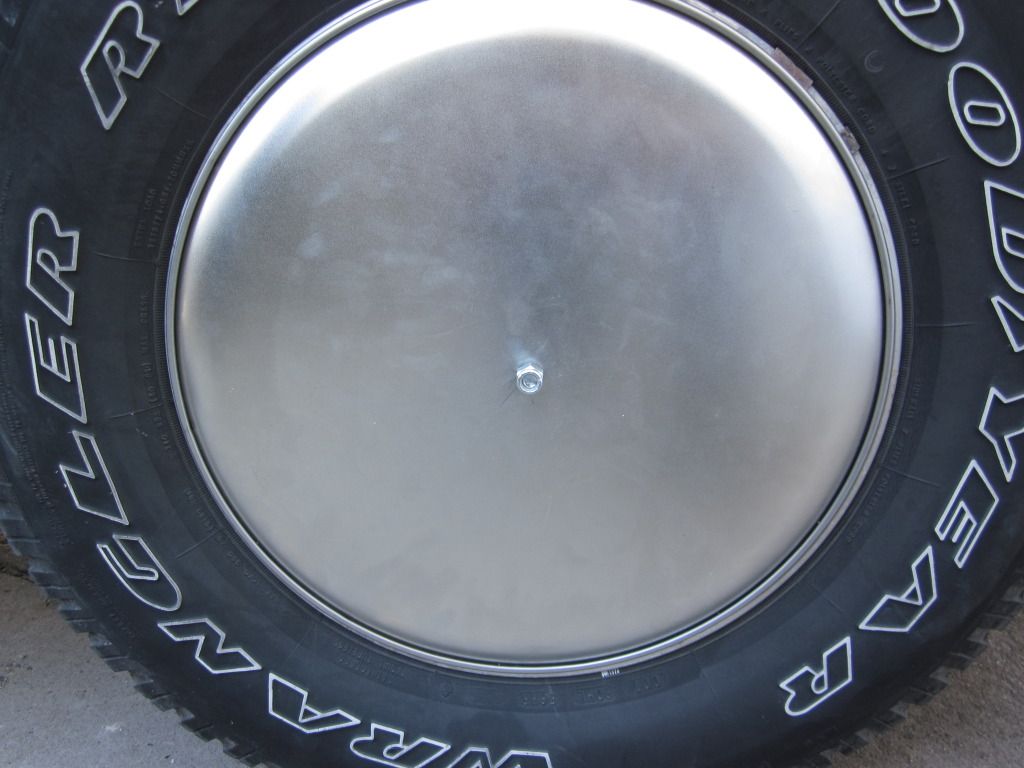


Done!

__________________
Simplify, then add lightness.

Last edited by raylit20; 10-25-2012 at 01:31 PM..
  Reply With Quote
The Following 16 Users Say Thank You to raylit20 For This Useful Post:
Cd (10-25-2012), Christ (01-27-2013), Daschicken (03-15-2018), deejaaa (08-12-2013), GalwayBogger (05-31-2013), kYLEMtnCRUZr (10-02-2014), mcrews (12-11-2012), mikeyjd (08-07-2013), niky (10-04-2012), Outlaws69 (10-26-2012), Piwoslaw (10-04-2012), Puddlejumper (03-18-2013), Smurf (10-04-2012), sustainable sam (10-27-2012), SwamiSalami (03-08-2013), WesternStarSCR (10-25-2012)
Alt Today
Popular topics

Other popular topics in this forum...

   
Old 10-04-2012, 02:25 AM   #2 (permalink)
EcoModding Apprentice
 
Join Date: Mar 2012
Location: Adelaide, Australia
Posts: 235

F Truck - '77 Ford F100 2x4, single cab, lwb
90 day: 8.75 mpg (US)

Bombodore - '98 Holden Commodore Exec Wagon
90 day: 21.35 mpg (US)

Civic - '93 Honda Civic GL
90 day: 36.62 mpg (US)

Jim The Prius - '09 Toyota Prius
90 day: 36.66 mpg (US)
Thanks: 154
Thanked 62 Times in 35 Posts
awesome! i have been trying to figure out a way to secure pizza pans on my wheels, i might be able to use this option, just have to check out my center caps
__________________


(Posted in 2020) 2009 Prius Off Road project: https://ecomodder.com/forum/showthre...ide-38366.html

(Posted in 2012) 1977 F100 Project: http://ecomodder.com/forum/showthrea...tml#post310326
  Reply With Quote
Old 10-04-2012, 02:30 AM   #3 (permalink)
Master EcoModder
 
Join Date: Aug 2010
Location: Philippines
Posts: 2,173
Thanks: 1,739
Thanked 589 Times in 401 Posts
Awesome write-up. Simple, concise and very helpful!
  Reply With Quote
Old 10-25-2012, 07:10 AM   #4 (permalink)
EcoModding Lurker
 
Join Date: Oct 2012
Location: Newark UK
Posts: 12

Passat - '06 VW Passat SE
Thanks: 3
Thanked 1 Time in 1 Post
They look very good and a clean fitting.
Would the center cap be strong enough to hold it though i would be worried that it may come off when cornering?
  Reply With Quote
The Following User Says Thank You to c4a8l For This Useful Post:
WesternStarSCR (10-25-2012)
Old 10-25-2012, 12:14 PM   #5 (permalink)
Busting Knuckles Often
 
Join Date: Aug 2012
Location: SE Michigan
Posts: 135

Blue Maxx - '04 Chevrolet Malibu Maxx LT
Team Chevy
90 day: 26.96 mpg (US)

Tink's Van - '08 Chrysler Town & Country Touring
90 day: 19.09 mpg (US)

2004 5 Speed Goldrolla - '04 Toyota Corolla CE
Team Toyota
90 day: 36.3 mpg (US)
Thanks: 313
Thanked 28 Times in 20 Posts
Quote:
Originally Posted by c4a8l View Post
They look very good and a clean fitting.
Would the center cap be strong enough to hold it though i would be worried that it may come off when cornering?
I am wondering same thing. I am planing on doing this on my Malibu, it has the plastic center cap that comes out easier than I expected.

I am thinking I will use some silicone caulk on it, then press it in to place, then use some Gorilla duct tape as an extra measure to keep the cap on. Since it will be covered by the pizza pan, you won't see the tape!
__________________


  Reply With Quote
Old 10-25-2012, 12:28 PM   #6 (permalink)
Busting Knuckles Often
 
Join Date: Aug 2012
Location: SE Michigan
Posts: 135

Blue Maxx - '04 Chevrolet Malibu Maxx LT
Team Chevy
90 day: 26.96 mpg (US)

Tink's Van - '08 Chrysler Town & Country Touring
90 day: 19.09 mpg (US)

2004 5 Speed Goldrolla - '04 Toyota Corolla CE
Team Toyota
90 day: 36.3 mpg (US)
Thanks: 313
Thanked 28 Times in 20 Posts
Thanks! Glad Chevy has these plastic, removeable caps.

Quote:
Originally Posted by raylit20 View Post
This is a DIY guide for mounting a set of smooth wheel covers to a wheel. The vehicle being modded today is a '99 Chevy Blazer 4x4.

Materials and tools needed:
  • 4- 16 inch smooth pizza pans (Size is adequate for 14'' or 15'' wheels)
  • 4- 3/8x1.5'' bolts
  • 4- 3/8 standard hex nuts
  • 4- 3/8 lock nuts
  • 16- 3/8 washers
  • 1- Tube of epoxy or strong adhesive

...

Done!
Awesome DIY! I just ordered 4 - 17" Aluminum pizza pans from Grainger, for my 16" OEM Malibu Wheels.

I was assuming I would have to put 2 or 3 smaller bolts into the plastic center cap from the outside, and I was not sure of some details etc.

With your writeup, I am going to take your approach, and use just 1, bigger, more robust bolt, pointing OUT. Makes it easy to take off for getting to the lug nuts.

I am going to notch them for my air valve access.

I think smearing some good silicone on the hub cap before press fitting back in will work for me, with some good tape across it as well for good measure.

I will post my DIY as well. So glad I found your post!!!

I wonder how to get this post into the Areodynamic section too, that is where I see most of the moonie / solid disc hub cap write ups...

__________________


  Reply With Quote
Old 10-25-2012, 01:29 PM   #7 (permalink)
Hakuna Matata
 
Join Date: Dec 2009
Location: Green Bay
Posts: 40

Avalon - '99 Toyota Avalon XLS
Thanks: 12
Thanked 26 Times in 11 Posts
Quote:
Originally Posted by c4a8l View Post
They look very good and a clean fitting.
Would the center cap be strong enough to hold it though i would be worried that it may come off when cornering?
The epoxy forms an incredibly strong bond between the cap and cap mounting bore when used correctly.

As to the cover to stud mounting, the lock nut positively secures the wheel cover to the stud. Neither are going to come off without prying on them with force. Remember to replace the lock nut after it has been removed and reinstalled a few times as the nylon locking mechanism distorts and wears with frequent removal.

If you follow the guide, the covers will not come off while driving.

I also have a DIY guide up for doing a clean mirror delete. - http://ecomodder.com/forum/showthrea...ete-23608.html
__________________
Simplify, then add lightness.
  Reply With Quote
The Following User Says Thank You to raylit20 For This Useful Post:
WesternStarSCR (10-25-2012)
Old 10-25-2012, 03:11 PM   #8 (permalink)
Busting Knuckles Often
 
Join Date: Aug 2012
Location: SE Michigan
Posts: 135

Blue Maxx - '04 Chevrolet Malibu Maxx LT
Team Chevy
90 day: 26.96 mpg (US)

Tink's Van - '08 Chrysler Town & Country Touring
90 day: 19.09 mpg (US)

2004 5 Speed Goldrolla - '04 Toyota Corolla CE
Team Toyota
90 day: 36.3 mpg (US)
Thanks: 313
Thanked 28 Times in 20 Posts
Doh...

Ahh, yes makes sense now. I was worried I needed to keep the plastic caps removeable.

They dont need to be separate from the wheel. When I need to get to the axle nut, the whole wheel is off anyway...

Epoxy it is...

I just have to make sure the head of the bolt is not interfering with the threaded axle on my FWD.

Thanks again, much easier your way... Do you plan on notching pizza pan for access to air valve?
__________________


  Reply With Quote
Old 10-27-2012, 03:07 PM   #9 (permalink)
Hakuna Matata
 
Join Date: Dec 2009
Location: Green Bay
Posts: 40

Avalon - '99 Toyota Avalon XLS
Thanks: 12
Thanked 26 Times in 11 Posts
I planned to keep the covers as smooth as possible. The new tires I had installed should retain air pressure for quite a while, making valve stem access slots unnecessary.

I did recently sell the vehicle these covers were initially installed on. I saved the parts and will modify them to suit my next vehicle.
__________________
Simplify, then add lightness.
  Reply With Quote
The Following User Says Thank You to raylit20 For This Useful Post:
WesternStarSCR (10-28-2012)
Old 10-27-2012, 03:45 PM   #10 (permalink)
...beats walking...
 
Join Date: Jul 2009
Location: .
Posts: 6,190
Thanks: 179
Thanked 1,525 Times in 1,126 Posts
...and, for the ultimate aerodynamics, replace the nylon-inserted nut with an suitably-threaded acorn nut and a sparingly small amount of Locktite™

  Reply With Quote
The Following User Says Thank You to gone-ot For This Useful Post:
WesternStarSCR (10-28-2012)
Reply  Post New Thread


Powered by vBulletin® Version 3.8.11
Copyright ©2000 - 2024, vBulletin Solutions Inc.
Content Relevant URLs by vBSEO 3.5.2
All content copyright EcoModder.com