...
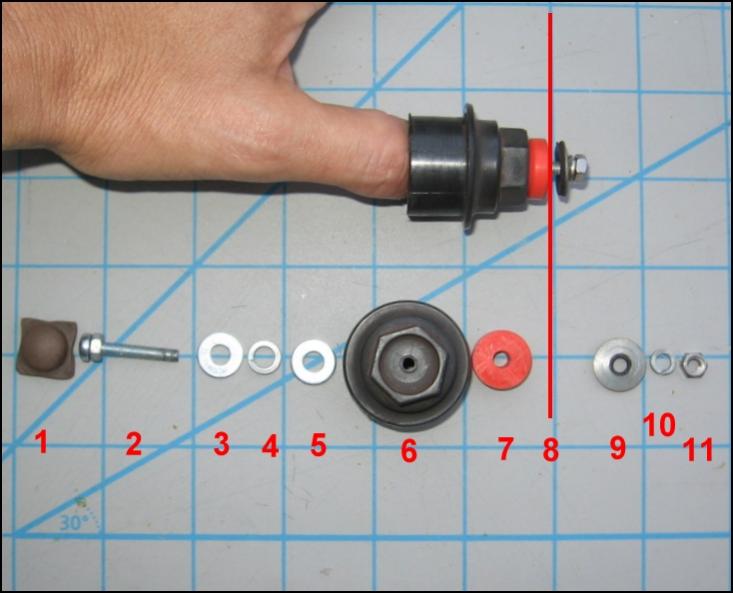
Here is the anatomy of my overkill but solid as a pet-rock connection system :

1 - A square piece of craft sponge to keep the bolt snug. This keeps it from rattling around when I am installing the cover. The cylinder shape is from being squished up against the real lug nut. Pipe insulation is perfect in place of craft insulation.
2 - Bolt with nut screwed all the way on. This was a quick way to shorten the bolt by the width of the nut.
3 - A washer to cover the ...
4 - Lock washer to help make things snug followed by ...
5 - Another washer to cover up the lock washer. Therefore,
3+4+5 form a
washer+lock washer+washer sandwich that protects the ...
6 - Plastic lug nut that is the base for the attachement system. Notice that the hole is small. I did this to preserve as much of the plastic as possible. I wanted to do this because every milligram of plastic that is preserved contributes to the robustness of the solution. That hole is 0.15" in diameter. The bolt is the same, so I have to screw it on to get it to go through.
7 - A plumbing washer that is conical in shape on the side that touches the plastic lug nut.
8 - A line representing the plastic wheel cover.
9 - A washer with a rubberized backing. In this way
7+8+9 are all "plastic on plastic" with a metal bolt going through. My thinking is that this helps to protect the (brittle plastic) wheel cover from damage by isolating it from metal parts.
10 - Another lock washer to help keep the ...
11 - Retaining nut. When I screw on the nut, even though there is nothing to keep the bolt from spinning, there is enough friction in the setup to allow the bolt to screw on quite well. I just screw it hand-tight. I have not lost a single nut (yet).
...