01-24-2013, 02:54 PM
|
#21 (permalink)
|
|
Master EcoModder
Join Date: Aug 2012
Location: northwest of normal
Posts: 28,992
Thanks: 8,226
Thanked 9,000 Times in 7,434 Posts
|
If you get a corner strike, you'll get a *lot* of torque on the hitch.
|
|
|

|
 Today Today
|
|
|
|
 Other popular topics in this forum...
|
|
|
|
|
01-25-2013, 07:06 PM
|
#22 (permalink)
|
|
Master EcoModder
Join Date: Jan 2008
Location: Sanger,Texas,U.S.A.
Posts: 16,404
Thanks: 24,471
Thanked 7,410 Times in 4,800 Posts
|
corners
I've laid up fiberglass compound corners inside hemispherical steel barbecue lids found at metal recycling centers.
I've also run schedule-40 PVC pipe through the table saw to create molds for the corner radii.
Thermo-formed ABS plastic fish ponds have some fabulous compound forms of which the inside surfaces could serve as molds.
Tractor Supply also carries cattle troughs which are thermo-formed ABS which possess both compound corners and edge radii.
And children's poly tubular playground slides have compound curves almost as large as what Airstream and Argossy trailers use.
Flea Markets,yard sales,junk dealers,Habitat for Humanity Resale stores can all be sources for what would otherwise be extremely expensive 3D forms. 
__________________
Photobucket album: http://s1271.photobucket.com/albums/jj622/aerohead2/
Last edited by aerohead; 01-25-2013 at 07:08 PM..
Reason: correct language context
|
|
|
|
|
The Following 3 Users Say Thank You to aerohead For This Useful Post:
|
|
|
01-26-2013, 04:05 AM
|
#23 (permalink)
|
|
Master EcoModder
Join Date: Mar 2012
Location: Salt Lake City
Posts: 292
00C - '00 Toyota Corolla 90 day: 43.54 mpg (US)
Thanks: 147
Thanked 190 Times in 73 Posts
|
Quote:
Originally Posted by freebeard

That's an interesting business model. What's the up/down ratio? It seems like they would have to grade the submissions to keep it from filling up with cruft.
|
I suspect the 'review' has more to do with driving folks to paying for a level-up service which comes with 5 download credits (that you don't have to wait for) for $120. Some of the CAD files also can't be accessed without a higher-level account. It's a racket.
Last edited by christofoo; 01-26-2013 at 04:39 PM..
|
|
|
|
|
01-26-2013, 05:31 AM
|
#24 (permalink)
|
|
Master EcoModder
Join Date: Mar 2012
Location: Salt Lake City
Posts: 292
00C - '00 Toyota Corolla 90 day: 43.54 mpg (US)
Thanks: 147
Thanked 190 Times in 73 Posts
|
Quote:
Originally Posted by christofoo
...
There is also the caster shown; I still haven't decided for sure, but I think this is the way to go. This design means in a ground-strike the caster and hitch receiver will have to bear the weight of some of the vehicle. The caster here is rated at 300lbs, so it may or may not break. My experience is that the car will not strike at this departure angle if it's unloaded. So if I do this right, the weight on the caster should be no more than the load in the car, not the car itself. I've also set the bottom slope at 15.5° to keep the departure angle sane, which is faster than ideal but will still provide some aero benefit.
Another approach is to use a caster, hinge and chain so that the box can just bend out of the way instead of trying to support the vehicle. This would also enable lowering the bottom slope closer to the aerodynamic ideal. But space is tight between the trunk and the box, and it adds complexity, and I'm debating whether it's worth it, since I'd have to redesign everything. (Better now than later though.)
...
|
I overheard myself thinking aloud in that post and started to question my logic. So I started overhauling my CAD around Tue. LCD failure on my antiquated desktop caused some delay since my laptop is too new to run my CAD, but anyways I think the fixed bottom rail is probably not the way to go after all. At least not for a low ground-clearance vehicle like the Civic.
For one thing, the caster costs 2° of departure angle, resulting in 13.5° instead of 15.5°. For another, I want to avoid lifting the car using the hitch receiver. Class 1 should only have 200lbs tongue weight. Actually my Civic isn't rated for any towing at all, but I guess that just means I need to upgrade the rear shocks and stick to Class 1, for the purposes of a hitch box. (Anyways it hasn't stopped me so far.)
The orange triangle depicts a 26° wedge between the box and the hood if I locate the hinge at the point of the triangle. This pic also gives you an idea as to how I'm defining the envelope for the hitch box; I put all the pixel coordinates of the red dots into a spreadsheet and defined the scale using the known dimension specs (3.8pix/inch). 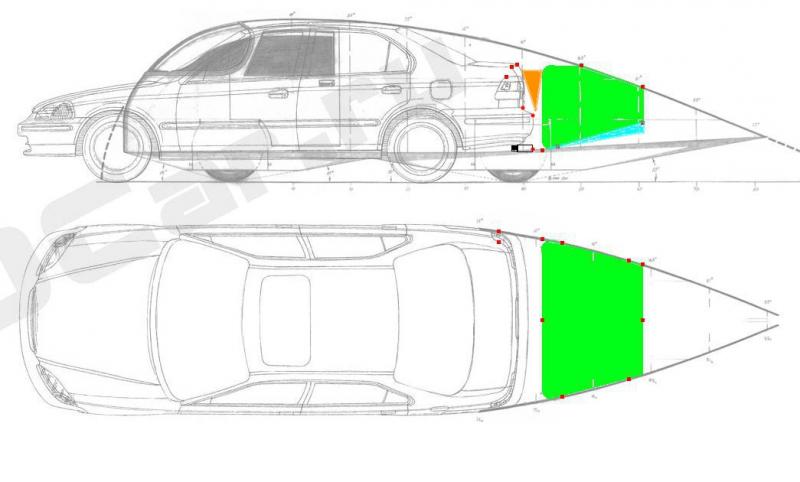
Now for a demonstration: in this picture there is an 'invisible' car between the hitch box and the rear tires (actually just dimensional constraints that hold them together in the right place). The ramp is at 15.5° and the driver didn't turn into it. I believe my own driveway is around 15-15.5° and it's one of the worst I ever use. 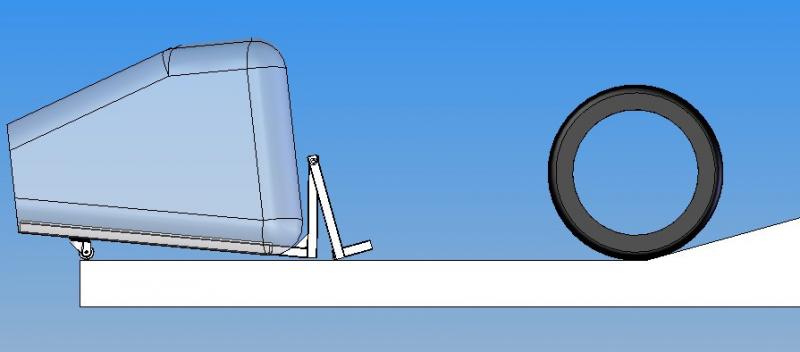
The same, but now the ramp is at 16.5° since the driver angled the car to 10°. You can see the front corners of the box are under threat and there's nothing the caster can do about it. I can shorten one of the posts so the box is higher in the front. I have already taken off 0.5" and that made a big difference. But the more I do this, the more it (maybe) becomes less aerodynamic with flow detachment on the bottom. EDIT: I think this is actually not as bad as it looks since the suspension will tend to compensate. 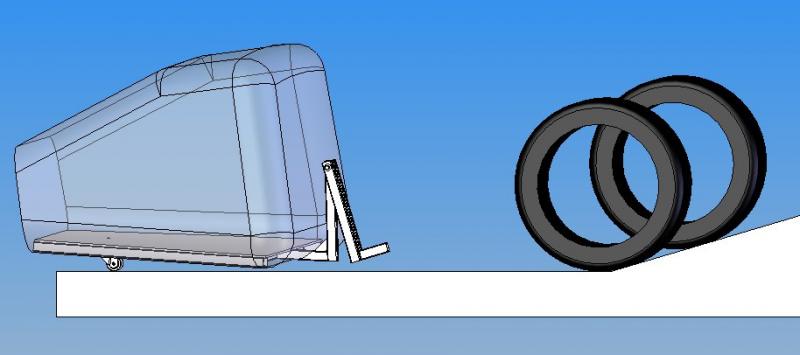
Now the driver turns to 20°. No problem here. If the driver turns in much steeper the box just stays off the ground and never even hinges. EDIT: this speaks to COcyclist's concern. In most situations the center caster is adequate, at least for the hinged version. 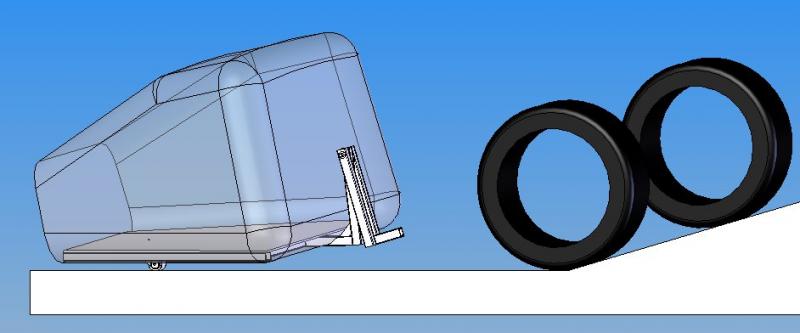
However, sidewalks can strike the front of the box if the ramp angle is over about 15°, and if the driver backs in or faces out. 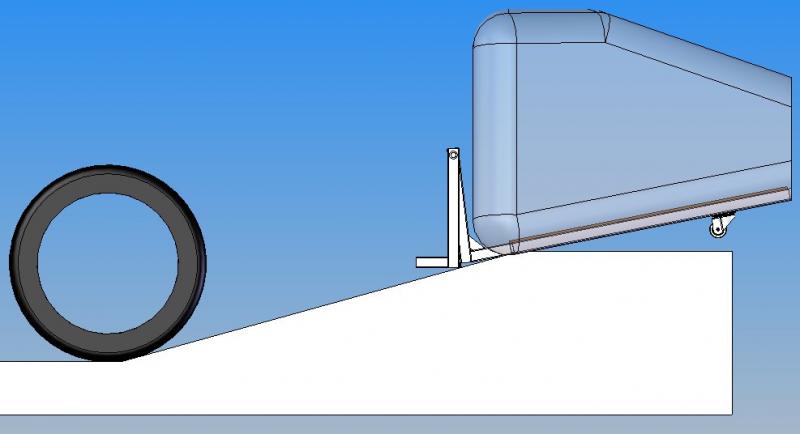
The driver should avoid doing this on steep driveways that have sidewalks. This probably deserves a little more thought because it can be a big deal in business parking lots, i.e. where facing out is required.
And so, here is my v2 implementation: 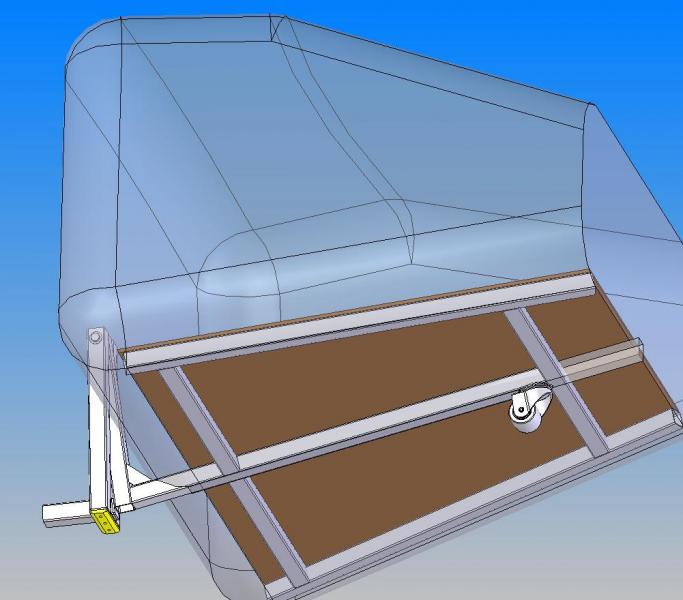 - Hinged frame located right behind the rear bumper. The trunk is just above this and can still open with the hitch box in place.
- Using a clevis pin in the 'hinge', so the hitch box can be installed and removed in two pieces. Expecting to use this feature a lot since I want to keep heavy stuff in the trunk. Hard to get heavy stuff in and out of the trunk with a hitch box in the way, even if the trunk opens. Hmm, I should probably change over to a locking pin so my box doesn't get stolen.
- The location of the hinge also deserved some thought; if the pivot point is too low then braking can cause the box to swing forward, depending on how it's loaded. Also if it is too high at some point it impinges on the trunk. For the 16.5° ramp the box only hinged about 11°, so I still have plenty of space there.
- 1.25" steel square tube frame, welded. 120-wall for the two bottom-center rails, 60-wall for everything else.
- The yellow pad at the bottom is machined from UHMW polyethylene. I'm hoping this material is tough enough and slick enough to act a bit like a caster in case this area strikes. The advantage over a caster is that it is much lower profile. I was hoping to avoid machined parts, but at least this is light duty, and if I decide against it I might just do a sacrificial 1/8" steel plate here with beveled edges.
- I believe in controlling failure. I might also attach strips of UHMW PE under each of the three front-to-back floor frames. That might be the partial solution if there is a genuine issue facing out of business parking lots with sidewalks.
Man, what a load of details. For anyone who wants my CAD for whatever, I put it here: Index of /files
Tomorrow I got to get the shop cleaned up and ready to use the new welder and planishing hammer. 
Last edited by christofoo; 01-26-2013 at 04:34 PM..
|
|
|
|
|
The Following 2 Users Say Thank You to christofoo For This Useful Post:
|
|
|
01-26-2013, 06:21 PM
|
#25 (permalink)
|
|
Master EcoModder
Join Date: Aug 2012
Location: northwest of normal
Posts: 28,992
Thanks: 8,226
Thanked 9,000 Times in 7,434 Posts
|
Quote:
|
Originally Posted by christofoo
I suspect the 'review' has more to do with driving folks to paying for a level-up service...It's a racket.
|
Well, color me 'surprised'.
Interesting. I could use blocks of this under the front of my car. |
|
|
|
|
01-26-2013, 06:26 PM
|
#26 (permalink)
|
|
Master EcoModder
Join Date: Mar 2012
Location: Salt Lake City
Posts: 292
00C - '00 Toyota Corolla 90 day: 43.54 mpg (US)
Thanks: 147
Thanked 190 Times in 73 Posts
|
<slaps head> I was going to say; the up/down ratio is 1:1.
|
|
|
|
|
01-28-2013, 02:16 PM
|
#27 (permalink)
|
|
PSmodder lurker
Join Date: Jan 2009
Location: Chino
Posts: 1,605
Thanks: 26
Thanked 909 Times in 522 Posts
|
An anecdotal observation, when you see large RVs with extra-long tails turn into deep entrance/exit ramps the sides & corners often strike the road surface. For your extended box instead of a single center caster, the bottom corners may benefit with much lower profile sled-like runners.
|
|
|
|
|
The Following User Says Thank You to botsapper For This Useful Post:
|
|
|
01-28-2013, 02:49 PM
|
#28 (permalink)
|
|
Master EcoModder
Join Date: Mar 2012
Location: Salt Lake City
Posts: 292
00C - '00 Toyota Corolla 90 day: 43.54 mpg (US)
Thanks: 147
Thanked 190 Times in 73 Posts
|
Quote:
Originally Posted by botsapper
An anecdotal observation, when you see large RVs with extra-long tails turn into deep entrance/exit ramps the sides & corners often strike the road surface. For your extended box instead of a single center caster, the bottom corners may benefit with much lower profile sled-like runners.
|
Yeah, that's on my radar. It isn't like runners will cost much, and having them will add to my sanity, whether they are needed or not.
The aero box does have the advantage over RV's and such that it's not square, looking at it from the top-down view. That's why the rear corners tended not to strike in my models. It does make sense that the front corners would be more seriously threatened because the frame hinges but the front corners don't actually move out of the way, considering the pivot location. If I go for a v3 design overhaul the next level is to put in linear slides (like drawer slides) instead of a hinge, so the box translates upwards instead of pivoting. I'm still mulling it over - could be overkill.
After I fab the floor frame I plan on driving around with various loads to prove it out. Having driven with a 4.5" clearance air dam in the Corolla I know where the worst ramps and dips in town are.
Last edited by christofoo; 01-28-2013 at 04:02 PM..
|
|
|
|
|
01-28-2013, 03:55 PM
|
#29 (permalink)
|
|
Master EcoModder
Join Date: Mar 2012
Location: Salt Lake City
Posts: 292
00C - '00 Toyota Corolla 90 day: 43.54 mpg (US)
Thanks: 147
Thanked 190 Times in 73 Posts
|
Skills and tools
Here's a brief sideline on metalworking skills and tools for this project. Sorry this is a bit of a distraction, but I found this really fascinating since it was mostly new to me, and folks who aren't in on metal shop and want to quickly gauge difficulty of the project or weigh against fiberglass may find this useful.
Fancy new tool list: - Angle grinder for cutting, grinding, beveling of frame members
- 90 A flux-core welder (only works on mild steel), (plus auto-darkening mask and leather apron / gloves)
- Teardrop hammer and 'stump' for shrinking
- Planishing hammer for finishing (beautifying) compound curves (I already own an 8 gallon air compressor)
Here's a picture of a little bowl I made in 20-mil Aluminum. Looks great, and it was a breeze, only about 10 min on my first try. Step 1: shrink with the home-made 'stump' and teardrop hammer until rough shape is achieved. Step 2: planish with the pneumatic hammer to smooth out imperfections.

Here are some references for the curious on metal shaping:
Basics and overview of sheet metal shaping by Hotrod Magazine
'Stump' shrinking results in a little bit of stretching, which I realized may not be desirable for the shape I want. This other method of tuck shrinking minimizes stretching, so I might have to drop my 'stump' and do this instead, but I'll cross that bridge when I get there.
Planishing is basically cosmetic after the shape is formed, and this can also be accomplished on a dolly with a hammer or slapper, but my planishing hammer was less than $100, dollies and additional hammers would have cost money anyways, so I consider pneumatic planishing very cost-effective.
The welder actually was much harder to learn to use, partly because I practiced on zinc-plated steel strip (EDIT: DANGER, don't weld zinc / galvanized stuff - it's TOXIC, what am I doing?), which does not take a bead easily. But after an hour I tweaked the settings and got decent penetration and good bond strength in 1/8" steel, albeit with some hideously ugly beads. Most of this project will be 60-mil steel fillet joints, so I need to get more scraps and practice even more.

There's an argument to be made that I might have been better off with a MIG, but part of the reason I chose the flux-core was that it was a single-phase 120 V plug and quite cheap, which affect the project in other ways. I'm not really sure that extra layers of complexity for MIG actually result in a hugely easier learning curve anyways. Once you get the settings dialed in for the flux-core it goes very quickly and it's repeatable.
Last edited by christofoo; 04-04-2013 at 06:55 PM..
|
|
|
|
|
The Following 5 Users Say Thank You to christofoo For This Useful Post:
|
|
|
01-28-2013, 10:38 PM
|
#30 (permalink)
|
|
Master EcoModder
Join Date: Aug 2012
Location: northwest of normal
Posts: 28,992
Thanks: 8,226
Thanked 9,000 Times in 7,434 Posts
|
That planishing tool is awesome. 10 minutes on the first try? 
|
|
|
|
|