I've noticed lately a lot of interest in monitoring the Lean burn of the VX ECU. I did some searching (thanks to
Krousdb) and found his post about which ECU pins to connect to with a DMM/DVM to monitor Lean Burn.
Enjoy!
Quote:
|
Originally Posted by Krousdb
I'm starting to get the hang of the lean burn on the VX. It feels strikingly familiar to the Insight lean burn. First, some info from the OBDI training manual.
The LAF (Lean air fuel) sensor can be used to detect AF ratios in a range from approx 12:1 to 22:1. These were used on the 92-95 VX and 96-98 HX. If an AF ratio richer than 12:1 is required, the ECU will go into open loop.
A good way to monitor AFR is to attach the positive lead of a DMM to the Pump Cell Control O2 lead and the negative DMM lead to the O2 reference voltage lead. This shifts the O2 output such that 0V is stoich, a negative reading is rich and a positive reading is lean. To test the LAF, when introducing propane to the intake would create a rich condition resulting in a reading of -1.3. To create a lean condition, you could disconnect one of the fuel injectors which would result in a 0.4V reading.
In practice, I have found that lean burn does indeed result on a reading of 0.4 to 0.5. That is similar to the reading that you would expect when you have one injector disconnected. I could then logically conclude that lean burn could reduce fuel consumption by as much as 25%.
Of course it takes time for the cat to warm up enough to enable lean burn mode. When starting cold, you will notice a reading of -0.77V. This is also what you would read if the LAF was disconnected, and similarly, you get the same reading when the LAF is dead. After a few minutes, the reading will oscillate between -2.0V to 0V. After another minute or so you will notice the reading stabilize around 0V and then climb to 0.40 to 0.45V during a lean burn cruise. During idle, the reading is cut in half to about 0.22V.
Lean burn on the VX has more range than on the Insight. I can climb even the steepest hill on my commute in 2nd gear and maintain lean burn mode. Moderate hills can be climbed in 3rd and more gradual hills in 4th. On the highway, lean burn mode can be held at speeds up to 65-70 MPH, much higher than the Insight. Once your vacuum drops below a certain point, it seems like VTEC kicks in and your instantaneous FE drops immediately by 1/3. For example, While climbing slight grade in 5th at 55MPH, I can hold 45MPG indefinitely. When encountering a steep grade, you would open the throttle to hold your speed. As the injector pulse width reaches about 6.3ms before dropping out of lean burn. The instantaneous FE drops immediately to 30 MPG. This is very similar to what you would feel during a NOx purge in the Insight.
There is a downside to lean burn in that when you don't have it, the FE is worse than what i got with the Del Sol. And after a long engine off coast, the LAF has to warm up all over again. <snip>
|
Now for the info on the ECU pins to connect to and what you should be seeing:
Positive lead of the DMM/DVM to pin
D14 (
orange with
blue stripe)
Negative lead to pin
D16 (
blue with
green stripe wire)

Readings can be as low as -1.4V and as high as .8V
This is considered normal.
In a good functioning LAF the peak-to-peak voltage difference should exceed 1 volt. I.E. if you get a reading of -1.3V (rich) and .6V (lean) the voltage range is 1.9V which is acceptable as a proper functioning LAF.
Checking Reference Voltage:
Positive Lead on D16 |
Negative Lead on Chassis Ground

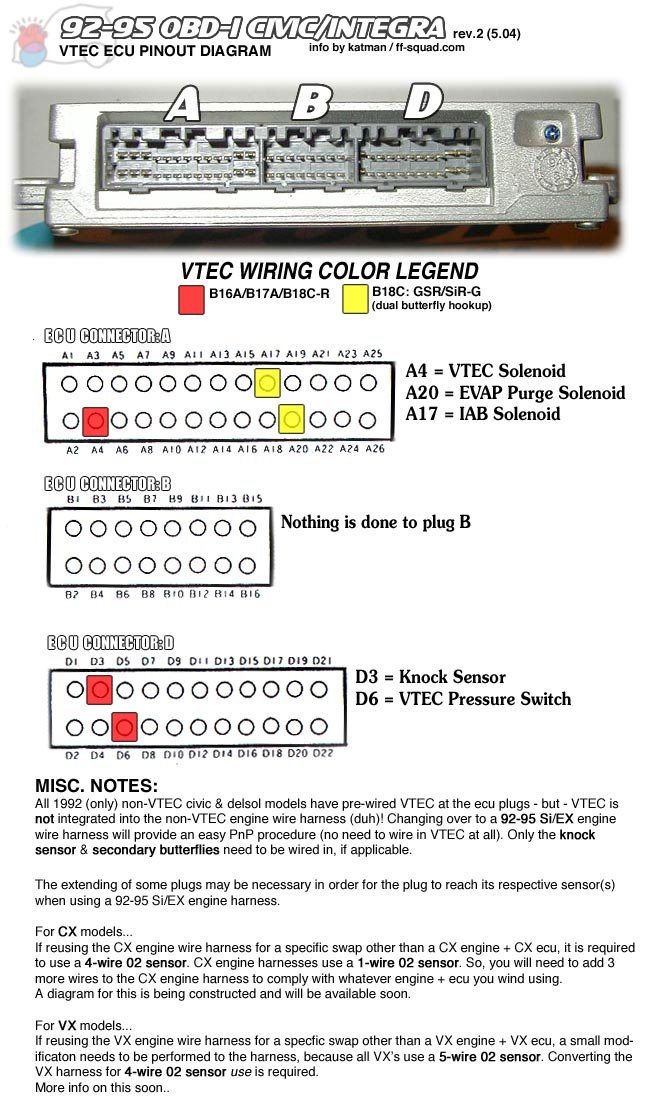
These wires are located on the far right connector once the ecu is orientated like the ECU picture below.
Courtesy of FF-Sqaud.com:
 What it is:
D14 is the IP+ (positive pump cell) signal of the LAF and D16 is the IP- (negative pump cell), VS- signal of the LAF (VS- is the Reference Voltage that the LAF uses, the voltage is 450mV, measured from the Cell Voltage Input
D8) (Ip- is the "virtual ground" the LAF uses...so basically the LAF reference signal is at 450mV (2.7V measured from Chassis Ground) unlike a typical earth ground which resides at less than 10mV). This has all been checked out by me in the Helms Manual (the FSM for Honda).
Quote:
|
Originally Posted by The Honda OBD Training Manual
LAF construction:

Basically the LAF (L1H1) is made up of two O2 sensors, sensor 1 and sensor 2. The outside of the sensor 1 thimble shaped tip is exposed to the flow of exhaust gasses. The inside tip of sensor 1 is not exposed to the atmosphere, but to a diffusion chamber. <snip>Sensor 2 is mounted behind sensor 1 and the outside of sensor 2 creates an airtight chamber between the two sensors. The inside of sensor 2 is exposed to the atmosphere. A wire attached to the outside os sensor 1, returns to the ECM and is called the cell voltage input. This wire is similar to a traditional O2 sensor input wire since it produces a voltage that reflects the differences in oxygen concentration between the exhaust gases and the chamber in the inside. the key difference here is that the inside chamber is not the atmosphere but a chamber whose oxygen content can be controlled by the ECM. This chamber is called a diffusion chamber.
A second wire is attached to the inside of sensor 1 and the outside of sensor 2. This is a common ground for the two sensors. It is best to think of it as a reference voltage since it does maintain close to 3 volts during operation.
A third wire is attached to the outside of sensor 2 and returns to the ECM. This wire is called the pump cell control since this is the wire that the ECM uses to "pump" oxygen into and out of the diffusion chamber.
Operation of the LAF Sensor:
<snip>
The ECM monitors the voltage that is produced by sensor 1. Sensor 1 works like a traditional O2 sensor in that it is producing a voltage that reflects the difference in oxygen concentration between the exhaust gases and the diffusion chamber.
The ECM tries to maintain .45 volts on sensor 1 by controlling the amount of oxygen in the diffusion chamber. Oxygen is "pumped" into or out of the diffusion chamber by the current sent over the pump cell conrol wire to sensor 2.
How can an oxygen sensor be used to pump oxygen? I know it sounds strange, but hey... it works. Just like many other electrical phenomena, the oxygen ion flow to voltage relationship works both ways. Just like electricity makes magnetism and magnetism makes electricity, oxygen ion movement makes voltage and voltage makes oxygen ions move. The voltage applied by the ECM to sensor 2 causes it to either pump oxygen ions into the diffusion chamber, or to pump them out of the diffusion chamber.
OK, lets put the whole thing together! The ECM is monitoring the voltage being produced by sensor 1 via the cell voltage input wire. The ECM attempts to maintain the voltage at .45 volts by controlling the voltage applied to sensor 2 via the pump cell control wire. The ECM monitors the voltage that must be applied to sensor 2 to maintain .45 volts on sensor 1 and uses this to determine the oxygen content (and subsequently the A/F ratio) of the exhaust gases.
LAF Sensor Contamination:
LAF sensors do not wear out, they typically fail due to contamination. The material that the sensing tip is made of is porous and many types of material will clog the pores or the LAF sensor. As the sensor becomes contaminated it slowly gets slower and slower in its response to changes in the oxygen content of the exhaust. Eventually the sensor may totally fail.


There are external air vents on the LAF that must be clear of debris and free of any contaminants to function properly. These vents are built into the body of the LAF sensor. If these vents get clogged, the sensor will not operate properly.
Personal Note - (It may be possible to clean a failing LAF by placing it in a vice (just to hold not to crush) with the sensor facing out and heating the tip with a propane torch. Be careful to not over heat the tip. Keep the tip under 800 degrees to be safe. DISCLAIMER! This is what I've seen/read/heard from other sources)
|
Whew! That was some reading! If you didn't get it the first read, that's fine. Just go back and read it again until it does make sense. There is much more that I could type and quote from the training manual, but I'm at work while typing this and I have to get some things done here.
 PCV info for CX/VX model:
I just checked on my Honda E-catalog (the same software the dealer uses) and got different numbers for the VX/CX model as compared to the rest of the models.
VX/CX = PCV 17130-P07-A02 (shown to be used on all CX/VX model civics 92-95) The rest = 171300-PM6-003 (all models except CX/VX)
The reason for posting this info is because the VX/CX PCV valve is not like a normal PCV valve. It may be located underneath the intake manifold. From the factory they may have used a straight PCV, not one with a 90* fitting. the fitting on the intake manifold may just be an elbow used to connect the hose to the intake manifold nipple. If your auto parts store/dealer doesn't have the proper part in stock, you can gut out the OEM PCV valve and then use the 90* PCV valve in the spot where the open elbow was in the intake manifold.
DIY on making an aftermarket PCV into an OEM VX PCV
Usually Honda has the parts grouped by ECU ie VX=P07 and the correct corresponding parts have that in the middle of the part number. So it seems that VX and CX share the same PCV valve.
Displays that can be used with the VX LAF:
It wouldn't be too hard to rig up a simple voltage comparator circuit to light up an LED when the signal from the O2 goes higher than the reference signal. hmm, but for me, it's just easier to hook up a DVM.
Tech Edge has a display that can read a LAF as well, in fact the controller kit they used to sell has a heater controller circuit as well. And the cool part...the display shows A/F ratio or voltage depending on how you set it up during assembly.
Wide band display
HERE
Tech edge site
HERE
This company actually uses the VX L1H1 sensor in it's first version of DIY kit.
Spark plugs and wires:
The VX uses
NGK V-Power Spark Plugs No.
ZFR4F-11
Spark plug wires from the dealer are best and worth the money. If you do buy spark plug wires
from an auto store, buy them for an
Si model of the same year. This ensures that you get the proper fitting plug wires since
some auto stores have the wrong part number in their system for the VX spark plug wires.
Tire Size:
The original tire size of the VX was
165/70/R13
This tire size is getting a bit harder to find.
Use this table
HERE to find a tire size near the original stock size. If you don't have the stock rims, you can see similar sizes on larger rims by clicking
"show" on your rim size below the table.
VX Specific Aero Parts:
There are two specific Aero Parts for the VX. They are the front lip spoiler and a rear cover for the void between the driver's rear bumper and wheel well.

74663-SR3-H00 Cover RR. Lower 92-95 VX specific part only. $38.92 before shipping at
Majestic Honda. It's number 14 in the picture above.
Direct Link Here
Here are pics of my VX with rear panel from the factory:


Taken from the drivers side rear of the car.

Number 4 in this picture is the front lip spoiler. 71110-SR3-000 Spoiler, FR. AIR. Going for $70.88 on
Majestic Honda.
Direct Link Here The front lip isn't so much VX specific as it was a dealer option on all two door and hatch model civics.
Rust repair panels for the rear quarter panels:
212-92-51-L
212-92-51-R
Rust Repair Site
Click on "order by part number" button in the upper left of the page and enter one part number per line. The current price is $32.35 per panel, but well worth it. Shipping is pretty reasonable as well.
FSM Procedures:
VX Idle Set Procedure
VX Ignition timing Check/Set Procedure
O2 Heater Troubleshooting procedure
O2 troubleshooting procedure
Valve Lash adjustment procedure
Disclaimer!
I know it's a lot of info all in one post, but it's nice to have it all in one spot for search reasons. And a big Thank You to DaX and Krousdb for helping me!
And as always...Your Mileage May Vary!
