03-28-2013, 08:28 PM
|
#1 (permalink)
|
|
Bring on the turd polish!
Join Date: Feb 2010
Location: maine
Posts: 45
Pablo - '86 Toyota Pickup 1 Ton, 22RE, W56 trans, 4.300 diff. Pickups 90 day: 25.68 mpg (US) Red Brighton - '98 Subaru Legacy Wagon Brighton 90 day: 32.3 mpg (US) Rust Victim - '00 Toyota Tacoma SR5, 2WD, 5 speed manual, 2.4l, Extracab. Last 3: 29.68 mpg (US)
Thanks: 8
Thanked 18 Times in 10 Posts
|
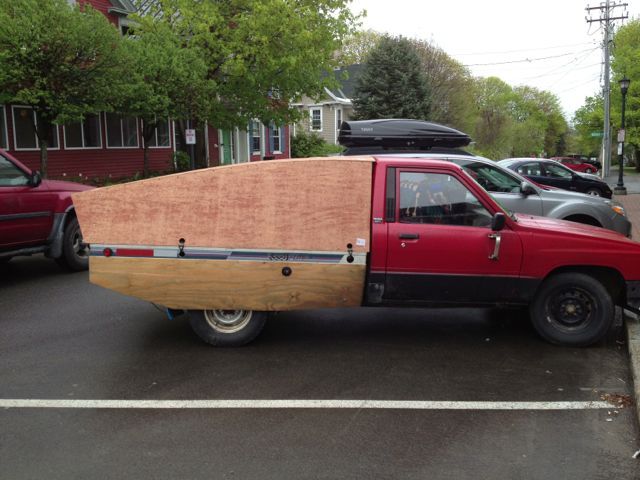
Work begun on the cap for the flatbed.
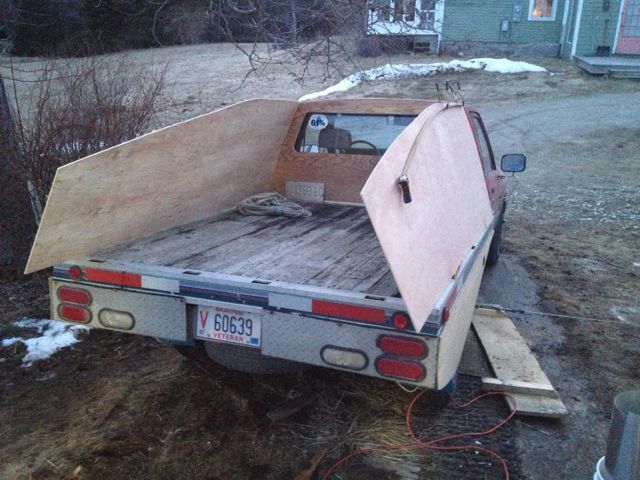
I'll check the template, see how far I should come down, and trim it tomorrow. Then I'll add what boat builders would call chine logs, knees, and a transom. My concept is that there will be a rail on each side that firmly fastens down to the stake pockets. The cap will be hinged on the driver's side and latched in several places on the passenger side. That way I can open it from the sidewalk when parallel parked. There will be some way to remove the transom when needed so that long loads can stick out the back. There will be a plexi-glass window in the back slope just above the transom, but I'll be using my mirrors and turning my neck a lot too.
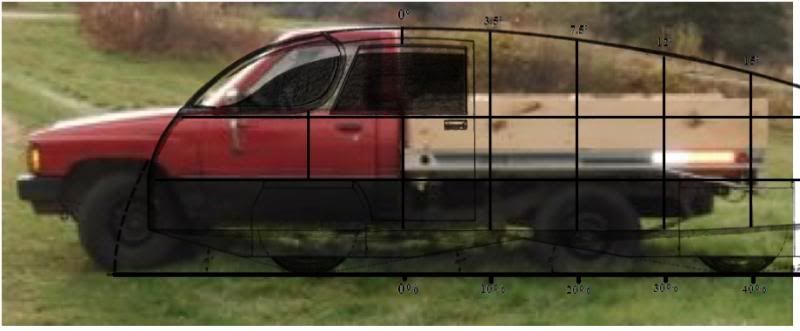
I could move the peak forward a little maybe and reduce the transom size, but I want the space, and this template position still looks good.
Last edited by mackerel; 03-28-2013 at 08:52 PM..
|
|
|

|
|
The Following User Says Thank You to mackerel For This Useful Post:
|
|
 Today Today
|
|
|
|
 Other popular topics in this forum...
|
|
|
|
|
03-28-2013, 09:39 PM
|
#2 (permalink)
|
|
Batman Junior
Join Date: Nov 2007
Location: 1000 Islands, Ontario, Canada
Posts: 22,541
Thanks: 4,085
Thanked 6,989 Times in 3,619 Posts
|
Subscribed!
|
|
|
|
|
03-30-2013, 11:22 AM
|
#3 (permalink)
|
|
Banned
Join Date: Oct 2009
Location: Fort Worth, Texas
Posts: 2,442
Thanks: 1,422
Thanked 737 Times in 557 Posts
|
X2
(and maybe consolidation with earlier threads, moderators?)
OP, I highly recommend you add a 5" or 6" round convex spot mirror to the existing arms (not to the existing mirror face). The mirrors present are great for up/down plus front/rear, but not for side/side. Backing, alone, makes this mirror type invaluable, not just lane-changing.
.
|
|
|
|
|
05-10-2013, 07:32 PM
|
#4 (permalink)
|
|
Bring on the turd polish!
Join Date: Feb 2010
Location: maine
Posts: 45
Pablo - '86 Toyota Pickup 1 Ton, 22RE, W56 trans, 4.300 diff. Pickups 90 day: 25.68 mpg (US) Red Brighton - '98 Subaru Legacy Wagon Brighton 90 day: 32.3 mpg (US) Rust Victim - '00 Toyota Tacoma SR5, 2WD, 5 speed manual, 2.4l, Extracab. Last 3: 29.68 mpg (US)
Thanks: 8
Thanked 18 Times in 10 Posts
|
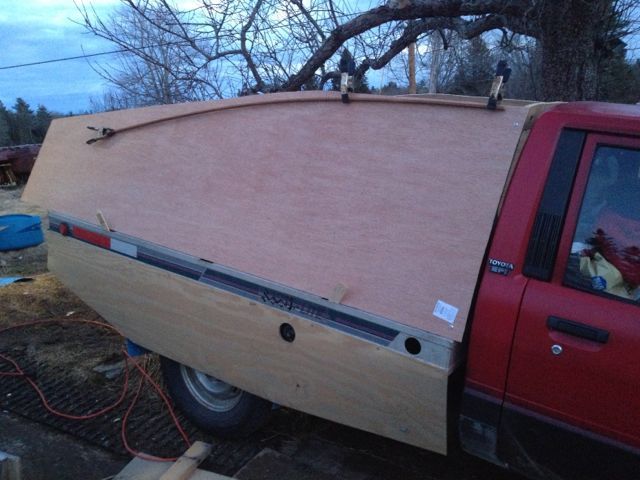
Well that took a while.
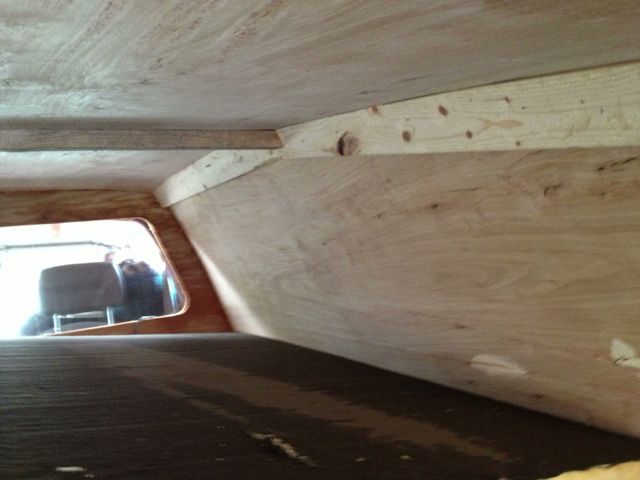
Previously, I had fitted the front and back panels, and cut the rear window area of the front panel to match the back of the cab.
Wednesday night I cut a hole to crawl through in the back panel. I matched up the sides and did a final trim so they fit down to the top corners of the back panel, and installed side base boards, which are 5/8 plywood about 2" wide, and beveled to match the angle of the side panels. Then I screwed the sides to the base boards and the end panels.
I used pieces of strapping on the inside , leaving it proud of the curve. These got screwed on at about 5" intervals, then I used the power planer to trim them back down to the curve, mostly with the tops horizontal athwartships.
I set the top panel on, marked where it met the sides with a pencil, pulled it off, and cut off most of the excess. I don't want to cut off to much, so I left a little extra, and after screwing it down I went after it with the belt sander. It's still not perfect, but not bad, and I can still adjust it.
Aft of the back panel I added a few more blocks to connect the sides and tops and screwed them together.
I drilled 1 1/2" holes in the sides, just above the base boards, and a couple more holes in the aluminum sides of the flatbed where I can hook ratchet straps. The straps go side to side and are almost down at bed platform level. To take the assembly off, I loosen and remove the straps, and lift the cap so the front and back panel stakes come out of the stake pockets. There are a few blocks screwed to the bed to prevent the side base boards from moving inward as the ratchets are tightened.
I gave it one coat of a clear soak-in latex sealer, and I should give it a second coat. I'm debating front and back plexiglass, which I have in stock if needed. A ribbon over the rear hatch tended slightly inward while driving today.
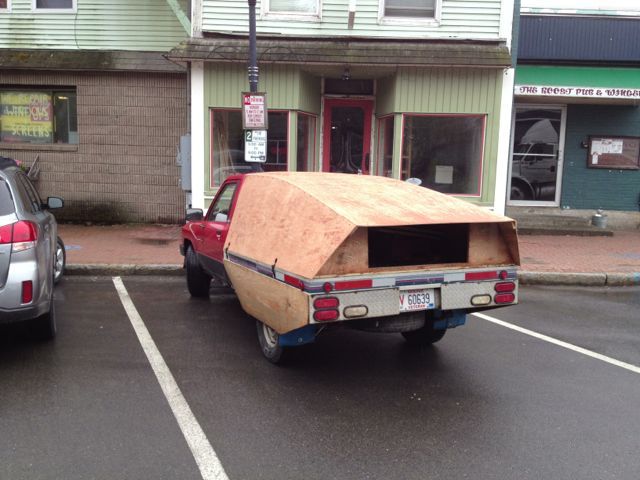
So here are pictures from yesterday. I got some good stares from passers-by, watching from a window seat in a restaurant.
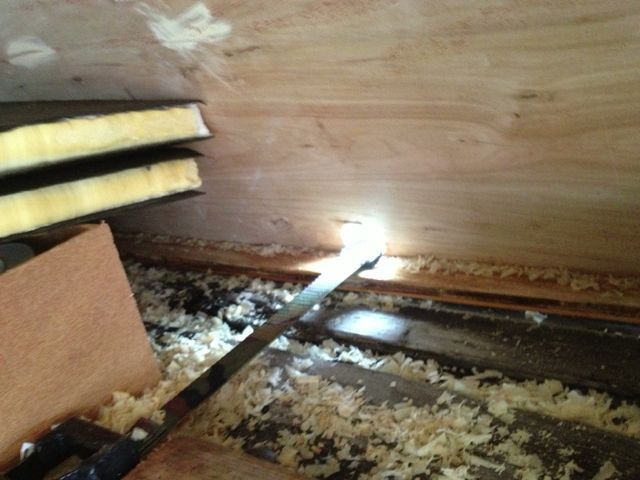
I shouldn't have shone my flashlight on the strap while taking that last one, and I need to clear out some sawdust and planer shavings from the construction process, but it seems successful.
No data yet, but it feels good. It's not a great beauty, but it's as least as good as some of the coroplast projects around here. I need to sand the top seams a little more, and then maybe some Zip Tape over them. Zip Tape is designed for sealing plywood sheathing seams on houses being built. I think those seams need protection and I don't feel like fussing with fiberglass and resin.
Edit to add: I stuck a 2 1/2" spot mirror on the lower inboard corner of the passenger side mirror. That should help a lot. For the driver's side, my neck turns well.
Last edited by mackerel; 05-10-2013 at 07:38 PM..
|
|
|
|
|
The Following 5 Users Say Thank You to mackerel For This Useful Post:
|
|
|
05-10-2013, 08:49 PM
|
#5 (permalink)
|
|
Not Doug
Join Date: Jun 2012
Location: Show Low, AZ
Posts: 12,307
Thanks: 7,309
Thanked 2,246 Times in 1,733 Posts
|
It looks good!  |
|
|
|
|
05-10-2013, 09:15 PM
|
#6 (permalink)
|
|
B.O. Zen
Join Date: Feb 2009
Location: Folsom, CA
Posts: 208
Pickup - '99 Toyota Tacoma 2wd, Regular Cab, Short Bed 90 day: 34.62 mpg (US)
Thanks: 130
Thanked 141 Times in 59 Posts
|
Cool Project! Subscribed.
__________________

|
|
|
|
|
05-11-2013, 01:25 AM
|
#7 (permalink)
|
|
Master EcoModder
Join Date: Aug 2012
Location: northwest of normal
Posts: 29,366
Thanks: 8,353
Thanked 9,118 Times in 7,528 Posts
|
I like it. You don't even mention my favorite part—the fender skirts. Was that in an earlier thread.
It ties the while thing together.
|
|
|
|
|
05-11-2013, 12:08 PM
|
#8 (permalink)
|
|
Aero Deshi
Join Date: Jan 2010
Location: Vero Beach, FL
Posts: 1,065
Thanks: 430
Thanked 669 Times in 358 Posts
|
 Looks Great! The sharp edges would be my only complaint, these allow differing pressures to be in direct contact with each other, making them in my mind, 7 foot long vortex generators. Since you did a great thing by keeping it close to the template and didn't drop below it, I think the pressure variations will be minimal, so the VG drag will be minimized as well. |
|
|
|
|
05-11-2013, 01:04 PM
|
#9 (permalink)
|
|
Bring on the turd polish!
Join Date: Feb 2010
Location: maine
Posts: 45
Pablo - '86 Toyota Pickup 1 Ton, 22RE, W56 trans, 4.300 diff. Pickups 90 day: 25.68 mpg (US) Red Brighton - '98 Subaru Legacy Wagon Brighton 90 day: 32.3 mpg (US) Rust Victim - '00 Toyota Tacoma SR5, 2WD, 5 speed manual, 2.4l, Extracab. Last 3: 29.68 mpg (US)
Thanks: 8
Thanked 18 Times in 10 Posts
|
Chaz, I know exactly what you're saying. The only way to eliminate the vortex generation with sharp corners like that is (I think) to curve the sides in at the same rate as the top, so that all flow is parallel to the sharp corner. That isn't much of an option here due to the fixed width of the bed, and I recognize that this is a compromise. But then what isn't?
I do wonder if there's anything to be done with a spoiler or other arrangement to reduce vortexes. Vortices. Something like that.
And, not having a belly pan, I'm looking at the spare tire area and wondering what to do to clean that up.
|
|
|
|
|
05-11-2013, 02:07 PM
|
#10 (permalink)
|
|
Master EcoModder
Join Date: Jan 2008
Location: Sanger,Texas,U.S.A.
Posts: 16,514
Thanks: 24,517
Thanked 7,436 Times in 4,817 Posts
|
spare
Quote:
Originally Posted by mackerel

Chaz, I know exactly what you're saying. The only way to eliminate the vortex generation with sharp corners like that is (I think) to curve the sides in at the same rate as the top, so that all flow is parallel to the sharp corner. That isn't much of an option here due to the fixed width of the bed, and I recognize that this is a compromise. But then what isn't?
I do wonder if there's anything to be done with a spoiler or other arrangement to reduce vortexes. Vortices. Something like that.
And, not having a belly pan, I'm looking at the spare tire area and wondering what to do to clean that up.
|
On my Dodge pickup I used the space between the frame rails to create a 'closet' for the spare tire.The 'floor' of the closet forms the 'diffuser.'
No more crawling under the truck when changing a flat!. 
__________________
Photobucket album: http://s1271.photobucket.com/albums/jj622/aerohead2/
|
|
|
|
|