Quote:
Originally Posted by RobertSmalls

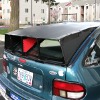
Jim,
It looks very nice, and I'm surprised how close you were able to get to the rear suspension.
|
When trimming the panel next to the suspension, I jacked up each side of the suspension with a separate jack, while the car was on jack stands, and then got a close look at how close the panel would be to the suspension in that area.
Sometimes "eye-ball engineering" can be done as well without such elaborate measures to get a good fit.
Quote:
Originally Posted by RobertSmalls

How thick is this panel, and how much clearance is there between it and the muffler? |
The panels at the rear vary in thickness, just like all the other panels on the car. Each panel is intended to be at least 2" thick, but compromises are always made to get things to fit on the car, and still leave good ground clearance for winter driving.
The clearance at the muffler is only 3/4", and I "tested" this clearance during the highway trip to LaCross last week. No problems were evident in the foam after returning.
I do plan on coating the inside of the panel with white Latex paint, partly for protection from the elements and partly due to the low absorption qualities of the color white. As you know black-body radiation is affected less by light colors and/or reflective surfaces like aluminum foil.
I suppose gluing some foil to the inside would be better to keep the foam cool, even on the hottest day.
Quote:
Originally Posted by RobertSmalls
What do you think about using fiberglass + epoxy without foam for the higher-temperature areas under the car?
|
Sure that would work, but then the fiberglass would have to be thicker for it's self support features. And a little heavier as well.
The foam seems to work well. Of course I didn't drive faster than 55 mph on the back roads, so maybe Interstate driving would heat up the muffler more. In that case it may be better to slip some fiberglass batting in between the foam panel and the muffler.
I plan on adding fiberglass batting just for better heat insulation in that area. I've used it on the first CatCon in the engine bay since last fall with good results.
Jim.


 ...
...
 Today
Today