 01-02-2015, 10:53 AM
|
#71 (permalink)
|
|
Administrator
Join Date: Dec 2007
Location: Germantown, WI
Posts: 11,203
Thanks: 2,501
Thanked 2,586 Times in 1,554 Posts
|
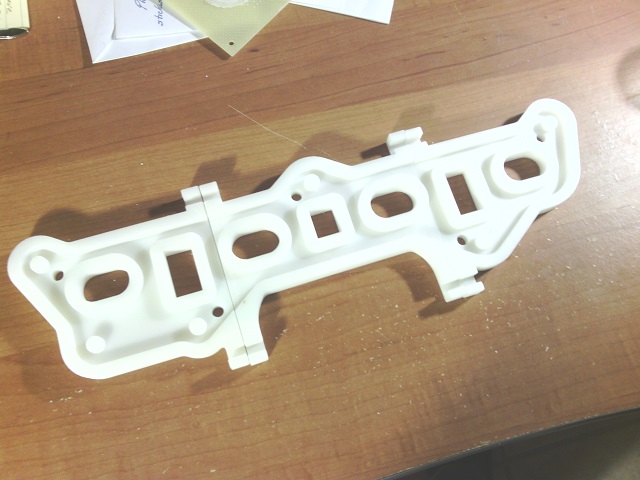
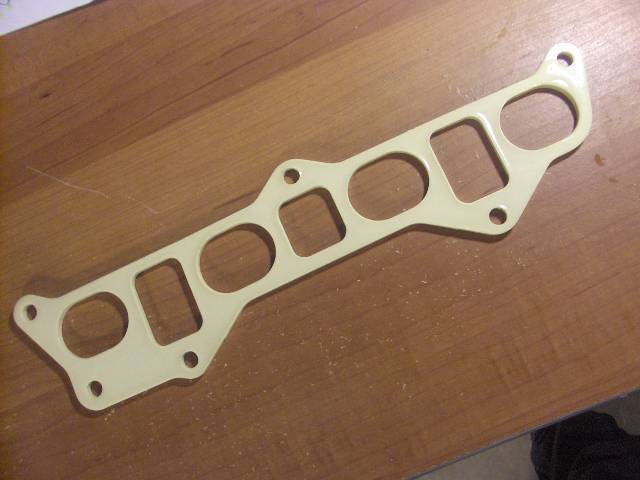
Back to the intake manifold insulators. I got the first one made this weekend. It was off a 3 piece mold since its too long to print all at once. Its urethane just like the throttle body one.
|
|
|

|
 Today Today
|
|
|
|
 Other popular topics in this forum...
|
|
|
|
|
01-03-2015, 08:07 AM
|
#72 (permalink)
|
|
Ultimate Fail
Join Date: Feb 2008
Location: Austin,Texas
Posts: 3,585
Thanks: 2,872
Thanked 1,121 Times in 679 Posts
|
Quote:
Originally Posted by darcane

Cool! What is the maximum size of the parts you can make?
|
I have the same question.
Also, what is the cost in materials for something the size of that shift knob ?
-Thanks |
|
|
|
|
01-05-2015, 07:51 AM
|
#73 (permalink)
|
|
EcoModding Lurker
Join Date: Oct 2013
Location: Finland
Posts: 43
Thanks: 3
Thanked 16 Times in 11 Posts
|
Nice work Daox!
I'll try to answer some questions as good as I can from my limited experience with printing. Correct me if I'm wring.
Material costs are none existing. I would guess $1.00 for that knob if it is constructed hollow. The time to print a part like that would take for the printer I'm using 2-3 hours. I think the 3d-printing manufacturing process is still in the experimental phase and it's not always easy to get the quality you want. A simple change in printing parameters affects so many things like warping, part bonding to print table and surface quality. Also printing a smaller or bigger part requires different settings. Not to mention different colors or different materials. If you want a part printed "100% perfect", it usually takes many tries to get it right.
Usually 3d-printed parts are not solid. From my experience by bending and breaking parts I think more than 3 surface layers do not make the part any stronger. The bond between layers is the limiting factor. Also more than 25% support inside the part doesn't make the part much stronger.
__________________

|
|
|
|
|
The Following 2 Users Say Thank You to hege For This Useful Post:
|
|
|
01-05-2015, 01:16 PM
|
#74 (permalink)
|
|
Administrator
Join Date: Dec 2007
Location: Germantown, WI
Posts: 11,203
Thanks: 2,501
Thanked 2,586 Times in 1,554 Posts
|
Hege is very close.
The printer I'm using can print up to 5" x 5" x 5".
The shift knob, made of ABS is $1-2 worth of materials depending on how dense you print the part. The inside is a honeycomb basically and you can control its size.
Printed on maximum quality (.2mm layer height) all at once, the print time is right around 3:15 for one set of shift knob parts.
|
|
|
|
|
The Following 3 Users Say Thank You to Daox For This Useful Post:
|
|
|
01-06-2015, 04:52 PM
|
#75 (permalink)
|
|
EcoModding Lurker
Join Date: Mar 2014
Location: okc
Posts: 49
Thanks: 22
Thanked 15 Times in 12 Posts
|
hello Daox,
just wanted to say its amazing this forum has someone here promoting and utilizing additive manufacturing! 3d printing of any media is the next big step, and the possibilities are endless!
i just bought a tig/stick/plasma cutter, and with my cousins garage door business left overs and a bit of teamwork from my drone building friends were going to build a HUGE X Y Z set up.
ive been looking at media nozzles, feed systems, and lasers. i believe our resolution goal is less than 1mm error but we will see..
i bet you can make some serious money with your machine, and some seriously cool parts!
take care
|
|
|
|
|
01-06-2015, 05:36 PM
|
#76 (permalink)
|
|
Master EcoModder
Join Date: Jan 2014
Location: South Carolina
Posts: 1,659
Thanks: 128
Thanked 764 Times in 461 Posts
|
Quote:
|
Printed on maximum quality (.2mm layer height) all at once, the print time is right around 3:15 for one set of shift knob parts.
|
You having any luck coming up with my 3-button version? I'm dying to put it on Turtle and have all 3 switches at my fingertips!
__________________

|
|
|
|
|
01-06-2015, 09:10 PM
|
#77 (permalink)
|
|
Administrator
Join Date: Dec 2007
Location: Germantown, WI
Posts: 11,203
Thanks: 2,501
Thanked 2,586 Times in 1,554 Posts
|
I have it mostly done. Cramming those toggle switches in there was interesting. Getting wires to fit will be interesting too.  I don't have the switches for it yet. I'll be getting those soon.
Sneak peak. The toggle switches stick out more than the momentary switch.

 |
|
|
|
|
The Following 4 Users Say Thank You to Daox For This Useful Post:
|
|
|
01-06-2015, 09:31 PM
|
#78 (permalink)
|
|
Master EcoModder
Join Date: Oct 2008
Location: Dallas Fort Worth
Posts: 259
Thanks: 223
Thanked 23 Times in 22 Posts
|
Question
What is the benefit/advantage (I like the DIY) of the printed intake gasket compared to the OEM/replacement.
|
|
|
|
|
01-07-2015, 05:36 AM
|
#79 (permalink)
|
|
Master EcoModder
Join Date: Jan 2014
Location: South Carolina
Posts: 1,659
Thanks: 128
Thanked 764 Times in 461 Posts
|
Man, that looks awesome!
FYI - I revised my original schematic to I only need one on/off pop-up (the one in the middle). That will be the clutch switch, which will need to be on or off for long periods of time. The thumb button (90 degrees) and the top one need to be momentary buttons, they will control the regenerating and the injector kill.
Sorry, thought I had PMed you that info, and thanks for the work you've put into it!
__________________
|
|
|
|
|
01-07-2015, 09:17 AM
|
#80 (permalink)
|
|
Administrator
Join Date: Dec 2007
Location: Germantown, WI
Posts: 11,203
Thanks: 2,501
Thanked 2,586 Times in 1,554 Posts
|
Quote:
Originally Posted by TexasCotton
Question
What is the benefit/advantage (I like the DIY) of the printed intake gasket compared to the OEM/replacement.
|
Its a performance modification for older cars with aluminum intake manifolds. The insulator gasket keeps the manifold cooler, and thus keeps the intake charge cooler and denser.
|
|
|
|
|


