Go Back   EcoModder Forum > EcoModding > Aerodynamics
Register Now
 Register Now
 

Reply  Post New Thread
 
Submit Tools LinkBack Thread Tools
Old 01-28-2013, 10:46 PM   #31 (permalink)
Master EcoModder
 
christofoo's Avatar
 
Join Date: Mar 2012
Location: Salt Lake City
Posts: 292

00C - '00 Toyota Corolla
90 day: 43.54 mpg (US)
Thanks: 147
Thanked 190 Times in 73 Posts
Quote:
Originally Posted by freebeard View Post
That planishing tool is awesome. 10 minutes on the first try?
Hopefully I didn't exaggerate too badly.

On the other hand the demo vids I linked to were only about 2.5 min each for the stump shrink and planishing hammer. So with a little practice I should be able to get it down to 5.

(And at that rate I ought to have this whole thing done, by say... midnight? )

  Reply With Quote
Alt Today
Popular topics

Other popular topics in this forum...

   
Old 02-03-2013, 07:58 PM   #32 (permalink)
Master EcoModder
 
christofoo's Avatar
 
Join Date: Mar 2012
Location: Salt Lake City
Posts: 292

00C - '00 Toyota Corolla
90 day: 43.54 mpg (US)
Thanks: 147
Thanked 190 Times in 73 Posts
Welding

Time for some fab!

Welding beads shrink a bit, so I put a couple dabs around the corners to keep it as stable as possible before laying down the heavy beads.


This double joint was a lot simpler than I expected.


More comments on tools:
A good machinist combination square would have been a big help, but a square and a little trig can do the job. Many things sold as protractors are not worth their salt.
The 90 Amp flux-core welder is not a nice tool for fillet joints on 1/8" steel. It can get the job done, but it's a challenge to do it and be certain that a solid weld has been achieved, and time consuming. Something more like a 120 Amp MIG welder would save a lot of time, but not that it matters a ton for a one-off.

Still a few important bits needed, but the frame is basically assembled and test fit on the hitch receiver here.

Last edited by christofoo; 02-04-2013 at 01:42 PM..
  Reply With Quote
The Following 5 Users Say Thank You to christofoo For This Useful Post:
BamZipPow (02-04-2013), COcyclist (02-04-2013), echo-francis (02-03-2013), mikeyjd (05-22-2013), slowmover (02-05-2013)
Old 02-03-2013, 08:56 PM   #33 (permalink)
40-60-40 MPH P&G
 
echo-francis's Avatar
 
Join Date: Feb 2011
Location: laval, QC
Posts: 277

Echo-P&G - '05 Toyota Echo base
Team Toyota
90 day: 82.76 mpg (US)
Thanks: 45
Thanked 113 Times in 58 Posts
sweet i really love the idea and if you have good results i will make one for my car
__________________
Best Tank (1557.2 Km): 2.57 LHK (91.63 MPG (US) )
Best Highway Trip (~36.8 Km): 2.16 LHK (109 MPG (US) )
Best Commute Trip avg (73.8 Km ): 2.33 LHK (101 MPG (US) )
Echo-Troll Modding Thread

I know i dont have a very good write-up
no lean-burn? no good gear ratio? p&g is the answer
MPG=1 TIME=0
  Reply With Quote
The Following User Says Thank You to echo-francis For This Useful Post:
HHOTDI (03-01-2013)
Old 02-03-2013, 11:11 PM   #34 (permalink)
EcoModding Lurker
 
Join Date: Nov 2010
Location: Washington
Posts: 30

Jeep - '98 Jeep Cherokee Classic
90 day: 14.92 mpg (US)

Lil Si - '05 Scion XA
90 day: 35.9 mpg (US)
Thanks: 3
Thanked 1 Time in 1 Post
That looks really good. I can't wait to see this finish up. I have thought about doing the same thing.
  Reply With Quote
Old 02-07-2013, 12:22 AM   #35 (permalink)
phh
EcoModding Lurker
 
Join Date: Jan 2010
Location: Portland Or
Posts: 20

Wifie's car - '89 Eagle Summit DL
Thanks: 9
Thanked 9 Times in 7 Posts
FYI - race car with similar aero treatment

The tail reminds me of this race car:


The entire article here:
Nerd's Eye View: The MCA Suspensions "Hammerhead" Silvia S13

Enjoy!
  Reply With Quote
Old 02-08-2013, 09:23 AM   #36 (permalink)
Hypermiler
 
PaleMelanesian's Avatar
 
Join Date: Dec 2007
Location: Texas
Posts: 2,321

PaleCivic (retired) - '96 Honda Civic DX Sedan
90 day: 69.2 mpg (US)

PaleFit - '09 Honda Fit Sport
Team Honda
Wagons
90 day: 44.06 mpg (US)
Thanks: 611
Thanked 433 Times in 283 Posts
Quote:
Originally Posted by phh View Post
The tail reminds me of this race car:


The entire article here:
Nerd's Eye View: The MCA Suspensions "Hammerhead" Silvia S13

Enjoy!
Thank you. I very much enjoyed that. That's amazing how much clearance they got with the actual bumper removed.
__________________


11-mile commute: 100 mpg - - - Tank: 90.2 mpg / 1191 miles
  Reply With Quote
Old 02-10-2013, 11:36 PM   #37 (permalink)
Easter McoModder
 
SwamiSalami's Avatar
 
Join Date: Mar 2010
Location: West Texas, US
Posts: 363

'99 Subaru OLL 2.5L - '99 Subaru Outback Legacy Limited
90 day: 22.57 mpg (US)

Rabbit - '08 VW Rabbit S
90 day: 32.93 mpg (US)
Thanks: 212
Thanked 28 Times in 26 Posts
beautimous.
  Reply With Quote
Old 02-11-2013, 11:04 AM   #38 (permalink)
EcoModding Apprentice
 
turbothrush's Avatar
 
Join Date: Nov 2008
Location: Canada
Posts: 133

2 x wrecked vx - '92 Honda Civic Vx
Team Honda
90 day: 62 mpg (US)
Thanks: 119
Thanked 54 Times in 30 Posts
Excellent project !

Have you finalized the techniques/ materials you will use for the "box" part ? What makes this especially nice is all edges radiused with no visable seems and a compound lid (as your sketch) . All possible with one-off fiberglass/epoxy and a foam core. Light weight too. You could build all the panels except the lid on a flat table and use 1/8" birch plywood for the inner skin for impact resistance and then fiberglass the outside after you glue the panels together and do the radius. I bet if you used epoxy with a filler to glue the panels together and also to glue the plywood skin you could go without a fillet in the interior.... For the lid I would check out the Teardrop Trailer guys and see how they deal with the hinges and weatherstripping etc. Click image for larger version

Name:	photo (11).JPG
Views:	71
Size:	55.5 KB
ID:	12462

Just a thought if you haven't already decided on the method/ materials for the box.

Also thanks for the videos on compounding sheet metal. Some of those techniques are new to me .

Last edited by turbothrush; 02-12-2013 at 09:19 AM..
  Reply With Quote
Old 02-11-2013, 10:46 PM   #39 (permalink)
Master EcoModder
 
christofoo's Avatar
 
Join Date: Mar 2012
Location: Salt Lake City
Posts: 292

00C - '00 Toyota Corolla
90 day: 43.54 mpg (US)
Thanks: 147
Thanked 190 Times in 73 Posts
Quote:
Originally Posted by turbothrush View Post
Excellent project !

Have you finalized the techniques/ materials you will use for the "box" part ? What makes this especially nice is all edges radiused with no visable seems and a compound lid (as your sketch) . All possible with one-off fiberglass/epoxy and a foam core. Light weight too. You could build all the panels except the lid on a flat table and use 1/8" birch plywood for the inner skin for impact resistance and then fiberglass the outside after you glue the panels together and do the radius. I bet if you used epoxy with a filler to glue the panels together and also to glue the plywood skin you could go without a fillet in the interior.... For the lid I would check out the Teardrop Trailer guys and see how they deal with the hinges and weatherstripping etc.

Just a thought if you haven't already decided on the method/ materials for the box.

Also thanks for the videos on compounding sheet metal. Some of those techniques are new to me .
Thanks!

Honestly I've got a bit of analysis paralysis on the skin and lid. I think I need ribs at the midpoint on the body and around the lid. Starting to favor wood ribs, not a bad method. Still leaning toward aluminum skin for most of the box.

... and still not totally finished with the frame either. UHMW slip pad(s), rubber stop, angle reinforcements on the acute joint, test runs...

I'd never heard of teardrop trailers! Those should have never fallen out of fashion.

My free-time is going to slow down a bunch... Still hopeful about having this done before spring.

About all I got done since last time:

No huge surprises. It looks like over an inch clearance, but it only takes about 100 lbs on the trunk to put the double joint on the ground.
  Reply With Quote
Old 02-12-2013, 12:58 AM   #40 (permalink)
Master EcoModder
 
christofoo's Avatar
 
Join Date: Mar 2012
Location: Salt Lake City
Posts: 292

00C - '00 Toyota Corolla
90 day: 43.54 mpg (US)
Thanks: 147
Thanked 190 Times in 73 Posts
Design: strength, zinc, weight

Quick mind dump on some design issues that I over-analyzed:

Strength

In the interest of not loosing our stuff and ruining a family trip, I put some thought into the most prominent forces the frame has to withstand, i.e. the bumpy road scenario.

Self-explanatory.


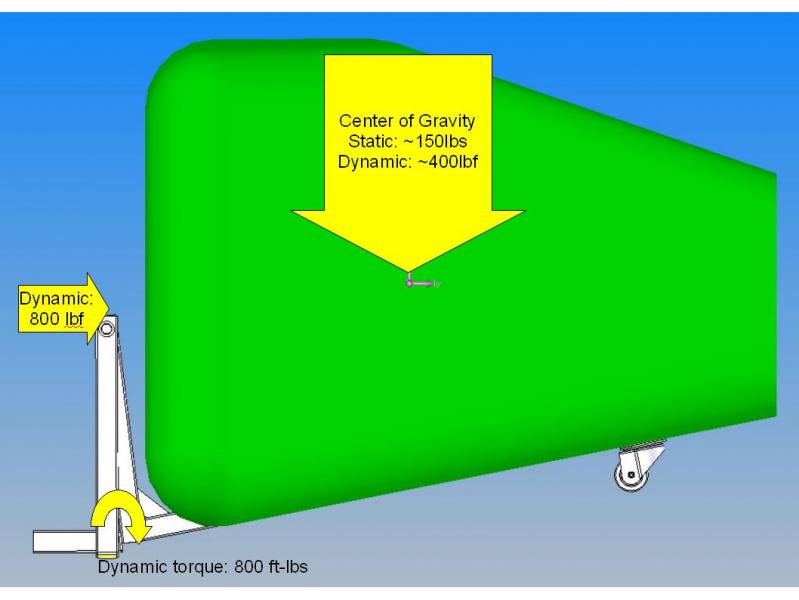
I came at this from a couple directions, but I think 120-wall (1/8") 1.25" square tubing has a yield strength that can be expressed as a torque of about 2,000 ft-lbs. Here is a 2-ft length of the stuff in Solidworks Simulation (formerly COSMOS), 1,000 lbf load on the end of a cantilever:

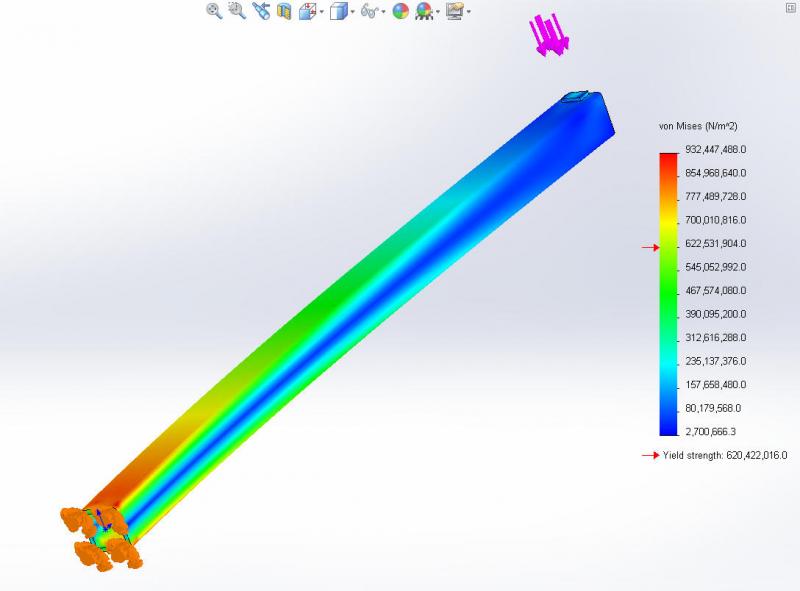
Of course this number needs to be derated for a number of factors; fatigue, localized stress, and rust, but I think it's pretty reasonable to expect this material to handle 600 to 800 ft-lbs for a lifetime. So assuming the box itself is under 50 lbs, considering all the margins I've thrown in, we'll probably be pretty safe if we keep the load under 150 lbs as a rule.

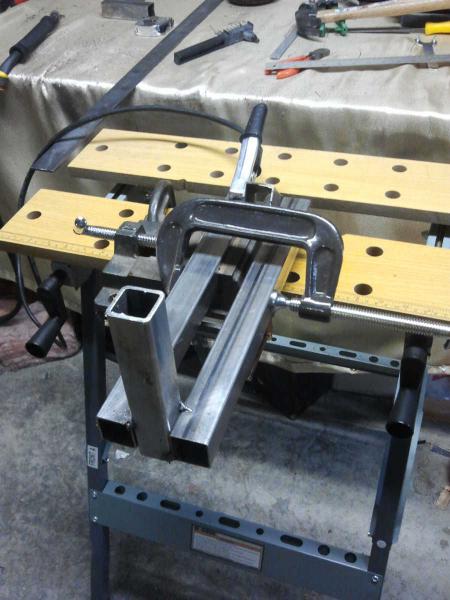
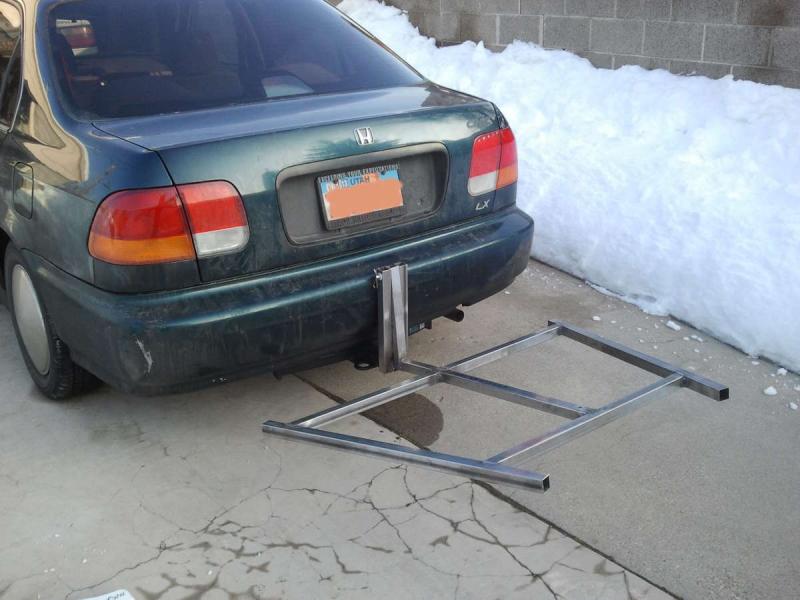
120-wall also seemed like an intuitive selection, but I wanted to go through this exercise because the hitch-rack I'm replacing actually uses a solid 1.25" square instead of tubing. (This one.) That seems pretty over-rated. I can't even bend the 120-wall with a sledge hammer (at least not with some wood buffers to prevent marring).

The carrier I'm replacing also weighs 49 lbs including the bag. I'd like to beat that number.

EDIT: I also put some thought into making the welds less critical - trying to have at least double the surface area of the tube in weld cross section.

Weight

The frame is about 19 lbs. There's at least 2.5 lbs I could have taken out of the side rails if I'd found just the right c-channel.

I was going to use plywood for the floor, but just 1/4" of that would weigh 8 lbs. 19-mil Aluminum sheet is 2 lbs instead.

19-mil Aluminum skin would be 12.5 lbs, but I'm going to assume for now that I need 25-mil, for 16 lbs.

So I'm at about 37.5 lbs, but this doesn't include a bunch of hardware and ribs.

Zinc

It probably isn't worth fussing much over galvanic corrosion. (I believe) there is some precedence for combining aluminum and steel in bikes and cars. On boats which are completely submerged for long periods you can get into trouble.

The difference in potential is probably around 0.15 V. Galvanic corrosion - Wikipedia, the free encyclopedia

(I'm hunting for a reference, but for that potential they should be fine in any environment except for submersion.)

Really the only time I would see galvanic corrosion is salty wet roads where there is heavy enough precipitation to electrolytically bridge an open steel zone with an open aluminum zone.

A Liquid Nails bead around the entry point for the frame into the skin, and of course painting both, should be sufficient. If I feel paranoid I might put in a zinc anode, or at least some galvanized screws, around that area as well.

That, and keep rain from getting inside and puddling forever.

There's definitely a strong motive for using steel for the frame but not for the skin. The hitch receiver is steel, so if I put aluminum in there it would be a zone where salty water could get trapped and cause real trouble. Steel is fine for framing but it makes a very heavy skin.

  Reply With Quote
The Following User Says Thank You to christofoo For This Useful Post:
COcyclist (02-12-2013)
Reply  Post New Thread


Powered by vBulletin® Version 3.8.11
Copyright ©2000 - 2024, vBulletin Solutions Inc.
Content Relevant URLs by vBSEO 3.5.2
All content copyright EcoModder.com