 04-24-2015, 03:52 PM
|
#31 (permalink)
|
|
EcoModding Apprentice
Join Date: Feb 2012
Location: Burlington, ON
Posts: 158
Thanks: 4
Thanked 36 Times in 26 Posts
|
Quote:
Originally Posted by rmay635703

This is the best project ever!
I have wanted to put a RWD MIEV drivetrain in the rear boot of either my insight or my fathers ZX40 for some time, (while having a FWD gasser up front as a hybrid)
This thread provides inspiration, you are truly from the great generation!
|
I've thought of the same thing for my mini. Smart ED is also a good candidate, similar range and performance with a smaller footprint for the battery so it may be more compact than the iMiev. I've checked the smart gas rear subframe looks like it would come out with suspension pretty easily. iMiev looks like if you used the whole subframe you'd have to fabricate top mounts for the struts. However the smart doesn't have the chademo quick charge if that matters to you.

|
|
|

|
 Today Today
|
|
|
|
 Other popular topics in this forum...
|
|
|
|
|
04-24-2015, 05:04 PM
|
#32 (permalink)
|
|
xpedro01
Join Date: Feb 2011
Location: Manhattan, Kansas
Posts: 46
Thanks: 11
Thanked 151 Times in 28 Posts
|
This is Daox posting for xpedro01. I'm on his mailing list for email updates on the project and I asked Tom if I could share. He agreed, so enjoy!
============================
Hi, this is Tom Shrimplin (xpedro01). Since I have had requests for pictures (and progress) I decided to send updates to those requests. This first one merely deals with the Nissan parts that will need to be transferred. NEXT week I plan to show where they will go. The third episode should show my progress to date.

1. This is what I bid on-front end damage.

2. It looked like the power train was not damaged, so I took a chance.

3. A very good neighbor with a bobcat made it easy to work on. Note size of battery.

04. Nissan layout.

05. This part was under the rear seat.

06. This group of modules was under the front seat.

07. These fit under foot between front and rear seat.

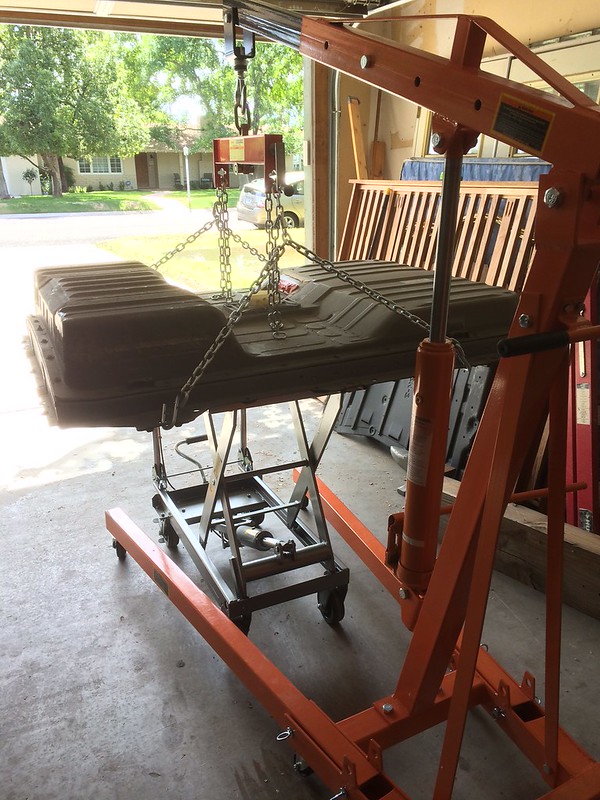
08. The heavy case (200 pounds-18 gauge) two halves were glued and I could not separate them. A cut off disk was used to remove the top half.

09. The Leaf battery was air tight and slightly pressurized. I personally think a flood damaged car would have a good battery. External pins were gold plated. |
|
|
|
|
The Following 7 Users Say Thank You to xpedro01 For This Useful Post:
|
|
|
04-24-2015, 05:32 PM
|
#33 (permalink)
|
|
Growin a stash
Join Date: Jun 2014
Location: Austin TX
Posts: 819
Thanks: 417
Thanked 310 Times in 233 Posts
|
That's awesome. Buy a salvaged car and flip it over... much easier to work on now. 
__________________

2024 Chevy Bolt
Previous:
2015 Nissan Leaf S, 164 mpge
|
|
|
|
|
04-27-2015, 07:17 PM
|
#34 (permalink)
|
|
xpedro01
Join Date: Feb 2011
Location: Manhattan, Kansas
Posts: 46
Thanks: 11
Thanked 151 Times in 28 Posts
|
This is Daox posting for xpedro01. I'm on his mailing list for email updates on the project and I asked Tom if I could share. He agreed, so enjoy!
============================
This deals with the battery placement in the honda. My copy of the encyclopedia came from Britain, so it looks different. Note that behind the seat it looks like there is a 12 inch vertical beam across the car. It is not a beam. It goes up 12 inches, then goes back on top of the frame rails all the way to the rear of the car. Behind the rear axle, it drops down a foot to make a place for the spare tire. All of the honda electronics and battery sit above this level in a 10 x20 x30 aluminum box.

The Nissan large 96kg 180 volt pack is now mounted under that floor, where the gas tank used to be. Its center of gravity is only 10.5 inches above the ground.

There are 2 of these 60 volt 70 pound packages bolted to the passenger side floor. They are 19x14x6 inches, stacked they are about even with the floor that goes to the rear.
These packs have a CG of 12 inches. All 400 pounds will be a foot lower than the honda was. When I am in the drivers seat, my 180 almost counters the batteries, giving a better side to side than the original.


These 2 - 35 pound-30 volt packs go where the passengers feet would be.
Because it presented itself, I elected to make it a one person car with a place to lie down and take a nap. Since I excel at that and am much too old (88), a pad to sack out on sounds good. It also relieves me of any liabity of having a passenger. I have used RV parks for many years---and they all have 240volt 50 amp outlets.
Next episode will cover mounting the power train up front.
 |
|
|
|
|
The Following 2 Users Say Thank You to xpedro01 For This Useful Post:
|
|
|
04-28-2015, 01:37 PM
|
#35 (permalink)
|
|
xpedro01
Join Date: Feb 2011
Location: Manhattan, Kansas
Posts: 46
Thanks: 11
Thanked 151 Times in 28 Posts
|
This is Daox posting for xpedro01. I'm on his mailing list for email updates on the project and I asked Tom if I could share. He agreed, so enjoy!
============================
The power train still in the car. It took me a week to remove it.
There was always another connecter to unhook. The plastic containers are because I cannot stand very long so I work sitting a lot.

This is the power train mounted on the sub frame.

NOTE the sub frame is rubber mounted. The large pads are where the power train attaches. This may be why they claim it is quiet.

Two more days were spent removing the axle shafts. Nissan recommends using a slide hammer type gear puller.

Here it is sitting in place. .25 x 1.5 inch bar stock was used to hang the sub frame from the hex tube bumper mount frame member. Additional pressure on that connection is only applied in reverse. Normal rotation applies torque to the rear mount.

Please note the gold plated connector receivers on the Chademo receptacle.
Next will be connecting the Leaf power train to the Honda front wheels.
 |
|
|
|
|
The Following 7 Users Say Thank You to xpedro01 For This Useful Post:
|
|
|
05-04-2015, 10:42 AM
|
#36 (permalink)
|
|
xpedro01
Join Date: Feb 2011
Location: Manhattan, Kansas
Posts: 46
Thanks: 11
Thanked 151 Times in 28 Posts
|
custom axles
This is Daox posting for xpedro01. I'm on his mailing list for email updates on the project and I asked Tom if I could share. He agreed, so enjoy!
============================
I spent an entire week trying to figure what method to use for connecting the Leaf power train to the Insight front wheels. Because of the case hardening of the leaf axles I decided no local (we are a college town) machine shop could properly handle resplining the leaf axle. Here is what my first attempt will be. I have cut the axles with a cut off disk. It took almost an hour to make a cut.

The center of the Leaf axle is soft enough to machine, so I hope to have my machinist;
1. Drill into the leaf axle a hole to allow an interference (press) fit for an entrance of 1 inch.
2. With a piece of 1.5 inch shaft 4" long, drill half way the leaf diameter and the other half being the Insight shaft diameter, again being press fit.
3. Press this sleeve over the Leaf axle. It will extend 1" BEYOND beyond the bored part.
4. Now press the Honda shaft into the sleeve and the bored Leaf axle. The weak spot will be where the sleeve ends on the Honda end.
5. Weld it or whatever he suggests.

If this works and the tires slipping provides the fuse, then "problem solved". If the axle breaks, Then I will have to go with the "big boys" that make axles for a living and have proper shaft material. In my next note, I will report on the outcome. If you have any suggestions, please Holler. xpedro01. |
|
|
|
|
The Following User Says Thank You to xpedro01 For This Useful Post:
|
|
|
05-04-2015, 10:59 AM
|
#37 (permalink)
|
|
Batman Junior
Join Date: Nov 2007
Location: 1000 Islands, Ontario, Canada
Posts: 22,534
Thanks: 4,082
Thanked 6,979 Times in 3,614 Posts
|
fuse
Quote:
|
If this works and the tires slipping provides the fuse, then "problem solved".
|
Funny analogy.
With my 48v/400A electric conversion, I was never in danger of blowing any mechanical "fuses". The Leaf is a different story. |
|
|
|
|
05-11-2015, 02:07 PM
|
#38 (permalink)
|
|
xpedro01
Join Date: Feb 2011
Location: Manhattan, Kansas
Posts: 46
Thanks: 11
Thanked 151 Times in 28 Posts
|
This is Daox posting for xpedro01. I'm on his mailing list for email updates on the project and I asked Tom if I could share. He agreed, so enjoy!
============================
The pieces have all been to the machinist, he has done his good work and I have one installed in the car. He said he got a good press fit. It took 7 tons of pressure to install the Honda axle.

NOW LOOK below!!

I think I have found my first big mistake (if I don't count starting this project).
This shows the Leaf power train is Too far forward and will not permit the steering to go lock to lock. It will probably take me several weeks to correct. It will require removing and relocating the small anti sway bar, and removing the sub frame and re working it a little. I just did not notice that and was so happy the way things fit in. I do have room to do what is necessary, but the project could take lots of time--weeks, at the speed I travel. I will keep you all posted. This was not in the schedule. xpedro01. |
|
|
|
|
The Following 2 Users Say Thank You to xpedro01 For This Useful Post:
|
|
|
05-13-2015, 03:12 AM
|
#39 (permalink)
|
|
EcoModding Lurker
Join Date: Jul 2010
Location: UK
Posts: 73
Thanks: 0
Thanked 37 Times in 23 Posts
|
This is a very interesting project. Nice work.
If any of us at Insight Central can help with tech stuff lets us know by posting any questions over there or we might not see them.
I will put a link to this thread on IC,
Regards Peter
|
|
|
|
|
05-13-2015, 05:17 PM
|
#40 (permalink)
|
|
EcoModding Lurker
Join Date: Apr 2015
Location: Phoenix, AZ
Posts: 10
Thanks: 1
Thanked 4 Times in 1 Post
|
Sorry about your setback Tom, happens to the best us!  Looking forward to seeing how your drive shafts do once its sorted out.
Here's the progress on my end:
Ran first test with car partially disassembled, so far so good. Removed pretty much the whole center console, dash, and airbag system. Quite a few DTCs, but still ran, drove and charged fine.
Re-using complete Leaf Drive System (w/VCM) - Page 2 - DIY Electric Car Forums

Managed to get my battery out, ready to start rewiring. I bought an extra set of the brackets / bus bars for the larger 24 module sub-pack, and plan to disassemble all the smaller packs to populate so that I end up with 2 identical 24 module packs. Voltage and BMS connections will still be identical to stock, but two big packs should work better in my car than one big one and a bunch of smaller ones. Still need to take final measurements to confirm, but that's my plan anyway.
DIY Electric Car Forums - View Single Post - "New" EV: 1973 Saab Sonett Conversion
Best of luck getting your mount straightened out,
Rob
|
|
|
|
|


