 10-17-2014, 09:26 AM
|
#51 (permalink)
|
|
Administrator
Join Date: Dec 2007
Location: Germantown, WI
Posts: 11,203
Thanks: 2,501
Thanked 2,589 Times in 1,555 Posts
|
Well, part of it is me being cheap too haha. He wanted $125 for the trans which is a fair price. I was only willing to pay $50 since its just a mod and is would have been almost an hour and a half drive one way to go get it.
|
|
|

|
|
The Following User Says Thank You to Daox For This Useful Post:
|
|
 Today Today
|
|
|
|
 Other popular topics in this forum...
|
|
|
|
 10-17-2014, 09:34 AM
|
#52 (permalink)
|
|
Furry Furfag
Join Date: Nov 2013
Location: Apple Valley
Posts: 2,084
Thanks: 67
Thanked 409 Times in 313 Posts
|
Quote:
Originally Posted by Daox

Well, part of it is me being cheap too haha. He wanted $125 for the trans which is a fair price. I was only willing to pay $50 since its just a mod and is would have been almost an hour and a half drive one way to go get it.
|
Oh ok haha :P. Doesn't the xfi have tall gears as well?
__________________

|
|
|

|
|
The Following User Says Thank You to Baltothewolf For This Useful Post:
|
|
 10-17-2014, 09:38 AM
|
#53 (permalink)
|
|
Administrator
Join Date: Dec 2007
Location: Germantown, WI
Posts: 11,203
Thanks: 2,501
Thanked 2,589 Times in 1,555 Posts
|
The XFI has taller gears than mine, but the 1.3L came with the tallest gearing.
4.39 - 1.0L garden variety (1995 and up), 13 inch wheels <--- Mine
4.105 - 1.0L garden variety (1989-1994), 12 inch wheels
3.79 - 1.0L XFi (1989-1994), w/12 inch wheels
3.523 - 1.3L SOHC (1989-1994), w/13 inch wheels <--- What I want
Info from: Project 'nerd gear': taller tranny transplant nets +5.2% MPG - MetroMPG.com |
|
|

|
|
The Following User Says Thank You to Daox For This Useful Post:
|
|
 10-17-2014, 10:02 AM
|
#54 (permalink)
|
|
Administrator
Join Date: Dec 2007
Location: Germantown, WI
Posts: 11,203
Thanks: 2,501
Thanked 2,589 Times in 1,555 Posts
|
Last night I got around to doing a bit more welding repair on the front control arm mounts. This time I worked on the passenger side. It wasn't as bad as the driver's side, but it still wasn't good.
Here is what I started with after peeling away some paint and undercoating.

This is the hole on the inside of the mount. I find it odd that its so high up. 

Chipped out the rusty thin metal and cleaned it up to see what solid metal is left.


Then I got the first panel welded in. Again, tack welding it in a few places and using the hammer to get it to fit up closer to the follow the body lines.


And, while I was under the car, I found the culprit in the sagging exhaust. I'm pretty sure that strap around the CAT is supposed to be attached to the CAT.  I'll add that to the list of things to weld. 
 |
|
|

|
|
The Following User Says Thank You to Daox For This Useful Post:
|
|
 10-17-2014, 10:13 AM
|
#55 (permalink)
|
|
Batman Junior
Join Date: Nov 2007
Location: 1000 Islands, Ontario, Canada
Posts: 22,541
Thanks: 4,085
Thanked 6,989 Times in 3,619 Posts
|
Beads look much more weldy this time. 
Also, lucky you that a spare new front pipe with cat came with the car. Or are you just going to fix that one? Probably easier to fix than replace for now, eh?
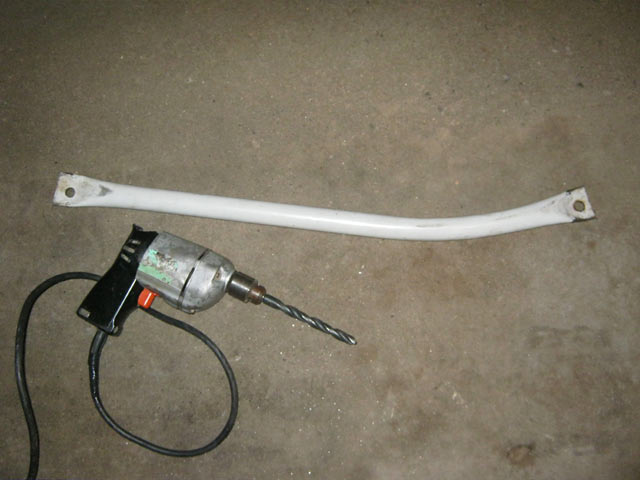
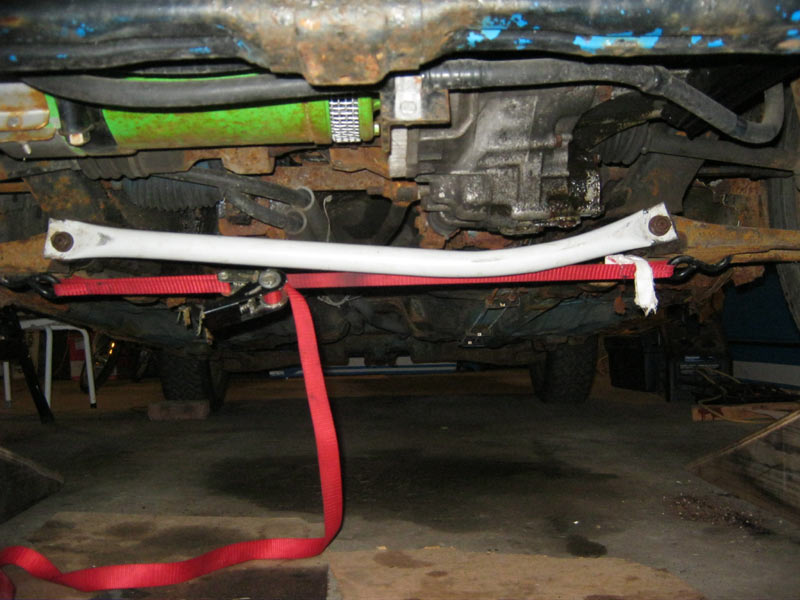
Don't forget to do a simple control arm brace while you're under there. Made a HUGE difference in stiffening the similarly rusted front end of the ForkenSwift. Bend & flatten the ends of some tubing:

I used ratchet straps to cinch the control arm mounts super tight before mounting the precision-drilled bar. The ratchet actually made a small but measurable difference in the spacing (if I remember it might have been 1/8 inch or so):
 |
|
|

|
|
The Following 3 Users Say Thank You to MetroMPG For This Useful Post:
|
|
 10-17-2014, 01:10 PM
|
#56 (permalink)
|
|
Administrator
Join Date: Dec 2007
Location: Germantown, WI
Posts: 11,203
Thanks: 2,501
Thanked 2,589 Times in 1,555 Posts
|
Yeah, the welds are definitely better. There is much better penetration and strength even though it still doesn't look amazing.
I may very well do that mod. Probably not right away. I just want to get it on the road!
As for the exhaust, I'll just weld it back together. It looks to be OEM and I'll use it until it falls apart (and isn't easily fixed), as it is working just fine.
|
|
|

|
|
The Following User Says Thank You to Daox For This Useful Post:
|
|
 10-17-2014, 04:44 PM
|
#57 (permalink)
|
|
Administrator
Join Date: Dec 2007
Location: Germantown, WI
Posts: 11,203
Thanks: 2,501
Thanked 2,589 Times in 1,555 Posts
|
While I was working on the control arm mount, my lovely wife helped out by polishing and sealing the headlights on the Metro. They weren't horrific, but they certainly look a lot better now.
She used the method shown here: http://ecomodder.com/forum/showthrea...-uv-30237.html
This method uses a urethane sealer after the headlights are polished to provide UV protection.
Here is a before shot.

And an after shot.

Right side done, left side cleaned but not done.

Both sides done with urethane on them.
 |
|
|

|
|
The Following 3 Users Say Thank You to Daox For This Useful Post:
|
|
 10-17-2014, 10:35 PM
|
#58 (permalink)
|
|
Too many cars
Join Date: Oct 2009
Location: New York State
Posts: 1,628
Thanks: 1,384
Thanked 832 Times in 494 Posts
|
Quote:
Originally Posted by Daox

The XFI has taller gears than mine, but the 1.3L came with the tallest gearing.
4.39 - 1.0L garden variety (1995 and up), 13 inch wheels <--- Mine
4.105 - 1.0L garden variety (1989-1994), 12 inch wheels
3.79 - 1.0L XFi (1989-1994), w/12 inch wheels
3.523 - 1.3L SOHC (1989-1994), w/13 inch wheels <--- What I want
Info from: Project 'nerd gear': taller tranny transplant nets +5.2% MPG - MetroMPG.com |
The 1995+ 1.3L cars also had the 3.79 gearing. And they're easier to find. 1998+ 1.3L cars got a shorter 1st gear. Nice when you stop on a hill.
__________________
2000 Honda Insight
2000 Honda Insight
2000 Honda Insight
2006 Honda Insight (parts car)
1988 Honda CRXFi
1994 Geo Metro


|
|
|

|
|
The Following 4 Users Say Thank You to Gasoline Fumes For This Useful Post:
|
|
 10-18-2014, 10:27 AM
|
#59 (permalink)
|
|
Administrator
Join Date: Dec 2007
Location: Germantown, WI
Posts: 11,203
Thanks: 2,501
Thanked 2,589 Times in 1,555 Posts
|
The control arm mounts are done (for now). I wasn't really able to get at the back side of the passenger side control arm mount, so I got at it as best I could from the outside.

I also took a quick moment to pop the cap off the distributor and clean that up, a suggestion from MetroMPG. The terminals were pretty corroded. Nice call Darin. 
 |
|
|

|
|
The Following 2 Users Say Thank You to Daox For This Useful Post:
|
|
 10-18-2014, 05:18 PM
|
#60 (permalink)
|
|
EcoModding Lurker
Join Date: Apr 2011
Location: Reseda,Ca
Posts: 22
Thanks: 0
Thanked 7 Times in 4 Posts
|
I did the control arm brace on my '91 metro EV and it made a major improvement in how my metro handles. The car felt like the front tires were going out of track when pushed hard in a corner without it. Lucky, it's a California car with no rust. The biggest improvement I have done so far for efficiency is a full belly pan out of 1/8" delrin sheet. It lowered the Amp draw 22% at 65mph, from 230 to 180 on flat ground.
|
|
|

|
|
The Following 4 Users Say Thank You to JoeG For This Useful Post:
|
|
|