11-30-2012, 07:55 AM
|
#101 (permalink)
|
|
EcoModding Apprentice
Join Date: Jun 2010
Location: Virginia
Posts: 114
Thanks: 33
Thanked 56 Times in 38 Posts
|
Quote:
Originally Posted by Daox

I happened to already have the door lock actuator, so all I needed was an h-bridge.
Options are always good though!  |

|
|
|

|
 Today Today
|
|
|
|
 Other popular topics in this forum...
|
|
|
|
|
12-03-2012, 12:04 PM
|
#102 (permalink)
|
|
Administrator
Join Date: Dec 2007
Location: Germantown, WI
Posts: 11,203
Thanks: 2,501
Thanked 2,589 Times in 1,555 Posts
|
|
|
|
|
|
The Following 7 Users Say Thank You to Daox For This Useful Post:
|
|
|
12-03-2012, 12:43 PM
|
#103 (permalink)
|
|
EcoMod Proof of Concept
Join Date: Mar 2008
Location: Chilliwack B.C. CANADA
Posts: 245
Thanks: 81
Thanked 85 Times in 45 Posts
|
Awesome .. I am looking forward to see the end result, so I can copy it.
__________________
2000 Insight MT 106K Citrus A/C 
|
|
|
|
|
12-03-2012, 01:47 PM
|
#104 (permalink)
|
|
Administrator
Join Date: Dec 2007
Location: Germantown, WI
Posts: 11,203
Thanks: 2,501
Thanked 2,589 Times in 1,555 Posts
|
Haha, thanks. I'm very happy with it thus far.
There is one thing I'd appreciate some help with though. The rods are a little loose in the coroplast. So, they have to be fixed to it somehow. It would be great if that method was adjustable so you could more easily get everything setup, slats to seal better, etc.
My initial thought was to cut a groove in the back side of the coroplast in a couple spots. Just a short 1/4" cut or so to expose the metal rod. In that slot I could put some glue into the groove to lock the rod to the coroplast. However, this isn't adjustable, so you'd have to be sure its where you want it before you glue it.
My second thought was to take another small piece of aluminum and tap it for a setscrew. Then, I'd cut a groove in the coroplast to expose the rod like the above idea. The aluminum piece could be glued to the coroplast and then you could tighten the setscrew against the rod to lock it in place. I'm just not sure what kind of glue would work all that great to hold aluminum to plastic. It also requires a tap which not everyone probably has laying around.
Ideas are welcome.
|
|
|
|
|
The Following User Says Thank You to Daox For This Useful Post:
|
|
|
12-03-2012, 06:17 PM
|
#105 (permalink)
|
|
Master EcoModder
Join Date: Nov 2010
Location: US
Posts: 1,016
Chief - '06 Pontiac Grand Prix 90 day: 26.7 mpg (US) SF1 - '12 Ford Fiesta S 90 day: 30.95 mpg (US)
Thanks: 195
Thanked 247 Times in 190 Posts
|
Quote:
Originally Posted by Daox
Haha, thanks. I'm very happy with it thus far.
My second thought was to take another small piece of aluminum and tap it for a setscrew. Then, I'd cut a groove in the coroplast to expose the rod like the above idea. The aluminum piece could be glued to the coroplast and then you could tighten the setscrew against the rod to lock it in place. I'm just not sure what kind of glue would work all that great to hold aluminum to plastic. It also requires a tap which not everyone probably has laying around.
Ideas are welcome.
|
Would it be possible to mount it like a carburetor throttle plate, putting the screws through the metal tab and in to the rod. If the rod was ground down in those areas it would make a no slip mount.
PS
To avoid tapping the rod , it might be possible to just drill it and put a screw with lock washer and nut. If the one side needs to be smooth , it could be counter sunk on one side.
Last edited by nemo; 12-03-2012 at 06:25 PM..
|
|
|
|
|
12-03-2012, 07:25 PM
|
#106 (permalink)
|
|
Smeghead
Join Date: Oct 2009
Location: South Central AK
Posts: 933
Thanks: 32
Thanked 146 Times in 97 Posts
|
have you the ability to center drill a couple holes through the steel rods? If so 2 holes in each (at the 1/3 and 2/3 of the coroplast lenghts) then smaller rod insertend through the holes and then zip tie the corplast to the smaller rods.
If you can not center drill use the same diameter rod, use a file to make interlocking notches, then drill from the flat side on each and use a small bolt or stainless wire to "Lash" them together.
to centerdrill with out a jig you can file a small flat (slightly smaller than the size of the drill bit) then centerpunch on the flat.
__________________
Learn from the mistakes of others, that way when you mess up you can do so in new and interesting ways.
One mile of road will take you one mile, one mile of runway can take you around the world.
|
|
|
|
|
12-03-2012, 07:48 PM
|
#107 (permalink)
|
|
EcoModding Lurcher
Join Date: Dec 2010
Location: Los Angeles
Posts: 333
Thanks: 151
Thanked 109 Times in 80 Posts
|
Quote:
Originally Posted by Daox
Haha, thanks. I'm very happy with it thus far.
There is one thing I'd appreciate some help with though. The rods are a little loose in the coroplast. So, they have to be fixed to it somehow. It would be great if that method was adjustable so you could more easily get everything setup, slats to seal better, etc.
My initial thought was to cut a groove in the back side of the coroplast in a couple spots. Just a short 1/4" cut or so to expose the metal rod. In that slot I could put some glue into the groove to lock the rod to the coroplast. However, this isn't adjustable, so you'd have to be sure its where you want it before you glue it.
My second thought was to take another small piece of aluminum and tap it for a setscrew. Then, I'd cut a groove in the coroplast to expose the rod like the above idea. The aluminum piece could be glued to the coroplast and then you could tighten the setscrew against the rod to lock it in place. I'm just not sure what kind of glue would work all that great to hold aluminum to plastic. It also requires a tap which not everyone probably has laying around.
Ideas are welcome.
|
If it were me, I'd glue the coroplast to the actuator rods to provide the best range of movement. I'd make adjustments in the linkage to the lock actuator. The length of a connecting rod can be adjusted, like by bending a kink more or less sharply, to get exactly the right action.
Also this looks beautiful!
-mort |
|
|
|
|
12-03-2012, 07:50 PM
|
#108 (permalink)
|
|
Administrator
Join Date: Dec 2007
Location: Germantown, WI
Posts: 11,203
Thanks: 2,501
Thanked 2,589 Times in 1,555 Posts
|
Unfortunately, the steel rods are only 1/8" in diameter. I don't think I'll be tapping or drilling into them.
|
|
|
|
|
12-03-2012, 07:54 PM
|
#109 (permalink)
|
|
Busting Knuckles Often
Join Date: Aug 2012
Location: SE Michigan
Posts: 135
Thanks: 313
Thanked 28 Times in 20 Posts
|
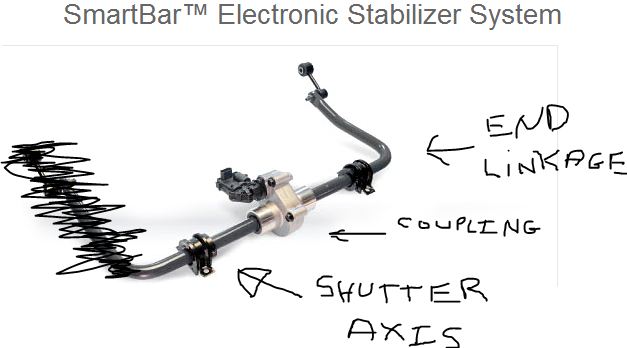
How about DECOUPLING each shutter axis from its bent linkage end
My thought was to keep your 'axle' and your bent linkage separate. This way, you can glue the axle to your plastic.
You leave some space at the linkage end, to slip one side of a double coupler to it. Now you attach the other end of set screw coupler to your bent rod.
This way, the axis of the shutter and the continuation of it are adjustable and can separate.

Your Axle of each shutter can then be glued good, with no worry about linkage position, it can be rotated and locked into place as needed.
The coupler would be like a small bit of round hollow aluminum, with a 2 set screws, one towards each end, to lock upon the steel rod.
Set Screw Shaft Couplers
Like this but you can make your own or find them cheap?

Hence, micro size decoupling "Smart shutter axle thing..."
---
My reference theory
Picture an anti-sway bar. Now picture the straight center of it versus the bends that mount it. You want to be able to rotate the 2 of them independently but lock them at correct spot.
Decoupled for off road use, coupled for on road stability. American Axle calls it a Smart Bar.
SmartBar™ Electronic Stabilizer System | Chassis System Components | Product Portfolio | American Axle & Manufacturing

__________________


Last edited by WesternStarSCR; 12-03-2012 at 11:04 PM..
Reason: Lots
|
|
|
|
|
The Following User Says Thank You to WesternStarSCR For This Useful Post:
|
|
|
12-03-2012, 08:12 PM
|
#110 (permalink)
|
|
Master EcoModder
Join Date: Nov 2010
Location: US
Posts: 1,016
Chief - '06 Pontiac Grand Prix 90 day: 26.7 mpg (US) SF1 - '12 Ford Fiesta S 90 day: 30.95 mpg (US)
Thanks: 195
Thanked 247 Times in 190 Posts
|
Great frame design, so simple. Looking forward to seeing the progress.
I am toying with the idea of build a set of these my car (will need right and left), but I think here in the south they would need to run in the open position a significant amount of the time. From a drag stand point would it be better to pivot the slats from the top or bottom edge, so when open the slat doesn't extend out past the front edge of the frame?
|
|
|
|
|