09-05-2013, 01:23 PM
|
#21 (permalink)
|
|
EcoModding Lurker
Join Date: Feb 2012
Location: Sandy, Utah
Posts: 68
Thanks: 2
Thanked 20 Times in 17 Posts
|
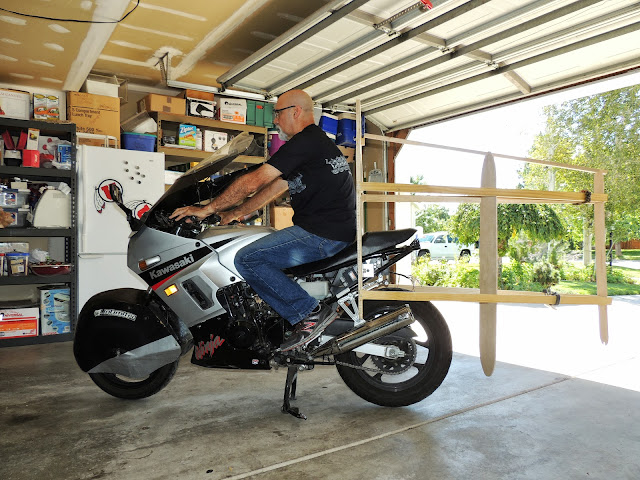
Work continues. I lightened the main bulkhead, test fit some stringers, and played around with the cargo shelf.
I priced corrugated plastic board and .032 aluminum for the skin: 4X8 sheet of the fluted plastic is $13 and a 4X10 aluminum sheet was $45 (I think). I am leaning toward the aluminum but the fluted board is tempting.
Next: Mount the main Bulkhead.
Photos (ignore the extra long stringer sticking out the front of the bulkhead it will be cut off) with a grocery bag to check if 4 of them will fit in the cargo area per Craig Vetter Challenge rules  :


|
|
|

|
|
The Following User Says Thank You to JeffM For This Useful Post:
|
|
 Today Today
|
|
|
|
 Other popular topics in this forum...
|
|
|
|
|
09-05-2013, 05:03 PM
|
#22 (permalink)
|
|
Master EcoModder
Join Date: Feb 2009
Location: France - Paris
Posts: 762
Thanks: 188
Thanked 33 Times in 30 Posts
|
Nice !
__________________

|
|
|
|
|
09-07-2013, 03:54 PM
|
#23 (permalink)
|
|
Master EcoModder
Join Date: Jan 2008
Location: Sanger,Texas,U.S.A.
Posts: 16,539
Thanks: 24,520
Thanked 7,439 Times in 4,819 Posts
|
boat tail
Darn! There goes Exxon/Mobil's next quarterly profits! 
__________________
Photobucket album: http://s1271.photobucket.com/albums/jj622/aerohead2/
|
|
|
|
|
09-16-2013, 11:57 AM
|
#24 (permalink)
|
|
EcoModding Lurker
Join Date: Feb 2012
Location: Sandy, Utah
Posts: 68
Thanks: 2
Thanked 20 Times in 17 Posts
|
I have the tail a bit more fleshed out. I need to finalize the mounts and glue and screw the whole bit together including a cargo shelf behind the main bulkhead. I will cut a couple of lightening holes in the mid-bulkhead. I am trying to keep it as light as I can especially as I go towards the rear of the tail.
Following the main assembly I will be painting/sealing the frame (for water resistance) prior to complete skinning. I think I have settled on using door skin for the sides of the tail and Coroplast for the top and bottom. I also need to fab up an inner fender for under the tail.
After that, I will wire up the lighting and change the gearing on the bike. I will either go 15/41 or 15/39 (the latter requires shortening the chain).
Other than the big things the rest will be polishing up the details.


The LED tail/brake light I will be mounting on the end of the tail. Tail/Brake Light Bar | Trailer Lights & Lamps | Truck/Trailer | Super Bright LEDs


 |
|
|
|
|
09-16-2013, 03:41 PM
|
#25 (permalink)
|
|
Master EcoModder
Join Date: Feb 2009
Location: France - Paris
Posts: 762
Thanks: 188
Thanked 33 Times in 30 Posts
|
Looks promising, plenty cargo space !
__________________
|
|
|
|
|
09-16-2013, 04:34 PM
|
#26 (permalink)
|
|
Master EcoModder
Join Date: Jul 2010
Location: Belgium
Posts: 4,683
Thanks: 178
Thanked 653 Times in 516 Posts
|
May I suggest a diagonal brace between the frame tubes underneath the rear saddle and the middle bulkhead ?
In the bottom picture, it looks like it's made to have a brace there, by continuing the frame tubes.
__________________
Strayed to the Dark Diesel Side

|
|
|
|
|
The Following User Says Thank You to euromodder For This Useful Post:
|
|
|
09-16-2013, 09:09 PM
|
#27 (permalink)
|
|
EcoModding Lurker
Join Date: Feb 2012
Location: Sandy, Utah
Posts: 68
Thanks: 2
Thanked 20 Times in 17 Posts
|
Quote:
Originally Posted by euromodder

May I suggest a diagonal brace between the frame tubes underneath the rear saddle and the middle bulkhead ?
In the bottom picture, it looks like it's made to have a brace there, by continuing the frame tubes.
|
Thanks euromodder, that is exactly what I am going to do  However, I plan on using the frame mounts for the top of the exhaust hanger + another mount just a bit lower to create a triangular brace to the mid-bulkhead. There are three in-line bolts there. You can see it just below the frame tubes you mentioned.
Plus, I will be adding a bracket connecting the bottom of the main bulkhead to the bolt where the exhaust hanger/rear foot peg mount is located. On the rear portion of the tail have a thin diagonal brace going from the bottom corner to the top of the mid-bulkhead.
Jeff
Last edited by JeffM; 09-16-2013 at 09:16 PM..
|
|
|
|
|
10-02-2013, 11:22 AM
|
#28 (permalink)
|
|
EcoModding Lurker
Join Date: Feb 2012
Location: Sandy, Utah
Posts: 68
Thanks: 2
Thanked 20 Times in 17 Posts
|
Update.
I have been doing a ton of looking at, and thinking about, the tail structure and how to mount it and make it stiff enough to actually work on the road.
All this thinking, of course, causes additional head scratching when you realize your original ideas may not work or may not be safe. Every idea causes compromises and these must be thought out.
Sometimes I build in a fury as the ideas come quickly and other times I feel quite stumped. 
At this point, I now think I have solutions for the tail to be mounted in a safe manner. Last thing I want is to have the tail come loose or break apart if I hit a bump or something. 
Stay tuned, I really want to get this thing finished so I can join greenaero and Alan Smith in Vegas for the next Vetter Challenge. However, I believe I am behind schedule but would rather be safe than sorry with a build of this nature.
Edit. >>> I will not be able to make it to Vegas due to work commitments. Oh well, maybe next year. <<<
Jeff
Last edited by JeffM; 10-02-2013 at 01:55 PM..
|
|
|
|
|
10-03-2013, 02:13 AM
|
#29 (permalink)
|
|
Master EcoModder
Join Date: Mar 2008
Location: USA
Posts: 568
Thanks: 1
Thanked 74 Times in 59 Posts
|
If possible, lose the barn door mirrors, replace with smaller, more aero shapes available pretty cheap on eBay, which also has combined mirror/turn signals. Also, note the mirror stalks' cross-section, and convert to teardrop airfoil shape.
A tankbag is handy to carry stuff, and fills in the gap between rider and windshield, where a low-pressure bubble forms and collapses, aka von Karmann vortex. A tankbag in that gap much reduces the buffeting and turbulence there, making for a much smoother and quieter environment inside your helmet. Less drag, too. This is akin to the fairings between cab and trailer on big trucks.
As others have noted, lose the rear hardbags and carry your stuff in your new tail section, or at least make a free-blown teardrop fairing behind the rider, that acts as a backrest for him and a stowage trunk for junk. I suspect your tail section fairing would work as well if only about half that long, and be lighter, cheaper, and more manageable.
On my BMW I may delete the stalk mirrors entirely, and mount mirrors to the windscreen inside the upper edge, sorta like fighter plane mirrors mounted inside the canopy bow, for less stuff hanging out in the breeze.
And, like my BMW R1100RSL, your bike has a big concave gap between headlight and front fender, which acts like a very efficient speed brake. I don't know what BMW was thinking, as the heat to be dissipated is on the boxer cylinder heads, not up in that big hole. Your bike may need the big hole to cool the engine, though. I used a semi-circular section of a plastic bucket, flattened it somewhat into an airfoil shape, and attached it to the front fork struts. This turned that huge speedbrake hole into at least a crude airfoil shape, reducing drag and buffeting significantly. I get about 51 mpg cruising at 80, ~10-15% better than other similar BMW bikes at 70.
Last edited by Otto; 10-03-2013 at 02:23 AM..
|
|
|
|
|
10-03-2013, 03:49 PM
|
#30 (permalink)
|
|
Master EcoModder
Join Date: Feb 2009
Location: France - Paris
Posts: 762
Thanks: 188
Thanked 33 Times in 30 Posts
|
Quote:
Originally Posted by Otto
I
And, like my BMW R1100RSL, your bike has a big concave gap between headlight and front fender, which acts like a very efficient speed brake. I don't know what BMW was thinking, as the heat to be dissipated is on the boxer cylinder heads, not up in that big hole. Your bike may need the big hole to cool the engine, though. I used a semi-circular section of a plastic bucket, flattened it somewhat into an airfoil shape, and attached it to the front fork struts. This turned that huge speedbrake hole into at least a crude airfoil shape, reducing drag and buffeting significantly. I get about 51 mpg cruising at 80, ~10-15% better than other similar BMW bikes at 70.
|
Would you have pics of your bike ?
Not that I can't imagine how you had it done, but a pic is always nice to look at.
__________________
|
|
|
|
|