Go Back   EcoModder Forum > EcoModding > Hybrids
Register Now
 Register Now
 

Reply  Post New Thread
 
Submit Tools LinkBack Thread Tools
Old 04-24-2008, 10:47 PM   #61 (permalink)
Red
Master EcoModder
 
Red's Avatar
 
Join Date: Mar 2008
Location: SF Bay Area
Posts: 713
Thanks: 1
Thanked 9 Times in 9 Posts
Quote:
Originally Posted by MetroMPG View Post
$3.5K would be outstanding!

I love seeing the updates to this thread - I'm rooting for you.

I like it so much, it's the top of the "top picks list" (my picks) on the home page: http://ecomodder.com/
Thanks Metro

Far as I can tell I'm in the home stretch, already have the new rotors and pads, just ordered some tires, the stock Bridgestone Potenza RE92s, got the emission sticker ordered up, all thats left is to get it inspected, registered, then detailed

  Reply With Quote
Alt Today
Popular topics

Other popular topics in this forum...

   
Old 04-25-2008, 02:27 PM   #62 (permalink)
EcoModding Apprentice
 
Join Date: Apr 2008
Location: southern cali
Posts: 159

DMC - '99 Honda Civic DX
Thanks: 0
Thanked 2 Times in 2 Posts
Since you're mechanic savvy do you plan to do any modifications to the car to improve it's mpg over what a stock insight is capable of?
  Reply With Quote
Old 04-26-2008, 01:39 AM   #63 (permalink)
Red
Master EcoModder
 
Red's Avatar
 
Join Date: Mar 2008
Location: SF Bay Area
Posts: 713
Thanks: 1
Thanked 9 Times in 9 Posts
Quote:
Originally Posted by Compaq888 View Post
Since you're mechanic savvy do you plan to do any modifications to the car to improve it's mpg over what a stock insight is capable of?

Been thinking about it. I really want to lower the car about an inch, theres tons of space inside the wheel wells and more than enough ground clearance below. Cept there is no aftermarket suspension stuff for it.

I want to do a grille block, replace the bottom grille/deflector thing built into the bumper with a grille block. I've always been leery of grille blocks cause of the cooling effect it will have. My parents have wasted enough engines by overheating them so I like to have some extra cool capacity. The Jeep its cooling system is pretty marginal, I'm not too sure how hardy the Insight' is. And I don't want to potentially break anything major.

Internally I want to add some gauges. I'm so used to the Jeeps full featured dash (volt, oil pressure, water temp) that it feels like im blind inside the Insight. The LCD display, while cool, isnt very exact.

Extend the factory belly pans to the rear bumper, right now they feed a rear deflector under the rear axle. I want to extend the pan all the way back.
  Reply With Quote
Old 04-26-2008, 06:57 PM   #64 (permalink)
Master EcoModder
 
Big Dave's Avatar
 
Join Date: Jan 2008
Location: Steppes of Central Indiana
Posts: 1,319

The Red Baron - '00 Ford F-350 XLT
90 day: 27.99 mpg (US)

Impala Phase Zero - '96 Chevrolet Impala SS
90 day: 21.03 mpg (US)
Thanks: 0
Thanked 186 Times in 127 Posts
Be sure to align the front end to zero camber and toe-in.
__________________
2000 Ford F-350 SC 4x2 6 Speed Manual
4" Slam
3.08:1 gears and Gear Vendor Overdrive
Rubber Conveyor Belt Air Dam
  Reply With Quote
Old 04-27-2008, 10:53 PM   #65 (permalink)
Red
Master EcoModder
 
Red's Avatar
 
Join Date: Mar 2008
Location: SF Bay Area
Posts: 713
Thanks: 1
Thanked 9 Times in 9 Posts
Quote:
Originally Posted by Big Dave View Post
Be sure to align the front end to zero camber and toe-in.
Need to find that sheet again, but I think in 06 or something the PO had it aligned so I'm hoping I'm still good. I hope
  Reply With Quote
Old 04-28-2008, 01:52 AM   #66 (permalink)
Red
Master EcoModder
 
Red's Avatar
 
Join Date: Mar 2008
Location: SF Bay Area
Posts: 713
Thanks: 1
Thanked 9 Times in 9 Posts
Front Brake Job

Front Brake Job - As a heads up its your standard disk brake job. Nothing special. I was debating about putting this up, but it seems like the general consensus is that vehicles with a regen braking system has some "special" brake systems, so I am shooting to dispel that myth.

Regen braking is a property of the electric motor and not the brakes. In a nutshell, if you are in gear and you hit the brakes the on board electronics switches the AC electric motor from propulsion generation to electrical power generation. The net effect is a very strong compression braking effect. Your actual, physical brakes have nothing to do with the systems functionality. Your brakes work the exact same way as everyone else's front brakes. You have a pair of pads actuated by a hydraulic piston (the caliper) which squeezes the spinning rotor that is bolted to the wheel/hub assembly. You still slow down and stop via friction. If you were to take the car out of gear you wouldn't have any regen braking, since the electric motor is splined to the crankshaft, hence it would be disconnected from the drive line.

I blame most of the ignorance of the system on Toyota and the marketing of the Prius.

Anyway,

Stuff you need

17mm 1/2 drive socket
12mm 3/8 drive socket
1/4" wrench
13mm deep 3/8 drive socket
6" extension 3/8 drive
#3 Phillips Screwdriver bit
3lb Sledge hammer
Lug Wrench or Impact Gun (Wheel Removal)
1/2 drive ratchet
3/8 drive ratchet
C Clamp

Brake Pads Front Set (Monroe Ceramic PN# MOF CX832- $46.95 {before $15 MIR )
Brake Rotors [Only needed if damaged/worn] (Raybestos Premium PN# RED 9891R $21.97 per)

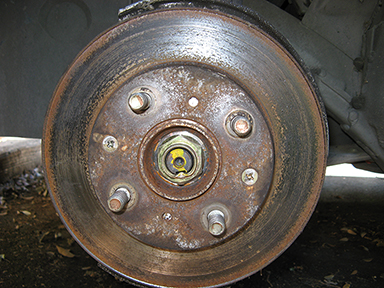
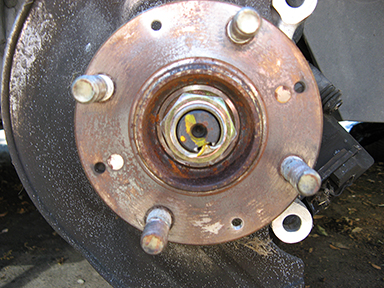
Jack up and secure the car. Remove the wheel on whatever side you want to start on. I normally start drivers then go to passengers, but it doesn't matter. Once the wheel is off, you should see this if you brakes have gone down the tube and your car has been sitting for six months.


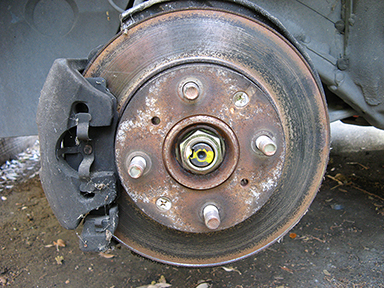
Now in my case I needed to replace both the pads and the rotors. So I'll be covering both.

Your caliper and caliper support bracket is held to the knuckle via the following bolts.


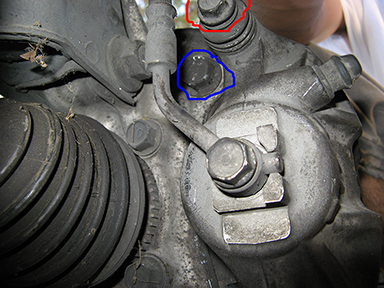
The caliper bolts are the ones outlined in red, the bracket is outlined in blue. If you are just replacing the pads, you need to remove just the red ones. If you are replacing the rotors, both the blue and the red must be removed.

The bolts in blue need a 17mm socket, the ones in red use the 12mm. The 17mm will be stubborn, so use the sledge to help them out. You will only be able to access the blue bolts after the red ones are removed. Do not use an impact gun on them as you can damage the protective coating on the bolts.

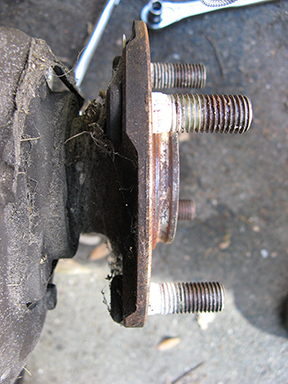
Once the red bolts are removed, rock the caliper fore and aft a bit to release the piston. Slide the caliper off and secure it somewhere. I was able to rest it on the A arm without a problem. Once secure remove the caliper support bracket. When you unbolt it, its going to more or less fall on the ground, which is fine. Its a solid hunk of aluminum. You should see this


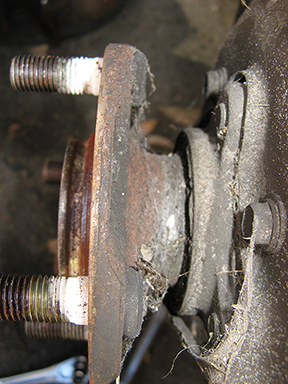
As you can see there are two little screws holding the rotor to the hub. Its screwed on to aide assembly and to rust in place you when you need to replace the rotor. All told you really don't need em. The lug nuts secure the rotor to the hub, those tiny things aren't going to do squat.

Now the best and easiest way to remove those screws is via an impact screwdriver. Unfortunately I don't have one, and at the time of this project was too lazy to go to Harbor Freight and go get one. So I fabbed my own impact screw removal device.

Before I get into it, first try to remove the screws normally, using the #3 and a screwdriver, if it comes out sweet, else continue on......

To remove those screws, take your #3 screw driver bit and you sledge hammer. Line the bit up and pound it into the screw with the sledge, the screw is made out of a soft metal and it should be easy. Your goal is to get the bit stuck in there, not to smash the screw to bits. Once the bit is stuck, slide the box end of your 1/4" wrench over the end of the bit. Attach the extension to the 13mm deep, and slip that whole thing over the end of the wrench. Should look like this


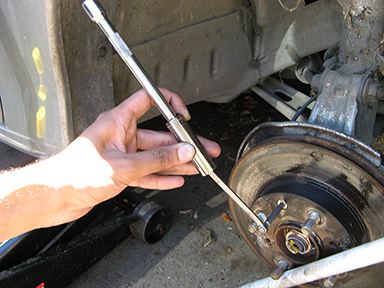
Now using one hand, apply some constant pressure to the "tool", and using the other hand tap the end of the bit with the sledge. After a couple of taps it should pop loose. Unscrew it and now remove the other one using the same method. If the hub starts to spin, either get a helper to hold it or just something to jam it.

Once the screws are out just pull the rotor off.

Pics of the new rotors
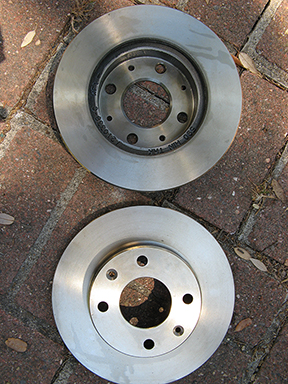
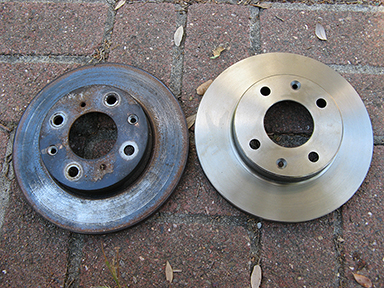

Old vs new


All that is left is to slide the new rotor on to the hub. Don't reuse the screws if you don't want to, I didn't. To hold the rotor in place just use one of the lug nuts.

Some pics of the hub. Seems like Honda machined off all the excess metal, leaving only what was required.


Once the rotor is back on, reinstall the caliper support bracket. Make it nice and tight. Take your C-clamp and one of the old brake pads and squeeze the piston back into the caliper.


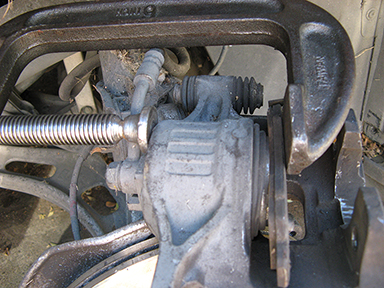
Once that is done, clip on the new pads. One pad clips to the caliper the other clips to the support bracket. Slide the caliper over the rotor and bolt it back up.
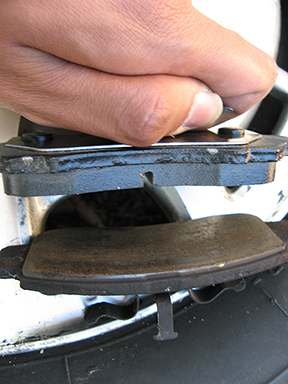
Old vs new pads


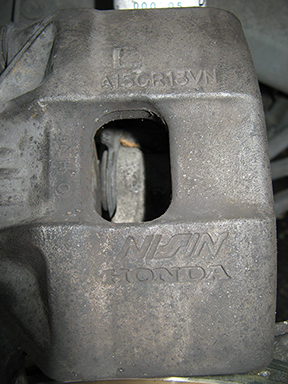
The caliper itself had a cool Honda logo cast into it


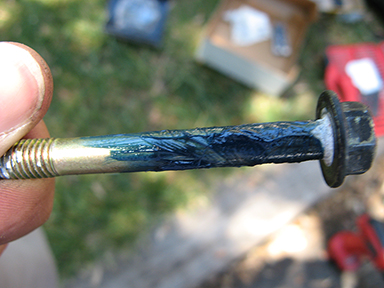
Be sure to lube up the top slider bolt.


Torque it down snug.
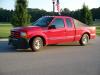
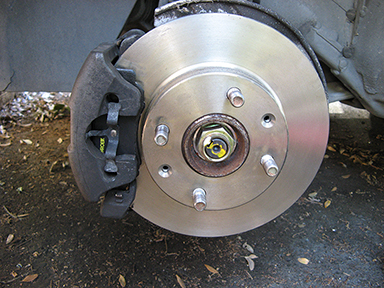
End result


And that concludes my last major thing to do. Left to do, replace the serpentine belt (keep forgetting to do it), and install the tires. I've also got a leaking strut.


So I'm hoping to upgrade, though parts are scarce.

All the other things left to do is body work. Get the dent fixed, raise the bumper back up and the hood all the way down.

But I'm not going to do any of that stuff until I get plates. As soon as I can get tires on it I can get it inspected and registered!
  Reply With Quote
Old 04-28-2008, 10:22 AM   #67 (permalink)
EV OR DIESEL
 
Join Date: Dec 2007
Location: South Louisiana
Posts: 1,758

FarFarfrumpumpen - '03 Volkswagen Jetta Wagon GLS Premium

Quorra - '12 Tesla Model S P85
Thanks: 57
Thanked 113 Times in 86 Posts
Send a message via AIM to dremd
Some thoughts

You may be able to lower it either by modifying the spring perches, or re-engineering the bearing assembly at the top. I all else fails, you can heat the springs (not recommended)

Typically you do not want 0 camber, it will handle like crap see if you can find the factory specs. If you can't adjust the factory camber I'd buy one of these http://64.233.169.104/search?q=cache...&client=safari works very well.

I'd guess the hybrid brake myth comes from the fact that the brakes will wear mor slowly (some energy used to charge rather than shunted to heat) and the fact that salesmen/ people are often dumb.

Keep up the good work.
__________________
2016 Tesla Model X
2022 Sprinter
Gone 2012 Tesla Model S P85
Gone 2013 Nissan LEAF SV
2012 Nissan LEAF SV
6 speed ALH TDI Swapped in to a 2003 Jetta Wagon
  Reply With Quote
Old 04-30-2008, 01:31 AM   #68 (permalink)
Red
Master EcoModder
 
Red's Avatar
 
Join Date: Mar 2008
Location: SF Bay Area
Posts: 713
Thanks: 1
Thanked 9 Times in 9 Posts
Thanks

Well the perches are part of the strut itself, haven't taken a look but I guess there might be some room up on top of the spring to maybe get some drop. Else I was thinking of just hitting up some local yards and see if I could find a spring of similar dimensions.

Stock calls for 0 everything more or less. Squirrelly handling is one of the Insights perks :P

I guess, the Jeeps a stick and if I hadn't installed a Van's brake kit, I'd still be running the original pads. I think its more on driving habits than anything else
  Reply With Quote
Old 04-30-2008, 01:33 AM   #69 (permalink)
Red
Master EcoModder
 
Red's Avatar
 
Join Date: Mar 2008
Location: SF Bay Area
Posts: 713
Thanks: 1
Thanked 9 Times in 9 Posts
Got my tires in today! No pics yet but the end is near! Need to get em mounted and take the Insight down to the DMV
  Reply With Quote
Old 04-30-2008, 01:36 AM   #70 (permalink)
EcoModding Lurker
 
cbergeron's Avatar
 
Join Date: Jan 2008
Location: Georgia
Posts: 64

aerospire - '95 Ford Aspire
90 day: 56.92 mpg (US)

Hindsight - '00 Honda Insight
Thanks: 0
Thanked 0 Times in 0 Posts
BigDave: Why zero camber and toe-in?

Shouldn't he use factory spec (or is factory 0)?

__________________
  Reply With Quote
Reply  Post New Thread


Tags
honda insight, modifying, rebuilding


Similar Threads
Thread Thread Starter Forum Replies Last Post
Honda IACV explained TomO Off-Topic Tech 16 12-21-2015 01:49 AM
Places to get OEM Honda Parts TomO Off-Topic Tech 10 06-02-2009 01:56 PM
Honda insight, doing research, interesting trends NoCO2 General Efficiency Discussion 15 05-06-2008 07:36 PM


Powered by vBulletin® Version 3.8.11
Copyright ©2000 - 2024, vBulletin Solutions Inc.
Content Relevant URLs by vBSEO 3.5.2
All content copyright EcoModder.com