 03-12-2013, 05:59 PM
|
This thread is in the EcoModder Project Library |
#1 (permalink)
|
|
Batman Junior
Join Date: Nov 2007
Location: 1000 Islands, Ontario, Canada
Posts: 22,541
Thanks: 4,085
Thanked 6,989 Times in 3,619 Posts
|
MetroMPG's Honda Insight boat tail extension (cardboard) tuft video; ABA test +9.7%
 (Aww, how cute - my second cardboard boat tail.
)
I haven't even finished the cosmetic details of the car's new removable/adjustable upper & lower grille blocks. But since I only ever drive this car on the open road, it drives me nuts to be wasting all those extra millilitres of fuel because it doesn't have a boat tail.
I literally think about it ... Every. Time. I. Drive.
Ultimately... eventually... I have in mind a hitch-mounted, "cargo carrier"-based type of tail (along the general lines of this one and this one). But that's quite a big project, and a ways off.
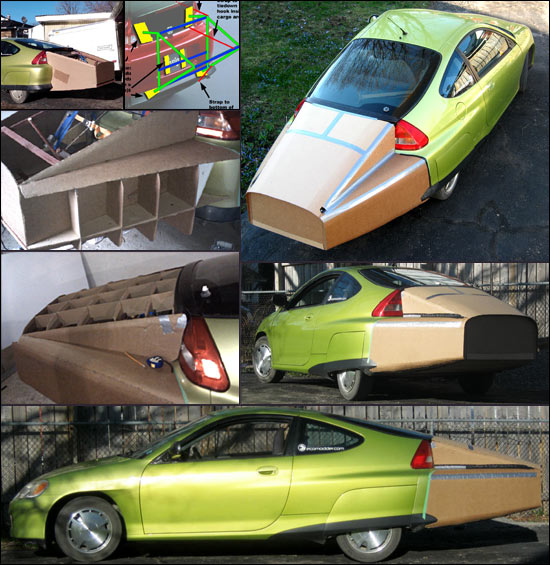
So, until that happens, this quick 'n' dirty prototype will have to tide me over:
- CAD construction (Cardboard Aided Design)
- very small, light internal wood frame (may contain some aluminum tubing also, because aluminum makes it more high tech)
- it'll hang from a bracket through the rear bumper (through factory holes over the licence plate)
- it'll attach via straps to factory tie-down hooks inside the hatchback's cargo area
- 2 more don't-fall-off! straps will run up the rear glass to the top of the hatchback
- the factory hatch will remain openable/accessible with the tail on the car (with the top straps disconnected, obviously)
- a skin of heavy plastic film plus lots & lots & lots of duct & hurricane tape will make it weather proof. And sexy.
- protective film will guard the paint where the tail is in contact with the bumper
- tail lights will be left where they are, exposed in cut-outs, like this coroplast Prius tail -- so only the lic. plate, light, and reflectors will be mounted on the end of the tail (maybe also side marker lights)
I'm basically just winging it (ha), eyeballing the curves & angles.
Ultimately this could also be reproduced in coroplast if it turns out to work OK.
Expectation management: don't expect rapid progress or significant updates to this thread for another week or three. TMP! (Too Many Projects). I just wanted to get it started to get the creative juices flowing. (Fluid dynamics of creative juices?)
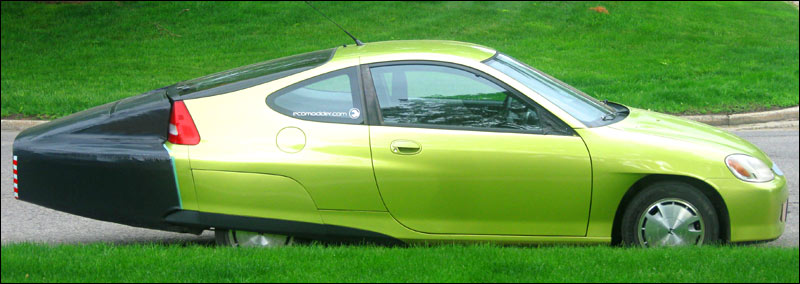
And it goes without saying, it won't be nearly as pretty (or as long, or as effective) as Jim's tail:
================================================== ========
Project summary...
updated April 23, 2013

 Dimensions:
 Length 79 cm / 31 inches
That makes the car+tail = 4735 mm (186 in.) overall. That's 3 inches shorter than the most popular/best selling car in the U.S. (2012 Toyota Camry).
Weight: 14 kg / 31 lbs
Curves/Angles:
(Approximate)
Top: from ~13 through ~16 degrees
Bottom: from ~6 through ~13 degrees
Sides: ~16 through ~24 degrees
Bottom clearance departure angle: ~18 degrees
Cost: Duh. It's cardboard, glue, tape & leftover wood, half dozen ratchet straps and heavy duty garbage bag plastic. Maybe 20 bucks in materials.
Test results: 1) Tuft testing video posted on April 22 (post #66) shows smooth, attached flow on top, and attached but turbulent flow toward the rear on the sides.
2) A-B-A testing on April 23 (post #77) showed a 9.7% improvement in fuel economy at 80 km/h (50 mph).
Real world results:109 mpg (US) / 2.2 L/100 km round trip fuel economy on a ~300 km round trip where my previous average fuel economy was ~95 mpg (US). See post #168 for details.
Tuft testing video:
|
|
|

|
|
The Following 24 Users Say Thank You to MetroMPG For This Useful Post:
|
101Volts (09-27-2013), 2000neon (03-14-2013), aerohead (03-12-2013), BamZipPow (04-02-2013), blownb310 (05-09-2013), California98Civic (04-24-2013), Cd (01-28-2015), echo-francis (05-06-2013), ECONORAM (05-02-2013), HyperMileQC (03-14-2013), jime57 (04-27-2013), jkv357 (06-05-2014), Joggernot (07-28-2013), Jyden (03-13-2013), myrefugeisintheLord (03-12-2013), Nevyn (05-03-2013), planetaire (02-02-2014), pRoy (04-24-2013), SpeedyCorky (04-30-2013), turbothrush (03-14-2013), UltArc (10-02-2013), wmjinman (04-22-2013), wyatt (04-25-2013), YeahPete (04-16-2013) |
 Today Today
|
|
|
|
 Other popular topics in this forum...
|
|
|
|
 03-12-2013, 06:33 PM
|
#2 (permalink)
|
|
Learning Aeromodding
Join Date: Feb 2011
Location: Spokane, WA.
Posts: 199
Metro - '93 Geo Metro 4 door hatchback 90 day: 35.26 mpg (US)
Thanks: 59
Thanked 45 Times in 32 Posts
|
VERY COOL!  I'll be keeping a close eye on your thread!  |
|
|

|
 03-14-2013, 02:21 PM
|
#3 (permalink)
|
|
Master EcoModder
Join Date: Aug 2012
Location: northwest of normal
Posts: 29,434
Thanks: 8,375
Thanked 9,129 Times in 7,538 Posts
|
Here's a material that is essentially coroplast with an aluminum skin on both sides: AlumaCorr. I haven't found a local supplier.
I've started a removable, redwood framed and shrinkwrapped, test boattail. I'm hoping my camera shows up before I get too far along. I intend to do the final version in Polymetal. It's $148 for a 4x8' piece, $104 if I have a shop order it for me.
It sounds like you have six attachment points. I would think with the reduced base pressure there wouldn't be too much suction trying to pull it off. Vibration and tail-wagging must be the bigger problems. I plan on two roof rack style clamps on the driprail and pegs into sockets already in the bumper brackets. With some straps to hold it down. |
|
|

|
|
The Following User Says Thank You to freebeard For This Useful Post:
|
|
 03-14-2013, 05:54 PM
|
#4 (permalink)
|
|
Batman Junior
Join Date: Nov 2007
Location: 1000 Islands, Ontario, Canada
Posts: 22,541
Thanks: 4,085
Thanked 6,989 Times in 3,619 Posts
|
Ooh, that sounds good. Do you have a thread going that I missed? Feel free to post the link.
|
|
|

|
|
The Following User Says Thank You to MetroMPG For This Useful Post:
|
|
 03-14-2013, 09:51 PM
|
#5 (permalink)
|
|
EcoModding Apprentice
Join Date: Feb 2013
Location: Ottawa, ON, Canada
Posts: 190
Thanks: 17
Thanked 59 Times in 38 Posts
|
Quote:
Originally Posted by MetroMPG

- CAD construction (Cardboard Aided Design)
- very small, light internal wood frame (may contain some aluminum tubing also, because aluminum makes it more high tech)
|
- CAD = Kewl
- Aluminum? Get some titanium fasteners, just because
I'll be watching this thread, not because I actually intend to boat-tail something, but more for the watching the build process. 
__________________
2016 BMW 535d
4100lb XDrive Eco-Yacht
|
|
|

|
 03-15-2013, 12:17 PM
|
#6 (permalink)
|
|
Master EcoModder
Join Date: Aug 2012
Location: northwest of normal
Posts: 29,434
Thanks: 8,375
Thanked 9,129 Times in 7,538 Posts
|
No thread yet. I'll probably bump an old thread (Project: the Third) but like I said, my camera is probably around here somewhere, I just can't lay my hands on it.
"Pix or it didn't happen."
|
|
|

|
 03-17-2013, 01:24 AM
|
#7 (permalink)
|
|
It's all about Diesel
Join Date: Oct 2012
Location: Porto Alegre, Rio Grande do Sul, Brazil
Posts: 13,042
Thanks: 0
Thanked 1,720 Times in 1,534 Posts
|
I've already seen some folks attempting to fix dents with cardboard, using plastic adhesive tape to weatherproof it. Others just used epoxi resin over the cardboard, as a cheaper alternative to fiberglass  |
|
|

|
 03-17-2013, 01:36 AM
|
#8 (permalink)
|
|
Master EcoModder
Join Date: Aug 2012
Location: northwest of normal
Posts: 29,434
Thanks: 8,375
Thanked 9,129 Times in 7,538 Posts
|
One could run the corrugated cardboard through a paper shredder, then a blender, add in a water soluble glue (or lime) and have paper maché.
|
|
|

|
 03-19-2013, 12:21 PM
|
#9 (permalink)
|
|
Aero Wannabe
Join Date: Dec 2007
Location: NW Colo
Posts: 738
Thanks: 705
Thanked 219 Times in 170 Posts
|
I am looking forward to some test results from this mod as I know you will be documenting any changes you see in mpg. I have been planning something similar for my hatchback but I want to keep the taillights functional so the sides would be recessed like yours. I may leave a gap at the top to see out of and have wondered if the air would re-attach.
__________________
60 mpg hwy highest, 50+mpg lifetime
TDi=fast frugal fun  https://ecomodder.com/forum/showthre...tml#post621801

Quote:
Originally Posted by freebeard

The power needed to push an object through a fluid increases as the cube of the velocity. Mechanical friction increases as the square, so increasing speed requires progressively more power.
|
|
|
|

|
 03-19-2013, 02:23 PM
|
#10 (permalink)
|
|
Batman Junior
Join Date: Nov 2007
Location: 1000 Islands, Ontario, Canada
Posts: 22,541
Thanks: 4,085
Thanked 6,989 Times in 3,619 Posts
|
The ghetto wasn't built in a day...
The flow will re-attach if you respect the proper shape (ie. not too "fast" or steep a curve/angle from where you've made the "step").
---
I've been playing with this a bit more:
- Making it up as I go along, I've pieced together a very ghetto wooden 1x2 frame to which both the outer skin and 6 securing straps will attach, and which provides the "contact patches" with the car: carpeted pads that press against non-painted surfaces (or normally hidden, painted surfaces):
 (... actual frame is much more ghetto looking than diagram ... but includes more triangulation for strength, not shown)
- Also revising on the fly, I'm no longer going to use external straps over top of the hatchback. Instead, I'm routing the straps from the frame, to the beefy hatchback gas strut mounts inside the car on the "C" pillars.
I'll snap some pics this evening to show how that will work.
Quick 'n' dirty? So much for this being a "quick" project!
I originally envisioned slapping this together in a couple of hours so it could save me a few drops of fuel on a pair of recent highway trips. Instead I've probably got about 5 or 6 hours in it, and the skin isn't even on yet!
It's still "dirty" though. 
|
|
|

|
|
The Following 6 Users Say Thank You to MetroMPG For This Useful Post:
|
|
|