Go Back   EcoModder Forum > EcoModding > Aerodynamics
Register Now
 Register Now
 

Reply  Post New Thread
 
Submit Tools LinkBack Thread Tools
Old 06-11-2010, 01:37 PM   #1 (permalink)
Master EcoModder
 
3-Wheeler's Avatar
 
Join Date: Dec 2008
Location: Southern WI
Posts: 827

AlienMobile - '00 Honda Insight
Team Honda
90 day: 80.05 mpg (US)
Thanks: 101
Thanked 560 Times in 191 Posts
Honda Insight Tail Extension Project

Honda Insight Tail Extension Summary Page


Quick-Links To Various Aspects of Project

Mounting System Framework 1
http://ecomodder.com/forum/showthrea...tml#post179658

Mounting System Framework 2
http://ecomodder.com/forum/showthrea...tml#post181187

First Piece of Foam in Place
http://ecomodder.com/forum/showthrea...tml#post184379

Rough CAD model of Extension
http://ecomodder.com/forum/showthrea...tml#post185387

Absolutely Beautiful Aptera Photograph
http://ecomodder.com/forum/showthrea...tml#post186578

Making Use of the AeroHead Streamlining Template 1
http://ecomodder.com/forum/showthrea...tml#post186492

Making Use of the AeroHead Streamlining Template 2
http://ecomodder.com/forum/showthrea...tml#post187635

Making Use of the AeroHead Streamlining Template 3
http://ecomodder.com/forum/showthrea...tml#post189335

Extension Removed From Car for First Time
http://ecomodder.com/forum/showthrea...tml#post187646

Rear Hatch Hardware
http://ecomodder.com/forum/showthrea...tml#post190135

Verifying Top Angle of Extension
More Info on Hatch Mounting System
http://ecomodder.com/forum/showthrea...tml#post190160

Adjusting Top Angle of Extension
http://ecomodder.com/forum/showthrea...tml#post190180

Beautiful Rendering of Tail Extension by Botsapper
http://ecomodder.com/forum/showthrea...tml#post190269
http://ecomodder.com/forum/showthrea...tml#post194208
http://ecomodder.com/forum/showthrea...tml#post194359
http://ecomodder.com/forum/showthrea...tml#post199524

Question About Vortex Generators Under Tail
http://ecomodder.com/forum/showthrea...tml#post191244

More on Rear Hatch Construction
http://ecomodder.com/forum/showthrea...tml#post193834

Design Concepts for the VW 1L
http://ecomodder.com/forum/showthrea...tml#post194558

SiverInsight2's Spy Photo
http://ecomodder.com/forum/showthrea...tml#post198744

Final Stages of Build for 2010
http://ecomodder.com/forum/showthrea...tml#post198995

Side Marker Details
Rear Hatch Clearance
http://ecomodder.com/forum/showthrea...tml#post199004

Wiring Loom Inside Extension
http://ecomodder.com/forum/showthrea...tml#post199007

First Impressions After Driving With Extension
http://ecomodder.com/forum/showthrea...tml#post199129

Pictures of Extension
http://ecomodder.com/forum/showthrea...tml#post199474
http://ecomodder.com/forum/showthrea...tml#post202974

MetroMPG's Ingenious WebCam
http://ecomodder.com/forum/showthrea...tml#post200415

First Severe Weather Test on Extension
http://ecomodder.com/forum/showthrea...tml#post200940

Summary Table for Build
http://ecomodder.com/forum/showthrea...tml#post201926

Limited Run Gas Mileage Test
http://ecomodder.com/forum/showthrea...tml#post203744
http://ecomodder.com/forum/showthrea...tml#post203904

Center of Pressure from Side Winds
http://ecomodder.com/forum/showthrea...tml#post209106


You can see the full array of pictures at:

Picasa Web Albums - Jim - Honda Insight...

__________________________________________________

Honda Insight Under-Body Smoothing Panel Project
http://ecomodder.com/forum/showthrea...lly-10638.html

Jim.

__________________________________________________

See also: MetroMPG's Insight boat tail project ...


MetroMPG's boat tail thread details:
  • design / construction
  • tuft testing (video)
  • A-B-A testing, showing 9.7% better mileage at 80 km/h (50 mph)
  • 110+ mpg (US) sustained at 80 km/h (50 mph) on a level road, warm weather
  • best ever trip mileage on a frequently driven route

.

Attached Thumbnails
Click image for larger version

Name:	Collage-b.JPG
Views:	18176
Size:	124.9 KB
ID:	7587   Click image for larger version

Name:	EcoModder-Details.jpg
Views:	14969
Size:	24.5 KB
ID:	7606  

Last edited by 3-Wheeler; 01-05-2011 at 01:46 PM.. Reason: Create Summary Page for Build
  Reply With Quote
The Following 27 Users Say Thank You to 3-Wheeler For This Useful Post:
2003protege (01-19-2012), Bicycle Bob (08-08-2012), California98Civic (06-26-2021), Cd (11-27-2011), christofoo (04-30-2013), darrylrobida (10-07-2012), ECONORAM (01-10-2013), eMax (04-24-2014), freebeard (07-11-2017), HHOTDI (01-14-2013), HyperMileQC (08-15-2012), IamIan (02-08-2011), j12piprius (12-11-2014), JasonG (05-06-2011), jime57 (07-11-2011), menaus2 (01-11-2011), MetroMPG (01-07-2011), Mira (04-27-2013), NachtRitter (04-02-2013), NeilBlanchard (02-03-2011), Pawtuckett (07-25-2012), Piwoslaw (07-12-2011), RedDevil (08-07-2014), redyaris (07-09-2011), Regenerit (08-12-2012), SoobieOut (12-23-2010), tumnasgt (01-29-2011)
Alt Today
Popular topics

Other popular topics in this forum...

   
Old 06-11-2010, 08:10 PM   #2 (permalink)
Master EcoModder
 
3-Wheeler's Avatar
 
Join Date: Dec 2008
Location: Southern WI
Posts: 827

AlienMobile - '00 Honda Insight
Team Honda
90 day: 80.05 mpg (US)
Thanks: 101
Thanked 560 Times in 191 Posts
Quote:
Originally Posted by RobertSmalls View Post
...I am curious about what methods you're using to keep your tail extension straight and true to the equations you developed. I've been using cardboard templates, but I'm not satisfied that I can align them accurately enough....
A little more incentive for adding a tail...


I used a cheap and old CAD program to layout the shape of a template that has the curvature of the side skirts to the tail.

It turns out that the template shape can be estimated by drawing a straight line, then indenting the line by 5/8" in the middle to form an ellipse.

This elliptical shape was then transferred to a large piece of foam, to form the template.

The foam dimensions are:

2" x 8" x 42"

The template is cut with a hacksaw blade, then sanded smooth so it "looks" consistent in curvature.

I have yet to layout and make a template for the curvature from the top of the glass to the tail.

This is a picture of the tail light socket. It shows what we have to work with regarding sheet metal.


This is a view showing where the trunk lid stops are. When the rear plastic bumper shroud comes, these stops will need to be replicated.


A wood block is being fashioned using a hacksaw blade into the compound shape required to fit against the sheet metal of the light socket.


The wood blocks are fitted tightly against the shape of the socket sheet metal.

Thickened epoxy resin was added to the wood pieces to mimic the exact shape of the sheet metal. Grease was used as a mold release to get the pieces back off after hardening.

The reason for the tight fit on the sheet metal will be apparent later on...


Jim.
Attached Thumbnails
Click image for larger version

Name:	IMG_4048a.JPG
Views:	16923
Size:	80.9 KB
ID:	6162   Click image for larger version

Name:	IMG_4049a.JPG
Views:	16839
Size:	76.2 KB
ID:	6163   Click image for larger version

Name:	IMG_4050a.JPG
Views:	16868
Size:	71.0 KB
ID:	6164   Click image for larger version

Name:	IMG_4051a.JPG
Views:	16740
Size:	70.0 KB
ID:	6165   Click image for larger version

Name:	Gas-Price.jpg
Views:	15770
Size:	35.7 KB
ID:	7959  


Last edited by 3-Wheeler; 03-17-2011 at 01:52 PM..
  Reply With Quote
Old 06-13-2010, 10:34 PM   #3 (permalink)
EcoModding Lurker
 
Join Date: May 2008
Location: Helena Mt
Posts: 37

01 Insight - '01 Honda Insight DX
Team Honda
90 day: 67.82 mpg (US)
Thanks: 2
Thanked 1 Time in 1 Post
Can't wait to see some more updates. been wanting to do this to my insight for a while though I don't have the funds/time at the moment.
  Reply With Quote
Old 06-14-2010, 06:44 AM   #4 (permalink)
Master EcoModder
 
Join Date: Oct 2008
Location: Mid-Atlantic
Posts: 491

OurInsight - '06 Honda Insight
Thanks: 170
Thanked 69 Times in 44 Posts
Quote:
Originally Posted by mtgeekman View Post
Can't wait to see some more updates. been wanting to do this to my insight for a while though I don't have the funds/time at the moment.
Me either. Time gets very tight around here during the summer

Last edited by jime57; 06-14-2010 at 08:57 AM..
  Reply With Quote
Old 06-15-2010, 10:11 PM   #5 (permalink)
Master EcoModder
 
3-Wheeler's Avatar
 
Join Date: Dec 2008
Location: Southern WI
Posts: 827

AlienMobile - '00 Honda Insight
Team Honda
90 day: 80.05 mpg (US)
Thanks: 101
Thanked 560 Times in 191 Posts
The next picture shows the rear end of the car with the plastic bumper guard removed. This is down by the rear of the tire skirt.


This shows that the rear air vents are actually protected by one way valves, made in a soft rubber material. Every time the trunk or door is shut, the vent valve opens briefly to relieve the cabin pressure.


Here is another chunk of wood that has been added to attach the previously separate pieces of wood.


This shows the rear of the wheel well guard. This will have to be attached to the rear extension at some point.


This picture shows many more blocks added to create a solid support in the tail light area.


Here's another view with the back hatch open.


This picture shows probably the most important feature of the mounting block:

Smooth surfaces in which to mount the block assembly to the car when the time comes. All the attachment points are placed in areas where the sheet metal is naturally stronger based on the inherent curvature of the tail light socket.

This is the most critical mounting point in the entire tail extension project. If this area looses adhesion, the entire tail will try to fall away from the car.


I'm planning on using silicone adhesive to hold this assembly to the tail light socket. This will accomplish two things:

1) Hold the assembly tightly to the sheet metal
2) Allow the assembly to be "pried" from the car, and the stock tail light returned to it's location, if need be.

Anyone have any other ideas for strong, yet removable adhesives?

Jim.
Attached Thumbnails
Click image for larger version

Name:	IMG_4053.JPG
Views:	16631
Size:	89.6 KB
ID:	6187   Click image for larger version

Name:	IMG_4054.JPG
Views:	16551
Size:	76.7 KB
ID:	6188   Click image for larger version

Name:	IMG_4055.JPG
Views:	16500
Size:	64.3 KB
ID:	6189   Click image for larger version

Name:	IMG_4056.JPG
Views:	16365
Size:	72.0 KB
ID:	6190   Click image for larger version

Name:	IMG_4057.JPG
Views:	16424
Size:	81.4 KB
ID:	6191  

Click image for larger version

Name:	IMG_4058.JPG
Views:	16363
Size:	80.5 KB
ID:	6192   Click image for larger version

Name:	IMG_4059.JPG
Views:	16507
Size:	104.1 KB
ID:	6193  
  Reply With Quote
The Following User Says Thank You to 3-Wheeler For This Useful Post:
jime57 (06-19-2010)
Old 06-15-2010, 10:55 PM   #6 (permalink)
Left Lane Ecodriver
 
RobertSmalls's Avatar
 
Join Date: Aug 2008
Location: Buffalo, NY, USA
Posts: 2,257

Prius C - '12 Toyota Prius C
Thanks: 79
Thanked 286 Times in 199 Posts
You're right, that will be the point that's under the most stress in a crosswind, when hitting a pothole, or just supporting the weight of the extension.

Do you plan to add some kind of access door to get at the hatch switch and lock cylinder? If so, you could use the same door to drive screws through the extension and into sheet metal. I don't know of any adhesives I'd trust with this job.

It might be easier to drive wood screws through the sheet metal and into the tail extension from the inside. The rear bulkhead carpet would hide the evidence, too.
  Reply With Quote
Old 06-16-2010, 09:50 AM   #7 (permalink)
Master EcoModder
 
3-Wheeler's Avatar
 
Join Date: Dec 2008
Location: Southern WI
Posts: 827

AlienMobile - '00 Honda Insight
Team Honda
90 day: 80.05 mpg (US)
Thanks: 101
Thanked 560 Times in 191 Posts
Quote:
Originally Posted by RobertSmalls View Post
...Do you plan to add some kind of access door to get at the hatch switch and lock cylinder?...
Yes.

The goal is to keep the car as stock as possible when making any of these changes, so they can more easily be undone if necessary.

So there will be a hatch that opens to the rear of the car and gain access to the normal hatchback and key-lock.

Unless someone has any other ideas, the plan is to use silicone caulk to create a tight fitting assembly into the tail light socket area that is held in with various screws.

The wood screws are mounted almost 90° to the normal force direction, and that should keep these fasteners in "shear" more than in "tension". This orientation will minimize the possibility of simply pulling the fastener right through the sheet metal under high force.

I do like your idea of getting more sheet metal involved though.

It makes sense to look at options that would mount a 2x4 piece of lumber sideways across the sheet metal that runs under the rear hatch glass in the area where the top of the plastic bumper guard ran.

If the wood in the tail light socket area were to come loose, at least the long 2x4 wood would hopefully give enough support to still keep the extension attached to the car.

Jim.
  Reply With Quote
Old 06-18-2010, 08:16 PM   #8 (permalink)
Master EcoModder
 
3-Wheeler's Avatar
 
Join Date: Dec 2008
Location: Southern WI
Posts: 827

AlienMobile - '00 Honda Insight
Team Honda
90 day: 80.05 mpg (US)
Thanks: 101
Thanked 560 Times in 191 Posts
Robert,

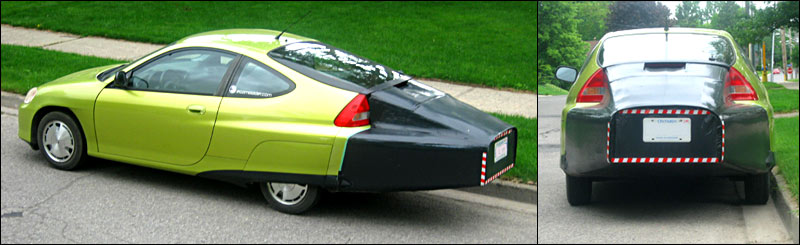
Your comments about getting good mechanical strength on the upper portion of the tail extension caused me to decide to beef up the mounting system dramatically.

This also means that the extension will not be used for trunk space, as you shall see in later photos that access to the "trunk" will be limited due to the beefy mounting system.

This first picture shows one way of getting more mechanical strength from thin sheet metal. The Insight is designed to be lightweight, and this also applies the sheet metal in the rear of the car.

Unfortunately, this also means that attempting to mount a lever arm off the back of the car means possible trouble if not done carefully.

The panels are thin enough that they easily "oil-can" when pushed in various locations. Because of this, any place there are transitions in the sheet metal, the ribbing causes the panel to be stronger in that location. We have to utilize this feature when mounting strengtheners to the car.

To this end, the back of the Insight is going to be beefed up to allow adequate mounting strength for the tail extension.


Here is another view of a way to strengthen the sheet metal. Any place were there are creases in the sheet metal, this is also an area where lumber can be used to aid in the stiffness of the assembly.


This shows the reverse side of the mounting lumber, and shows how smooth the finish is here. This was done by mixing thick epoxy and adding to the back side of the lumber and attaching it to the car and allowing to setup. Grease was used as a mold release, and even then, some areas stuck and had to be carefully pried apart after the epoxy setup.


This shows reinforcements being added to this "tab", which will later be used as one of the main structures to hold the tail extension.


This picture shows the embedded 5/8 inch fastener that was epoxied in place for good strength. This 5/8 threaded rod was drilled and tapped with a 1/4-20 thread for later attaching to a 5 inch long bolt.


Jim.
Attached Thumbnails
Click image for larger version

Name:	IMG_4060.JPG
Views:	16316
Size:	85.6 KB
ID:	6203   Click image for larger version

Name:	IMG_4061.JPG
Views:	16241
Size:	71.1 KB
ID:	6204   Click image for larger version

Name:	IMG_4064.JPG
Views:	16259
Size:	60.0 KB
ID:	6205   Click image for larger version

Name:	IMG_4065.JPG
Views:	16249
Size:	84.9 KB
ID:	6206   Click image for larger version

Name:	IMG_4066.JPG
Views:	16217
Size:	59.1 KB
ID:	6207  


Last edited by 3-Wheeler; 06-18-2010 at 08:23 PM..
  Reply With Quote
The Following 2 Users Say Thank You to 3-Wheeler For This Useful Post:
j12piprius (12-11-2014), jime57 (06-19-2010)
Old 06-18-2010, 10:56 PM   #9 (permalink)
Left Lane Ecodriver
 
RobertSmalls's Avatar
 
Join Date: Aug 2008
Location: Buffalo, NY, USA
Posts: 2,257

Prius C - '12 Toyota Prius C
Thanks: 79
Thanked 286 Times in 199 Posts
I'm taking notes and planning my own boattail construction in my head. There are large areas at the back of the Insight that have little structure, but there's pretty good stiffness around the perimeter of the hatch.

I think I will unbolt the center bumper cover retainer and attach the frame of my tail extension there. I will also get the bumper rebar involved. A few pieces of aluminium angle attached to those two components should be plenty to support a 3' long cargo floor with a 150lb weight capacity. This sturdy cargo area will give me plenty of rigid attachment points for the frame of the tail extension.

That lower piece of lumber looks like it's designed to fit under the original bumper cover. I take it that allows you to use lots of fasteners and never worry about how to remove it from the car?
  Reply With Quote
Old 06-19-2010, 10:37 PM   #10 (permalink)
Master EcoModder
 
3-Wheeler's Avatar
 
Join Date: Dec 2008
Location: Southern WI
Posts: 827

AlienMobile - '00 Honda Insight
Team Honda
90 day: 80.05 mpg (US)
Thanks: 101
Thanked 560 Times in 191 Posts
Quote:
Originally Posted by RobertSmalls View Post
That lower piece of lumber looks like it's designed to fit under the original bumper cover. I take it that allows you to use lots of fasteners and never worry about how to remove it from the car?
Hi Robert,

As usual, your observational powers are correct.

Yes, the lower lumber is slowly being prepared to be "semi-permanently" mounted on the car with silicone adhesive.

Several days ago, the wood was trimmed here and there to fit under the bumper cover.

By using silicone adhesive, IF NECESSARY, it can still be removed, but will take a lot of digging/prying with a plaster knife.

The wood will be prepared for "permanent" mounting by drilling more through holes and mounting with lots of wood screws.

Jim.

  Reply With Quote
The Following 2 Users Say Thank You to 3-Wheeler For This Useful Post:
Cd (07-08-2012), jayex (08-12-2012)
Reply  Post New Thread


Thread Tools


Similar Threads
Thread Thread Starter Forum Replies Last Post
FS: All USED Honda Insight Parts For Sale Fabio For Sale 17 06-16-2013 02:49 PM
Project: Rebuilding an '01 Honda Insight as a nonhybrid Fabio Hybrids 158 01-12-2013 11:59 AM
Project: Zombie Insight (2000 Honda) RobertSmalls Hybrids 191 03-03-2012 06:35 PM
Designing a tail extension for the first-gen Insight RobertSmalls Aerodynamics 187 07-11-2010 10:44 PM
Honda Insight Concept to Debut at Paris Int. Auto Show SVOboy EcoModder Blog Discussion 32 04-17-2009 10:45 AM


Powered by vBulletin® Version 3.8.11
Copyright ©2000 - 2024, vBulletin Solutions Inc.
Content Relevant URLs by vBSEO 3.5.2
All content copyright EcoModder.com