09-16-2013, 03:15 PM
|
#171 (permalink)
|
|
Master EcoModder
Join Date: Aug 2012
Location: northwest of normal
Posts: 29,361
Thanks: 8,352
Thanked 9,118 Times in 7,528 Posts
|
Quote:
|
The weldable 1/2" steel tube frame is primarily wanted because the whole thing will articulate for trunk access, so I want it somewhat stiff and tough.
|
Stiff and tough because it will alligator open?
Consider putting it on a 4-bar linkage. Then it will be held at four points instead of two so it won't get racked so much. The lower arms would want to be about as long as the decklid and the upper ones shorter.
Then use the decklid to replace the two bottom bars. 
|
|
|

|
 Today Today
|
|
|
|
 Other popular topics in this forum...
|
|
|
|
|
09-16-2013, 07:48 PM
|
#172 (permalink)
|
|
Master EcoModder
Join Date: Mar 2012
Location: Salt Lake City
Posts: 292
00C - '00 Toyota Corolla 90 day: 43.54 mpg (US)
Thanks: 147
Thanked 190 Times in 73 Posts
|
Quote:
Originally Posted by euromodder

...
Oh ...
You're only about 1 foot away from a full boattail ... 
... |
That's the idea - why close the gap between trunk and hitch box when it will almost certainly be more effective to close the gap between Kamm-roofline and hitch box?
I could spend more time tufting between the car and the box to try and figure out where the air is going and why... nothing jumps out at me as a sizable gap on the underside or sides... it may just be a recirculating vortex...
Quote:
Originally Posted by euromodder
...
As for the angle on the bottom of the hitch-box, I seem to recall somebody used a hinged plate on the bottom of their boat tail.
At its lowest, it was at the optimal angle.
On a steep driveway, it'd just get pushed up.
A bumper or small wheel takes care of lifting the plate when needed while reversing.
|
That sounds an awful lot like this project here. IIRC the angle that the under-side of my box follows is right around 12° from horizontal - just a little faster than ideal.
I think the explanation for the turbulence underneath my tail is that the flow is not smooth when it leaves the bumper. I haven't done anything to the underbelly yet.
Quote:
Originally Posted by freebeard
Stiff and tough because it will alligator open?
Consider putting it on a 4-bar linkage. Then it will be held at four points instead of two so it won't get racked so much. The lower arms would want to be about as long as the decklid and the upper ones shorter.
Then use the decklid to replace the two bottom bars. |
I was about to dismiss, but actually it's a pretty interesting idea. It's a decent alternative to mine, which was using a pushrod to link the Kamm and trunk to move in unison. You end up with 3 lids, but I might be stuck there anyway, more or less. |
|
|
|
|
09-16-2013, 11:54 PM
|
#173 (permalink)
|
|
Master EcoModder
Join Date: Aug 2012
Location: northwest of normal
Posts: 29,361
Thanks: 8,352
Thanked 9,118 Times in 7,528 Posts
|
I don't see the need for three pieces.
The upper bars could be non-parallel with the decklid, would pivot at the top of the backlight and could have the other end pretty much anywhere on the inner upper sides of the cap. You wouldn't want to try to lift the cap with the decklid so put vertical handles on the back of the cap and lift there, using the decklid simply as a hinge.
When the top hinge over-centers it will hold itself open.
Last edited by freebeard; 09-17-2013 at 12:00 AM..
|
|
|
|
|
10-06-2013, 02:10 AM
|
#174 (permalink)
|
|
Master EcoModder
Join Date: Mar 2012
Location: Salt Lake City
Posts: 292
00C - '00 Toyota Corolla 90 day: 43.54 mpg (US)
Thanks: 147
Thanked 190 Times in 73 Posts
|
Quote:
Originally Posted by freebeard
I don't see the need for three pieces.
The upper bars could be non-parallel with the decklid, would pivot at the top of the backlight and could have the other end pretty much anywhere on the inner upper sides of the cap. You wouldn't want to try to lift the cap with the decklid so put vertical handles on the back of the cap and lift there, using the decklid simply as a hinge.
When the top hinge over-centers it will hold itself open. |
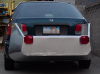
I meant 3 articulating pieces - Kamm, trunk, hitch-box-lid.
You have good ideas, though in this case I happen to favor my idea (or maybe it was a coworker's idea, sort of):
Using a hinged, high-pull Nd magnet to anchor the frame on the roof:

This bracket screws in where the license plate would fit to attach the trunk linkage (the license plate can still fit here if the Kammback is on while the hitch-box is off):

The trunk linkage lifts the Kammback, they move together:
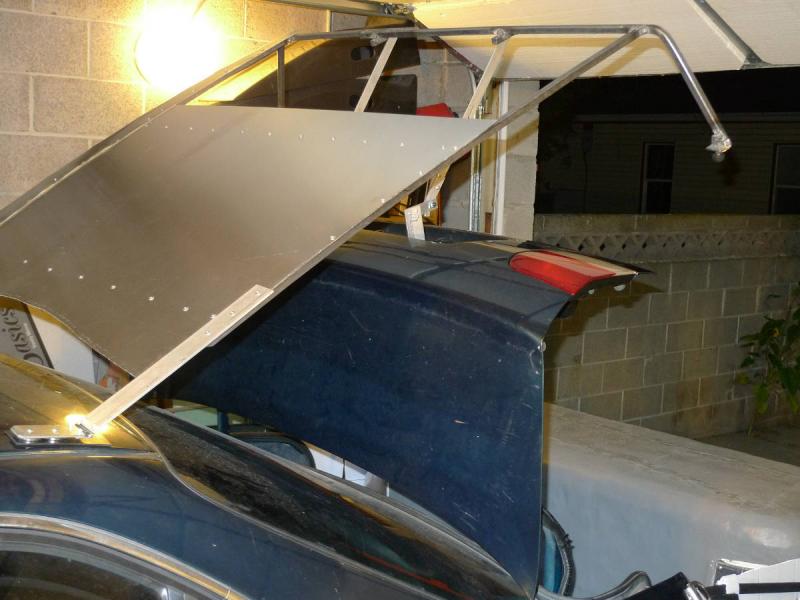
The edge-skin was the hard one: start by getting the simple curvature bending by hand (progressively) around a conduit that happens to have the right radius (actually tighter than target by about the right amount for spring-back):

The top of the Kammback curves with the template, so simple-curvature on the edge isn't enough, as an illustration:
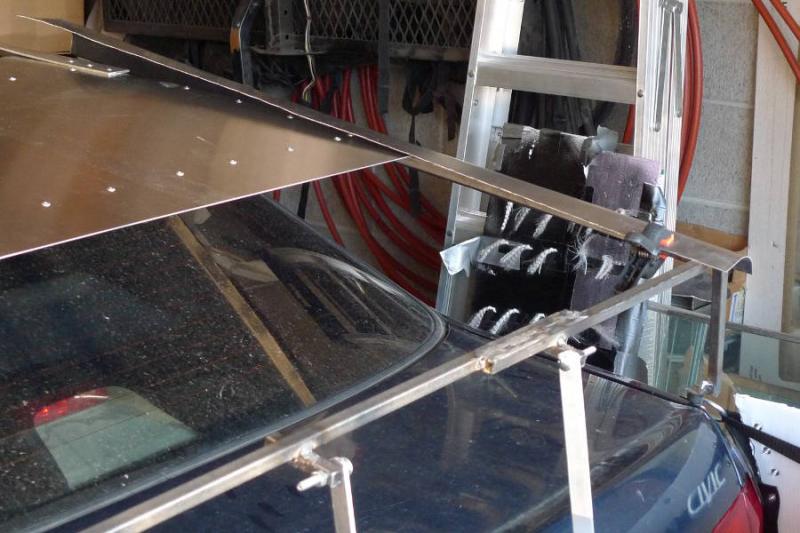
But this piece is quite doable with tuck-shrinking and planishing (though I believe an English wheel would be wanted to get the best finished look, probably instead of the planishing hammer, though if I had just the right dollies planishing could probably do a lot better as well). I happened to shoot this pic with a light at the right angle to emphasize its flaws (easy to see the shrunk-planished zones), I think it does look a bit better in real life.

(So I finally got a chance to use my DIY tuck tool and planishing hammer that I brought up months ago.)
That shot also shows where I want the Kamm opaque, the rest will be clear. The view from the rear-view is really good so far, also this does a good job shading a range of angles for the back seat, which is very important.
Lots of details left to finish up: clear sections, gaskets on 2 sides and magnetic gasket on top, then the gap-filler-piece...
By gap-filler-piece I'm thinking something probably like: aluminum reinforced clear plastic, hinged toward the Kamm (clipped or screwed on), elastic hook toward the aero-hitch-box. That would allow the hitch-box to still move on a ground-strike, also the gap-filler-piece is easily moved out of the way for either trunk or hitch-box access.
Last edited by christofoo; 10-06-2013 at 12:42 PM..
|
|
|
|
|
The Following 8 Users Say Thank You to christofoo For This Useful Post:
|
|
|
10-06-2013, 04:39 AM
|
#175 (permalink)
|
|
EcoModding Apprentice
Join Date: Oct 2013
Location: Canada
Posts: 132
Thanks: 2
Thanked 48 Times in 38 Posts
|
nice construction. I guess you don't know yet if the magnets will hold?
|
|
|
|
|
10-06-2013, 07:29 AM
|
#176 (permalink)
|
|
Not Doug
Join Date: Jun 2012
Location: Show Low, AZ
Posts: 12,307
Thanks: 7,309
Thanked 2,246 Times in 1,733 Posts
|
I really like the latest progress! 
What did you put down under the magnets? Does that prevent scratching? |
|
|
|
|
10-06-2013, 08:51 AM
|
#177 (permalink)
|
|
Cyborg ECU
Join Date: Mar 2011
Location: Coastal Southern California
Posts: 6,302
Thanks: 2,374
Thanked 2,176 Times in 1,471 Posts
|
Okay, the trunk linkage for the kamm and the trunk lid to lift together in one movement is very smartly done. Cool.
__________________
See my car's mod & maintenance thread and my electric bicycle's thread for ongoing projects. I will rebuild Black and Green over decades as parts die, until it becomes a different car of roughly the same shape and color. My minimum fuel economy goal is 55 mpg while averaging posted speed limits. I generally top 60 mpg. See also my Honda manual transmission specs thread.


|
|
|
|
|
10-06-2013, 01:19 PM
|
#178 (permalink)
|
|
Master EcoModder
Join Date: Mar 2012
Location: Salt Lake City
Posts: 292
00C - '00 Toyota Corolla 90 day: 43.54 mpg (US)
Thanks: 147
Thanked 190 Times in 73 Posts
|
Thanks for all the encouragement.
Quote:
Originally Posted by Xist
I really like the latest progress!
What did you put down under the magnets? Does that prevent scratching? |
I believe what's shown is 0.4mm (1/64") neoprene rubber, but that stuff 'feels' a little too thin, I'm worried it would wear through or involve excessive lateral twisting. I think the final version is going to be 40A durometer 0.8mm (1/32") EPDM rubber. The idea is to prevent scratching. Rubber has some capacity to absorb vibration, and so in principle it might spare the paint (or at least extend its life). BTW, EPDM and neoprene have very similar weather, UV, and ozone resistance, and temperature range, from what I've read, but automotive gaskets use EPDM for some reason, so I'll probably be favoring EPDM in the future. (Neither one is very oil/solvent resistent, but I think neoprene has the edge there.)
NdFeB magnets also are subject to rust, which can destroy their magnetic capacity. They are nickel plated for that reason. I'll be using a cold-galvanize spray on them (and the steel plate and screws touching them are also zinc plated). I've had good luck with the cold-galvanize on the hitch-box frame so far. Also I will form the EPDM into a boot to keep water out (and to streamline the leading edge). I might even pot inside the boot with caulk, though there are reasons not to do that. Maybe I'll just pot the tail end of the boot.
Quote:
Originally Posted by Thenorm
nice construction. I guess you don't know yet if the magnets will hold?
|
I think on paper each anchor (pair) might be good for around 40lbs pull at 0.8mm separation (could be a lot lower than that in real-life, due to thin-ness of car's steel panel, as well as its mild curvature). Rubber-on-metal presumably having a coefficient of friction around 1, they should have about the same strength against lateral forces. The Achiles-heel of a magnet anchor is torque, and they can be pried up by hand, but since the back of the Kamm will be strapped down, and given the location of the hinge, I don't see a lot of torque on these anchors.
I can grab hold of the frame and give the Kamm a good stout shake and the magnets hold tight, so I believe it's good to go.
They're also strong enough to pinch fingers, quite painfully.
These ones, if you're curious (if I recall):
K&J Magnetics - Products
(Except that somehow I managed to order them in N, S pairs, which is best, by far, for maximum pull.)
Last edited by christofoo; 10-06-2013 at 01:26 PM..
|
|
|
|
|
The Following User Says Thank You to christofoo For This Useful Post:
|
|
|
10-07-2013, 08:12 AM
|
#179 (permalink)
|
|
Master EcoModder
Join Date: Aug 2013
Location: Richmond, VA
Posts: 447
Thanks: 277
Thanked 231 Times in 105 Posts
|
Wow. Fantastic progress! I love what you're doing for the Kammback.
__________________

|
|
|
|
|
11-01-2013, 01:10 AM
|
#180 (permalink)
|
|
Master EcoModder
Join Date: Mar 2012
Location: Salt Lake City
Posts: 292
00C - '00 Toyota Corolla 90 day: 43.54 mpg (US)
Thanks: 147
Thanked 190 Times in 73 Posts
|
Slow progress, Kammback section finished...
Sedan-to-Kammback-Converter is now finished and on the car. I'm not expecting much aero gain out of this by itself though, thinking the clear-plastic gap-filler piece is critical for the gains, based on earlier tufting with the cardboard pieces, though the gap-filler should be a samewhat easier piece to make...


Let's see, what do I have left to explain about construction here? You can see the 1/32" textured neoprene rubber boots (couldn't find EPDM in that thickness) over the high-pull Nd magnets - not as aero as I'd hoped to make them, but doubt it matters much, or else maybe I'll do something about it later on... Also, the gasket closing the gap to the roof here is ferrite-magnet-doped rubber. It's not so good for holding an aero-mod in place, but it does a great job of closing a gap... although at $4 per sqft it needs to be used somewhat judiciously. On paper, it should be good for about 2 PSI holding power at 1/16" thickness. It feels 'about right' to me, and what you see here has been freeway tested a bit.

Mostly I'm using the "3X" Loctite construction adhesive on all the joints, the upper window is the exception with exterior caulk - thinking that piece might need to be replaced or upgraded someday. (Also I used #4 screws there instead of rivets, for the same reason.) The reason for the concern is that the view is at such an oblique angle to the window, little imperfections matter more than usual.
The c-pillar seals are 1/2" width foam rubber bulb.
I probably will need to tweak a couple of the seals to get them to behave when the trunk opens and closes. I.e. one of the magnet seals gets caught on the high-pull anchor, and a little section of the foam rubber bulb section gets folded over the wrong way. It's not hard to just walk around it and reseat the seals, but it would be nice if they just went back into place.
Last edited by christofoo; 11-01-2013 at 01:19 AM..
|
|
|
|
|