08-10-2013, 05:20 PM
|
#161 (permalink)
|
|
Master EcoModder
Join Date: Mar 2012
Location: Salt Lake City
Posts: 292
00C - '00 Toyota Corolla 90 day: 43.54 mpg (US)
Thanks: 147
Thanked 190 Times in 73 Posts
|
Skate wheels
Good idea - skate wheels.

(Also available on McMaster, for the impatient [me].) I replaced the skid pad while I was at it, just in case. These are rubber-on-steel 100lbs wheels.
I also wanted to make a rubber boot to replace the duct tape for weather-proofing the hinge tube tops. (The two outside tubes are welded closed on the bottom, so water can fill the tubes if it can get in.)

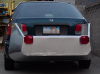
I wasn't happy with the strap hooks on the trunk lip - minor inconvenience for trunk access, and the straps were pressed against the trunk which caused paint wear. Just one layer of steel panel to drill at this location:

Use a sandwich to protect the car's sheet metal: anchor / neoprene / car-body / neoprene / washer.

(Also showing minor improvement; using velcro to secure rubber (gap filler) to the car. I'm a little bit lazy so I only added this at the top where it was most needed.)
Last edited by christofoo; 08-10-2013 at 05:28 PM..
|
|
|

|
|
The Following 2 Users Say Thank You to christofoo For This Useful Post:
|
|
 Today Today
|
|
|
|
 Other popular topics in this forum...
|
|
|
|
|
08-10-2013, 06:34 PM
|
#162 (permalink)
|
|
Master EcoModder
Join Date: Mar 2012
Location: Salt Lake City
Posts: 292
00C - '00 Toyota Corolla 90 day: 43.54 mpg (US)
Thanks: 147
Thanked 190 Times in 73 Posts
|
More tufting
I wanted to do another tuft test before fabricating the road-worthy Kammback to answer some questions. My cardboard skills are pretty disappointing, though.

Here's a still of the tufts, around 35MPH.

Here's the vid:
Also I did a vid of the underside, might have to redo this one:
|
|
|
|
|
The Following 4 Users Say Thank You to christofoo For This Useful Post:
|
|
|
08-12-2013, 06:07 PM
|
#163 (permalink)
|
|
Master EcoModder
Join Date: Jan 2008
Location: Sanger,Texas,U.S.A.
Posts: 16,534
Thanks: 24,520
Thanked 7,438 Times in 4,818 Posts
|
tufts
It looks like the air is making the 'jump' really well across the locked-vortex between Kamm rear edge and beginning of down-slope on the box.
The flat top area of box is the only area with reversed flow,indicative of the vortex swirling in towards the backlight.All good!
Hucho prefers long,shallow -angled diffusers.I suspect that the tufts underneath are kinda telling on that.
With concessions to driveway clearance and such we'll have to be 'practical' in this department.
Thanks for the pics and videos!Nice project evolution. 
__________________
Photobucket album: http://s1271.photobucket.com/albums/jj622/aerohead2/
|
|
|
|
|
The Following User Says Thank You to aerohead For This Useful Post:
|
|
|
08-13-2013, 02:03 AM
|
#164 (permalink)
|
|
Master EcoModder
Join Date: Mar 2012
Location: Salt Lake City
Posts: 292
00C - '00 Toyota Corolla 90 day: 43.54 mpg (US)
Thanks: 147
Thanked 190 Times in 73 Posts
|
Radius box lid to defeat locked vortex?
Quote:
Originally Posted by aerohead

It looks like the air is making the 'jump' really well across the locked-vortex between Kamm rear edge and beginning of down-slope on the box.
The flat top area of box is the only area with reversed flow,indicative of the vortex swirling in towards the backlight.All good!
Hucho prefers long,shallow -angled diffusers.I suspect that the tufts underneath are kinda telling on that.
With concessions to driveway clearance and such we'll have to be 'practical' in this department.
Thanks for the pics and videos!Nice project evolution. |
I'm glad you're seeing the same things I am. Maybe I'm learning something. 
(I have another thought on the diffuser though... when I remember to actually do it, I want to put up a photo of the car's rear-quarter-underbody. To my eye it looks horrible.)
I was wondering if the locked vortex could be a consequence of the excessively-sharp transition on the lid.
This morning I tufted the same rig again, but with the addition of some foam pieces to soften the curve.

Unfortunately, I forgot about the contrast thing again. I ought to carry a dark can of spray paint when I go out for tufting to help with my absent-mindedness. Or maybe I should have splurged and got some fluorescent yarn when it was suggested...
When I briefly reviewed the vid this morning I thought it was a failure. But after reviewing it frame-by-frame I realized that the second row of tufts actually spend most of the time facing the right way.


So maybe this is a solution that can attenuate the locked vortex and minimize energy loss there. (But probably I should add some black paint and re-tuft, and do a better job placing tufts... soon...)
(Video)
|
|
|
|
|
The Following User Says Thank You to christofoo For This Useful Post:
|
|
|
08-13-2013, 08:40 AM
|
#165 (permalink)
|
|
Cyborg ECU
Join Date: Mar 2011
Location: Coastal Southern California
Posts: 6,302
Thanks: 2,374
Thanked 2,176 Times in 1,471 Posts
|
Quote:
Originally Posted by christofoo
... But after reviewing it frame-by-frame I realized that the second row of tufts actually spend most of the time facing the right way.
|
Yes, I see that in the vids too. It definitely looks better than the previous vid before this fine tuning. Cool.
__________________
See my car's mod & maintenance thread and my electric bicycle's thread for ongoing projects. I will rebuild Black and Green over decades as parts die, until it becomes a different car of roughly the same shape and color. My minimum fuel economy goal is 55 mpg while averaging posted speed limits. I generally top 60 mpg. See also my Honda manual transmission specs thread.


|
|
|
|
|
08-13-2013, 07:00 PM
|
#166 (permalink)
|
|
Aero Wannabe
Join Date: Dec 2007
Location: NW Colo
Posts: 738
Thanks: 705
Thanked 219 Times in 170 Posts
|
This looks great. Do you still have a view of the road behind out your rear window? I am hoping to design my cargo carrier with a gap between the Kamm and the box to retain some rear visibility. Thanks for posting all you have learned in this quest for better mpg.
__________________
60 mpg hwy highest, 50+mpg lifetime
TDi=fast frugal fun
https://ecomodder.com/forum/showthre...tml#post621801

Quote:
Originally Posted by freebeard
The power needed to push an object through a fluid increases as the cube of the velocity. Mechanical friction increases as the square, so increasing speed requires progressively more power.
|
|
|
|
|
|
08-14-2013, 06:41 PM
|
#167 (permalink)
|
|
Master EcoModder
Join Date: Jan 2008
Location: Sanger,Texas,U.S.A.
Posts: 16,534
Thanks: 24,520
Thanked 7,438 Times in 4,818 Posts
|
foam
It's working.You've lifted the surface up into the free-stream flow,and what's left of the vortex is forward of it.That recovered kinetic energy can now work towards pressure regain,rather than be lost to heat.
__________________
Photobucket album: http://s1271.photobucket.com/albums/jj622/aerohead2/
|
|
|
|
|
08-22-2013, 02:26 PM
|
#168 (permalink)
|
|
Master EcoModder
Join Date: Mar 2012
Location: Salt Lake City
Posts: 292
00C - '00 Toyota Corolla 90 day: 43.54 mpg (US)
Thanks: 147
Thanked 190 Times in 73 Posts
|
Re-tufting the lid-top radius, view of the underside
I wanted to get a better view of the effect of the box lid-top radius, this time I added a piece of cardboard over the foam to recreate a sharp edge with the same tangents as the radius version, that way I don't have any change in gap size as a confounding factor.
I think this best fits the null hypothesis - radius at reattachment does not attenuate the locked vortex. (I can't wait for kdenlive to get image stabilization, youtube's stabilization doesn't recognize stills. EDIT; actually kdenlive does have stabilization - just a little counter-intuitive.)
It's nice to get this detail sorted out before fab. What this means to me overall is that the version most worth building should close the gap as much as possible. Also there's no point aerodynamically in rebuilding the box lid. Also for icy weather I may need to have heater lines in the rear window (since the alternative, a removable window, would open up a large gap and potentially negate the aerodynamics of the Kamm section).
There's also a better view of the underside at the end of the vid. To me it looks like it's begging for a belly-pan and wheel treatment.
Last edited by christofoo; 08-27-2013 at 12:37 PM..
|
|
|
|
|
The Following 2 Users Say Thank You to christofoo For This Useful Post:
|
|
|
09-16-2013, 12:08 AM
|
#169 (permalink)
|
|
Master EcoModder
Join Date: Mar 2012
Location: Salt Lake City
Posts: 292
00C - '00 Toyota Corolla 90 day: 43.54 mpg (US)
Thanks: 147
Thanked 190 Times in 73 Posts
|
Early Kammback frame
I've been overly busy, but finally got a decent start on the "Kammback".
A little teaser (wood and PVC are just here for setup):
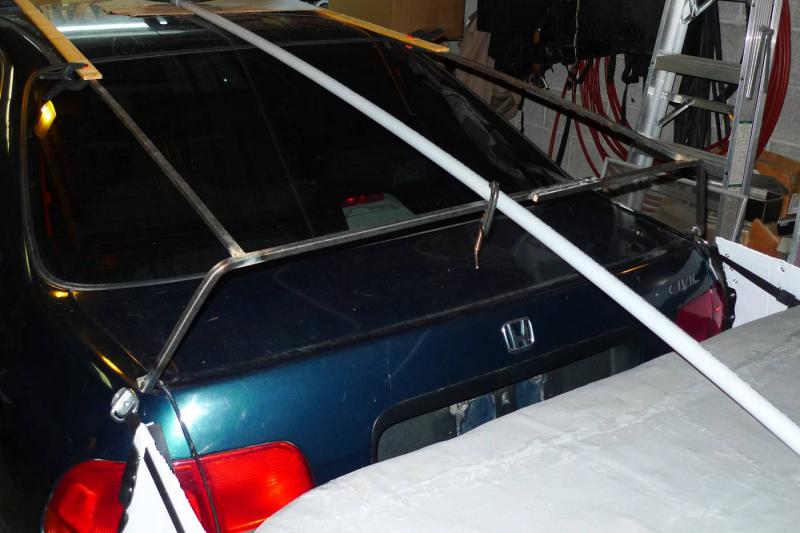
The weldable 1/2" steel tube frame is primarily wanted because the whole thing will articulate for trunk access, so I want it somewhat stiff and tough. Some of the skin will be aluminum (esp. to block solar heat gain from the back seat), but mostly it will be transparent. I'm planning to have a transparent extension piece to close the gap as much as possible. Details when I get there.
The frame needs rubber feet where it touches down.

Last edited by christofoo; 09-16-2013 at 12:25 AM..
|
|
|
|
|
The Following 2 Users Say Thank You to christofoo For This Useful Post:
|
|
|
09-16-2013, 03:10 PM
|
#170 (permalink)
|
|
Master EcoModder
Join Date: Jul 2010
Location: Belgium
Posts: 4,683
Thanks: 178
Thanked 653 Times in 516 Posts
|
Quote:
Originally Posted by christofoo
What this means to me overall is that the version most worth building should close the gap as much as possible.
|
I was going to suggest to close the gap between the trunk and the hitch-box. ")
The first row of tufts really got sucked in there - is it sealed completely on the bottom ?
If the air persistently turns in there, it's got to have someplace that it can easily get (sucked) out.
Oh ...
You're only about 1 foot away from a full boattail ...
As for the angle on the bottom of the hitch-box, I seem to recall somebody used a hinged plate on the bottom of their boat tail.
At its lowest, it was at the optimal angle.
On a steep driveway, it'd just get pushed up.
A bumper or small wheel takes care of lifting the plate when needed while reversing.
__________________
Strayed to the Dark Diesel Side

|
|
|
|
|