10-09-2012, 06:24 PM
|
#21 (permalink)
|
|
Master EcoModder
Join Date: Mar 2012
Location: Salt Lake City
Posts: 292
00C - '00 Toyota Corolla 90 day: 43.54 mpg (US)
Thanks: 147
Thanked 190 Times in 73 Posts
|
Pizza pan slick covers
Here are my wheel slicks, similar to many other pizza pan designs posted here.
Costs ($33 TL): - $27 - 14" aluminum pizza pans, set of 4 (can't remember why I spent that much, there are much cheaper sources available)
- $5 - Liquid nails
- <$1 - Rivets


I cutout the center of my existing snap-on plastic wheel covers. I remember someone saying their pizza pans are loud, so I put a heavy bead of liquid nails around the lip between the plastic and pizza pan, then cleaned it up to form an edge (there would have been less void to fill if I had managed to find deeper pizza pans). I was careful with the saw to leave enough plastic to support 4x 1/8" pop rivets applied from the outside. So far they've been quiet, easy enough to install and remove for air, and tough enough. On the rear wheels I used indoor/outdoor caulk instead of liquid nails. It's too early to be sure, but I think the liquid nails is better because of higher stiffness and yield strength. A couple of the 1/8" pop rivets slipped out of the plastic during installation, when that happened I drilled out the failed rivet and upgraded them to 3/16" rivets. Longer rivets and rivet washers would have been better than riveting into plastic. If any fail in service hopefully I'll notice while airing and upgrade them before I lose any pizza pans on the road.
Last edited by christofoo; 12-18-2012 at 04:10 PM..
|
|
|

|
 Today Today
|
|
|
|
 Other popular topics in this forum...
|
|
|
|
|
10-10-2012, 04:38 PM
|
#22 (permalink)
|
|
Master EcoModder
Join Date: Mar 2012
Location: Salt Lake City
Posts: 292
00C - '00 Toyota Corolla 90 day: 43.54 mpg (US)
Thanks: 147
Thanked 190 Times in 73 Posts
|
Air dam braces
Minor update; added cooling opening and braces, checked for flexing at freeway speed. This shot is about 67mph, taken from the bottom of the lower grill. The braces have pushed the dam lip forward an extra inch or so.

(I almost didn't post this because my heat gun work looks so bad, sorry.)
Still plenty left to do.
EDIT: I almost forgot; this is the best way to take a picture of an air dam at freeway speed:

This is an old picture from back when I thought it was necessary to have a friend drive. But I've found that's not really necessary. Now I just do a long EOC / P&G.
Last edited by christofoo; 10-10-2012 at 07:29 PM..
Reason: forgot about MacGyver
|
|
|
|
|
10-10-2012, 07:22 PM
|
#23 (permalink)
|
|
It's all about Diesel
Join Date: Oct 2012
Location: Porto Alegre, Rio Grande do Sul, Brazil
Posts: 12,935
Thanks: 0
Thanked 1,699 Times in 1,517 Posts
|
Quote:
Originally Posted by christofoo

Mods I'm in a hurry to get going (1200 mile road trip starting Friday morning) - Air dam (partially finished, still in progress, see post #2 and discussion starting at #6)
- Upper grill block and gap filler
- Hand throttle (since there is no cruise control)
- Passenger mirror delete
|
I'd consider to use smaller and more streamlined sport motorcycle rearview mirrors instead of delete the passenger-side one.
By the way, I'd also think about some weight-saving tricks, replacing a few body panels, such as front fenders and hood, with plastic ones, and also taking out some of the interior trim such as door liners and carpet. A single-arm windscreen wiper can also be quite effective to reduce the drag, and also shaving that antenna out of the A-pillar. An internal windscreen-mounted antenna is better if you won't ever consider to get rid of the radio. |
|
|
|
|
10-11-2012, 04:38 PM
|
#24 (permalink)
|
|
Master EcoModder
Join Date: Mar 2012
Location: Salt Lake City
Posts: 292
00C - '00 Toyota Corolla 90 day: 43.54 mpg (US)
Thanks: 147
Thanked 190 Times in 73 Posts
|
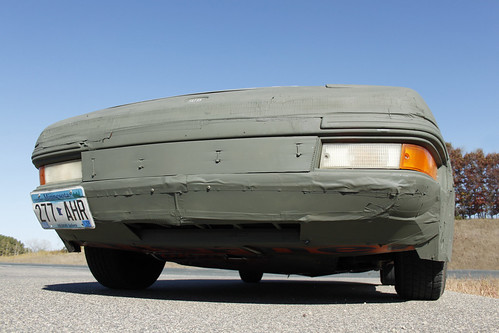
Air dam and grill blocks, done for now
Now the upper grill is blocked, and I have a barrier to keep the cooling inlet from spilling under the bumper and contributing to the underbody flow instead of cooling the engine (I decided ducting is too much trouble). Also I plugged a large gap above the bumper. (Too bad I couldn't find the backer rod in black though.)

I'm fairly pleased with the forward slope. I'm sure it could be even steeper before being optimal, but it looks effective to me. I'll probably do my road trip just like this.
My defunct bullnose contributed pre-painted coroplast that I wrapped around the upper grill and screwed in place on the top and bottom. (The plastic stock grill pops off for easy modding.)
Also, here is an upward shot so you can get an idea what the airflow might look like underneath. (Despite how it appears, the air dam is actually the lowest point.)

There are still a few items on my todo for the air dam, but I think these are less important: - Add half-tubing at the bottom lip for smoother flow underneath.
- Add sides to the barrier to better separate cooling flow from underbody flow.
- Paint most of it black.
Last edited by christofoo; 10-11-2012 at 04:43 PM..
|
|
|
|
|
10-11-2012, 04:47 PM
|
#25 (permalink)
|
|
Master EcoModder
Join Date: Aug 2011
Location: Warren, MI
Posts: 2,456
Thanks: 782
Thanked 669 Times in 411 Posts
|
Would half tubing even be worth the effort? Even if you could maintain attached flow (with no belly pan) would a radius make a difference? The front of the car is a very high pressure zone and you shouldn't have even a hint of trouble there.
It seems to me that what you're trying to do with a radius would be better accomplished by building a whole new bull nose with compound curvature and everything.
For sure duct the cooling. If you can patch that hole, it'll probably be better for aero to make it a "bottom breather" and move the cooling intake underneath the nose. This maintains clean airflow over the nose instead of breaking it up when it passes the vent.
__________________
He gave me a dollar. A blood-soaked dollar.
I cannot get the spot out but it's okay; It still works in the store
|
|
|
|
|
10-11-2012, 05:35 PM
|
#26 (permalink)
|
|
Master EcoModder
Join Date: Mar 2012
Location: Salt Lake City
Posts: 292
00C - '00 Toyota Corolla 90 day: 43.54 mpg (US)
Thanks: 147
Thanked 190 Times in 73 Posts
|
Quote:
Originally Posted by Sven7
Would half tubing even be worth the effort? Even if you could maintain attached flow (with no belly pan) would a radius make a difference? The front of the car is a very high pressure zone and you shouldn't have even a hint of trouble there.
|
I'm afraid I don't see your point. I think the goal for an air dam lip radius is to prevent (or reduce) vortex generation at that location. I thought flow attachment is an issue for sloping surfaces in the wake.
Quote:
Originally Posted by Sven7
For sure duct the cooling. If you can patch that hole, it'll probably be better for aero to make it a "bottom breather" and move the cooling intake underneath the nose. This maintains clean airflow over the nose instead of breaking it up when it passes the vent.
|
The reason I didn't move the intake down further is because the nose doesn't seem long enough; the intake duct would have to be at a steep angle if I put it all the way at the bottom. I could see why it still might be an advantage but I felt uncertain.
Another todo I forgot: intake block, esp. for commuting. |
|
|
|
|
10-11-2012, 06:34 PM
|
#27 (permalink)
|
|
Master EcoModder
Join Date: Aug 2011
Location: Warren, MI
Posts: 2,456
Thanks: 782
Thanked 669 Times in 411 Posts
|
Okay, hopefully without talking too much...
If you have a belly pan under there and cover up the hole you won't have vortexes anyway. So, just throw some coroplast on there and don't worry about a radius. Flow attachment usually is a problem on the rear, but with a slope like that on the front everything that goes under the air dam will be completely detached. There's nothing for the flow to "ride" on.
With ducting you should be fine. The Probe is fine even without ducting. If you're not aware, P&G and EOC keep engine temps down pretty well also. Mutual benefit.
__________________
He gave me a dollar. A blood-soaked dollar.
I cannot get the spot out but it's okay; It still works in the store
|
|
|
|
|
10-11-2012, 07:55 PM
|
#28 (permalink)
|
|
Master EcoModder
Join Date: Mar 2012
Location: Salt Lake City
Posts: 292
00C - '00 Toyota Corolla 90 day: 43.54 mpg (US)
Thanks: 147
Thanked 190 Times in 73 Posts
|
Quote:
Originally Posted by Sven7
Okay, hopefully without talking too much...
If you have a belly pan under there and cover up the hole you won't have vortexes anyway. So, just throw some coroplast on there and don't worry about a radius. Flow attachment usually is a problem on the rear, but with a slope like that on the front everything that goes under the air dam will be completely detached. There's nothing for the flow to "ride" on.
With ducting you should be fine. The Probe is fine even without ducting. If you're not aware, P&G and EOC keep engine temps down pretty well also. Mutual benefit.
|
My uncertainty on that design wasn't cooling effectiveness, but rather on the drag experienced by the air traveling through the scoop. After all, the advantage is that taking air from that location will reduce the drag elsewhere. But it may not be a net benefit if the scoop itself is lossy.
I know it would be better with a belly pan... and a boattail...
(BTW, the inlet is supposed to be designed for climbing 5% 2000ft mountain passes, one of the things it will be doing tomorrow. I can always block or partially block the inlet for less demanding applications.) |
|
|
|
|
10-18-2012, 03:44 PM
|
#29 (permalink)
|
|
Master EcoModder
Join Date: Mar 2012
Location: Salt Lake City
Posts: 292
00C - '00 Toyota Corolla 90 day: 43.54 mpg (US)
Thanks: 147
Thanked 190 Times in 73 Posts
|
Trip results and analysis
1300 mile trip results: 46 MPG!
For analysis, I note that this car looks very similar to the 1986-1992 VW Jetta in the CdA list. It also has similar outside dimension specs. I don't have specific CdA data for the Corolla.
Analysis:
Assumptions: - 65 MPH (trip time minus approximate stops / total distance)
- 59°F average outside temperature
- A=21.8ft^2 (like the Jetta)
- Gross weight 2300 lbs (including me and my tools)
- Crr >= 0.008 (generic tires at 44 PSI)
- engine efficiency <= 25%
Result:
Cd <= 0.28 or >22% reduction from stock 0.36 (Jetta). Aerodynamic & rolling resistance, power & MPG calculator - EcoModder.com (Why I used trip data with the calculator: long haul results are dominated by CdA, with very little city driving, etc. The primary uncertainty is wind speed, followed by engine efficiency and Crr. My impression is the wind was neutral overall on this ride. It tends to be so on a round trip.)
Not bad for a >23 year old car with just a handful of mods. (EDIT: maybe. I'm pretty sure I'm at least 10% ahead of stock. Really it's tough to know since I don't have a baseline for this type of trip.)
Mod list for this trip:- Blocked upper grill
- Air dam with cooling inlet
- Slick wheels
- Rear wheel skirts
- P&G (but not much EOC)*
- (Earlier I had a gap filler right above the bumper. I had to take it off within the first 100 miles for the little bit of extra cooling it offered. It's a big gap, basically a third grill. When I finish the ducting I should be able to close it off.)
* I have never done a long trip with high speed P&G before, but now I love it. It solves 2 problems: a) throttle loss, especially in this car with its not-so-tall gearing, b) prevents fatigue of my heel, especially in this car having no cruise control. I believe that EOC is not so beneficial with the carburetor, since it takes a couple seconds for the engine to die and I expect it consumes fuel while it tumbles. Bump start is also a bit slow and consumes more energy than in my other car. If the glide is shorter than about 10 seconds I leave it on.
Other thoughts:- It has really bad groove wander. The shimmy is not as pronounced but still present, although it depends on how smooth the pavement is.
- After the first 630 mile leg, I ran a 6 mile errand and the passenger drive axle fell out enough to leak transmission oil and made a big mess. I put in a refurbished axle (by chance this happened just outside my dad's garage) - and found the old axle was missing the retaining ring. Weird. Bizarre even.
- I tried to make this a reliable car and feel like I got burned. Maybe it was a fluke... like the two tire rod ends... and the muffler... and the clutch... and the groove wander... and the shimmy...
")
Last edited by christofoo; 11-02-2012 at 02:48 PM..
|
|
|
|
|
10-24-2012, 07:09 AM
|
#30 (permalink)
|
|
Master EcoModder
Join Date: Jan 2012
Location: MI, USA
Posts: 571
Thanks: 8
Thanked 73 Times in 50 Posts
|
Woah a flat bed eco car nice!
I have a 97 corolla and am getting around 40mpg currently with just grill blocks and smooth hubcaps (plastic). I do drive slower and have a scangauge 2. Your corolla is one body style older than mine, but the same/similar engine I think (mine is a 1.8L). Food for thought, my BEST mpg is between 42-45mph at around 55-65mpg depending on temp/wind durning the summer (80F+).
Very interested in how good you can get, since I haven't done anything to mine for months now.
|
|
|
|
|