07-14-2011, 01:34 AM
|
#11 (permalink)
|
|
EcoModding Apprentice
Join Date: Jul 2010
Location: Tucson, AZ
Posts: 245
Thanks: 111
Thanked 163 Times in 63 Posts
|
Quote:
Originally Posted by Frank Lee

Looks good; very inspirational!
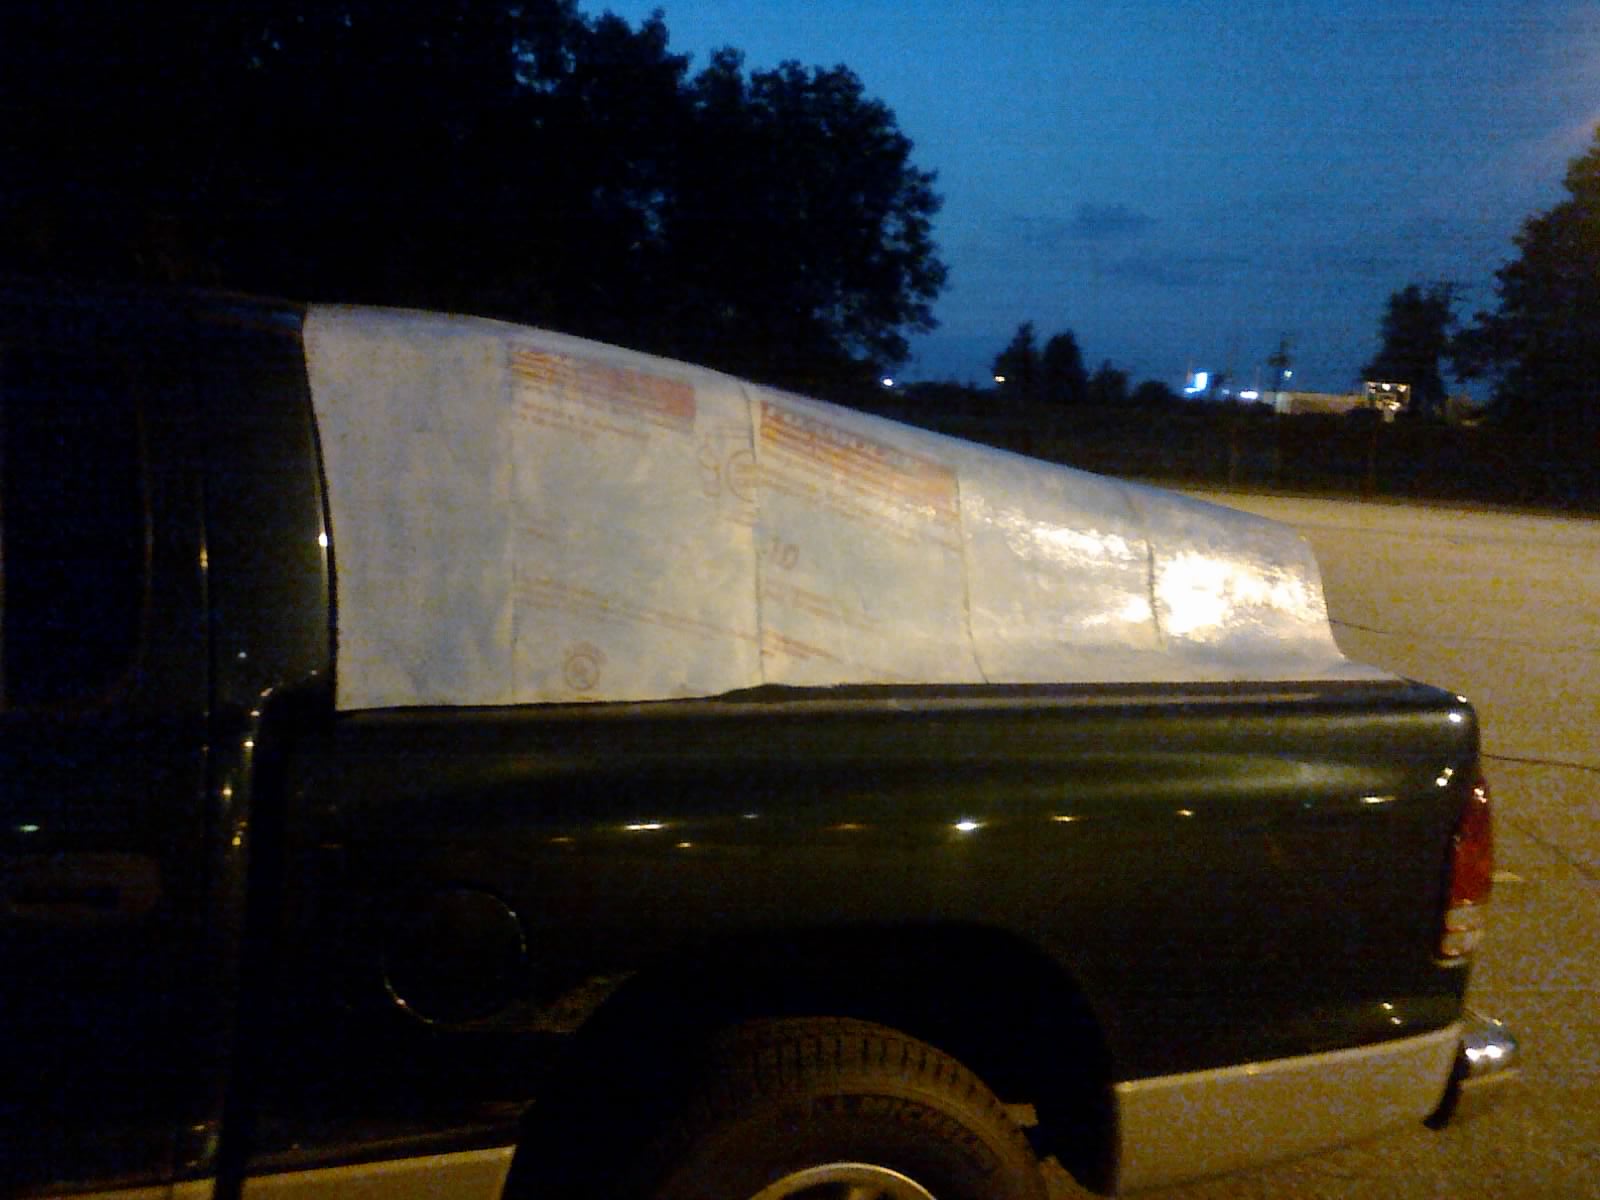
One question: is the flow any good along the bottom? Seems too much rise down there for attached flow... Looks like the tufts are swirling around in pic 7.
|
Frank, to be honest, I'm surprised the air flows as well as it does on the top and the sides, I was very concerned that I pulled them in too far. So far the results say it's pretty good but the testing is too incomplete to say for sure.
|
|
|

|
 Today Today
|
|
|
|
 Other popular topics in this forum...
|
|
|
|
|
07-14-2011, 01:36 AM
|
#12 (permalink)
|
|
EcoModding Apprentice
Join Date: Jul 2010
Location: Tucson, AZ
Posts: 245
Thanks: 111
Thanked 163 Times in 63 Posts
|
Quote:
Originally Posted by skyking
Mini Split Air Conditioner AmericAire 120000 Heat Pump
They are not specifically designed for RV's but a quick search and you will find plenty of folks "down under" who have retrofitted them on Rvs with great success. They have extreme heat and also extreme rough road conditions in Australia, so I consider that a good testament to the durability.
What gets me going is the lower power draw of the 12,000 BTU units. It is 2/3rds of the rated draw of a typical Coleman 13,500 BTU unit. I suspect that a Honda EU2000i generator just *might* be able to start it.
The other huge bonus is when you are plugged into a full hookup situation. Now you have a 12,000 BTU heat pump, also much more efficient. Keep that propane in your tank.
In your case you would hang the outdoor unit on the back, find a suitable wall and route the line set and cables, and finish off with an Rv skylight to fix the hole where the old AC was.
RV Skylight
|
Thanks Skyking, I'll definetly check it out. |
|
|
|
|
07-14-2011, 03:30 AM
|
#13 (permalink)
|
|
Aero Deshi
Join Date: Jan 2010
Location: Vero Beach, FL
Posts: 1,065
Thanks: 430
Thanked 669 Times in 358 Posts
|
The build quality of your Kamm Extension is very good, I hate to sound critical, but I believe you have made the taper too "fast". I'm sure it helps, and as we can see from your tuft tests, flow remains attached, however, if you didn't pull it in quite so much, I suspect it would work even better.
The Kamm should maybe be less tapered like the back of this camper concept.

I know it seems counterintuitive that making the back end bigger could be better than the smallish back you have created, but it has to do with keeping the shape of the vehicle close to the Aero Template. Also notice how the taper on my concept camper drawing starts very gradually, the rate of change on the shape is slow. You wanna always try and not make abrupt changes in the air flow on the back end of a vehicle.
As far as the AC fairing goes, I think if you just cut off the back foot of it for air flow, it will make very little difference in the Cd improvement you have made by making it a full fairing. It will still work very well to reduce drag, and it looks very well designed, cutting the back off will allow it to operate as an AC unit without having to futz with it or make up some sort of louver thing.

I only mention all this cause it sounds as if you project is a sort of prototype and you may make another version 2 of the same thing, I'd hope you consider making the Kamm shape less aggressive if you do.
Again, Excellent Job!! |
|
|
|
|
The Following User Says Thank You to ChazInMT For This Useful Post:
|
|
|
07-14-2011, 09:46 AM
|
#14 (permalink)
|
|
MPGuino Supporter
Join Date: Oct 2010
Location: Hungary
Posts: 1,808
iNXS - '10 Opel Zafira 111 Anniversary Suzi - '02 Suzuki Swift GL
Thanks: 831
Thanked 710 Times in 458 Posts
|
Quote:
Originally Posted by ChazInMT
I only mention all this cause it sounds as if you project is a sort of prototype and you may make another version 2 of the same thing, I'd hope you consider making the Kamm shape less aggressive if you do.
|
I second that observation. You did make your taper too aggressive. I offer my own experiences to show.
Version 1 of my aerocap, as you can see above, had a pretty aggressive slope. With it, I saw an average of 3.6% improvement in FE.
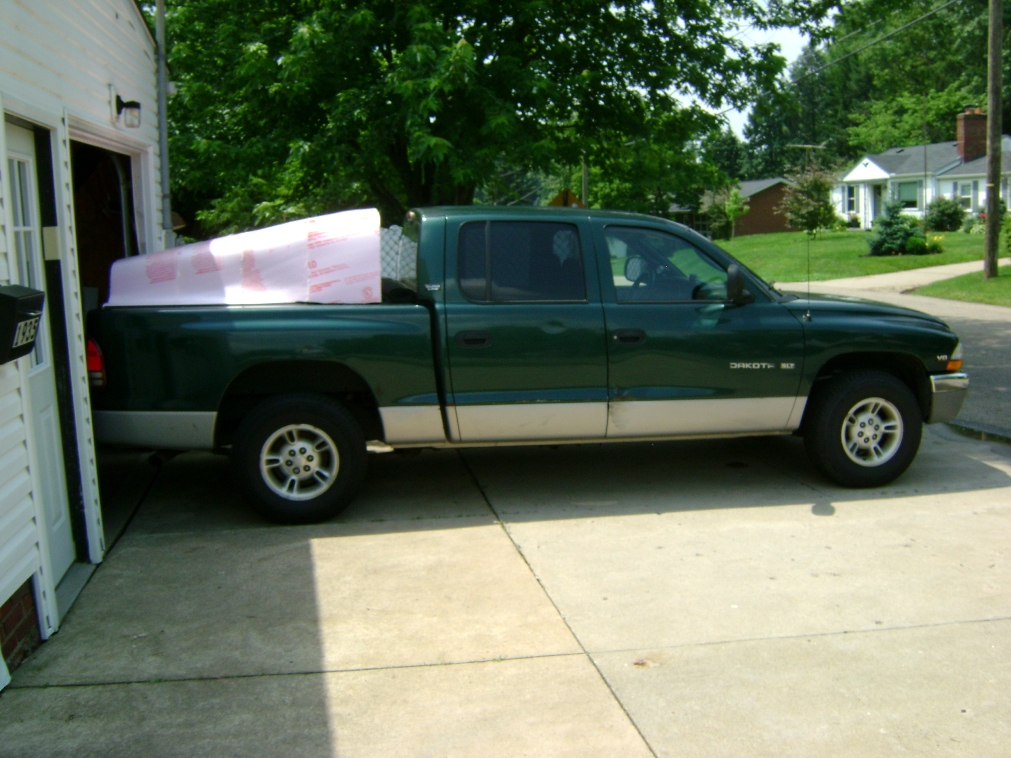
Version 2 above, as you can see, is nowhere near as aggressive. While version 1 tapered down to about 2 inches at the back, version 2 tapers down to about 11 inches. Also notice the nice big 8 inch gap between the aerocap and the cab rear. Common sense would tell you that these things I pointed out would not work so well.
The incomplete form of version 2 netted me a 6% improvement in FE.
The complete form of version 2, with the 8 inch gap filled in, netted a 10% improvement over no cap.
Now, it's not to say that you did a bad job. One can't ignore an 18% improvement in FE like you saw with your camper extension here.
However, should you build a version 2 for some reason (I built my version 2 because my version 1 decided to fly away from my truck at speed and destroy itself), you should keep in mind our advice to build a less aggressively sloped version.
Quote:
Originally Posted by ChazInMT
Again, Excellent Job!!
|
I second that, too.
|
|
|
|
|
07-14-2011, 10:55 AM
|
#15 (permalink)
|
|
EcoModding Apprentice
Join Date: Jul 2010
Location: Tucson, AZ
Posts: 245
Thanks: 111
Thanked 163 Times in 63 Posts
|
T vago and Chas,
Like I told Frank above, I was very concerned that I pulled the shape in too tight, but didnt realize it until I was so far into it I decided to try it as is. The top flow seems to be excellent according to the tales, the sides are OK and the bottom is crap. Since its already built and since it will be a major job to reshape it, Im going to finish the belly pan and fair the duallies and see if that improves the bottom flow, then do some more testing and see what it yields.
If the maiden voyage results turn out to be fairly accurate (too early to tell at this point) and the other improvements add significantly to those numbers, I may leave it alone and defer to the if it works dont fix it axiom, but well see.
T vago your bed fairing is excellent, nice workmanship on the curves and angles. Have you considered a hitch mounted boat tail for the rest of the rear end? Easy in, easy out. I'm going to build one for my Tundra as soon as I have time. You know, in my spare time. Ha.
Thanks for the input on the A/C fairing, Chas, Im not sure what to do with that yet, I may just might take it off since we use it so seldom.
Does anyone know the best way to get, build or buy something that will calculate mpg from an OBD I vehicle like my 95 RV?
|
|
|
|
|
The Following 2 Users Say Thank You to orbywan For This Useful Post:
|
|
|
07-14-2011, 01:16 PM
|
#16 (permalink)
|
|
EcoModder
Join Date: Jul 2008
Location: North Central Alabama
Posts: 572
Thanks: 110
Thanked 123 Times in 71 Posts
|
Quote:
Originally Posted by orbywan
Does anyone know the best way to get, build or buy something that will calculate mpg from an OBD I vehicle like my 95 RV?
|
I don't know if the MPGuino will work with a diesel (it never used to), but I know there was talk of it once... you may want to ping DCB with a PM to see what he knows.
As to your comment about $5 for every time someone asked what it was paying for materials... you would be way in the clear if you include all the people in their cars asking the same thing!
I am with others. If there happens to be a v2.0 you should stick with a 15 degree maximum slope. On the other hand, it is awfully hard to argue with the improvement you saw...
__________________

|
|
|
|
|
The Following User Says Thank You to wyatt For This Useful Post:
|
|
|
07-14-2011, 01:33 PM
|
#17 (permalink)
|
|
EcoModding Apprentice
Join Date: Jul 2010
Location: Tucson, AZ
Posts: 245
Thanks: 111
Thanked 163 Times in 63 Posts
|
Quote:
Originally Posted by wyatt
I don't know if the MPGuino will work with a diesel (it never used to), but I know there was talk of it once... you may want to ping DCB with a PM to see what he knows.
As to your comment about $5 for every time someone asked what it was paying for materials... you would be way in the clear if you include all the people in their cars asking the same thing!
I am with others. If there happens to be a v2.0 you should stick with a 15 degree maximum slope. On the other hand, it is awfully hard to argue with the improvement you saw...
|
Thanks for the info, I'll see if I can find DCB. Yes, we had some serious rubber necking going on the first road test, it was pretty funny. If I do the shape over I'll back off the slope a bit, it looks too steep to me also. |
|
|
|
|
07-14-2011, 02:06 PM
|
#18 (permalink)
|
|
EcoModding Lurker
Join Date: Jul 2010
Location: Illinois
Posts: 93
Thanks: 2
Thanked 5 Times in 5 Posts
|
By far, the MPGuino is the most easily tailored and available MPG monitor in existence. Here's the OBDuino variant thread, which should at least have some merit or inspiration for you.
Also, great work on the boat-tail! The taper, sure, might be a bit sharp, but for what I know, as long as your bottom taper is less than 15 degrees, you're in the zone. Motorhomes, especially Class A, have always put me off for many reasons (I'm a bit too fond of tents and bicycle touring!), but I appreciate your efforts in ecomodding one. |
|
|
|
|
07-14-2011, 02:30 PM
|
#19 (permalink)
|
|
EcoModding Apprentice
Join Date: Jul 2010
Location: Tucson, AZ
Posts: 245
Thanks: 111
Thanked 163 Times in 63 Posts
|
Quote:
Originally Posted by ecofreak
By far, the MPGuino is the most easily tailored and available MPG monitor in existence. Here's the OBDuino variant thread, which should at least have some merit or inspiration for you.
Also, great work on the boat-tail! The taper, sure, might be a bit sharp, but for what I know, as long as your bottom taper is less than 15 degrees, you're in the zone. Motorhomes, especially Class A, have always put me off for many reasons (I'm a bit too fond of tents and bicycle touring!), but I appreciate your efforts in ecomodding one. |
Thanks for the Guino link, I'll check it out. It's quite likely I'll have to lower the bottom.
"Motorhomes, especially Class A, have always put me off for many reasons (I'm a bit too fond of tents and bicycle touring!), but I appreciate your efforts in ecomodding one.[/QUOTE][/I]"
I know what you mean, I traveled lighter until I started getting older. After that, beat to hell syndrome started sneaking up, I want some walls around me and some comfort. Yeah, I know, wussie.  |
|
|
|
|
07-14-2011, 05:47 PM
|
#20 (permalink)
|
|
Ultimate Fail
Join Date: Feb 2008
Location: Austin,Texas
Posts: 3,585
Thanks: 2,872
Thanked 1,121 Times in 679 Posts
|
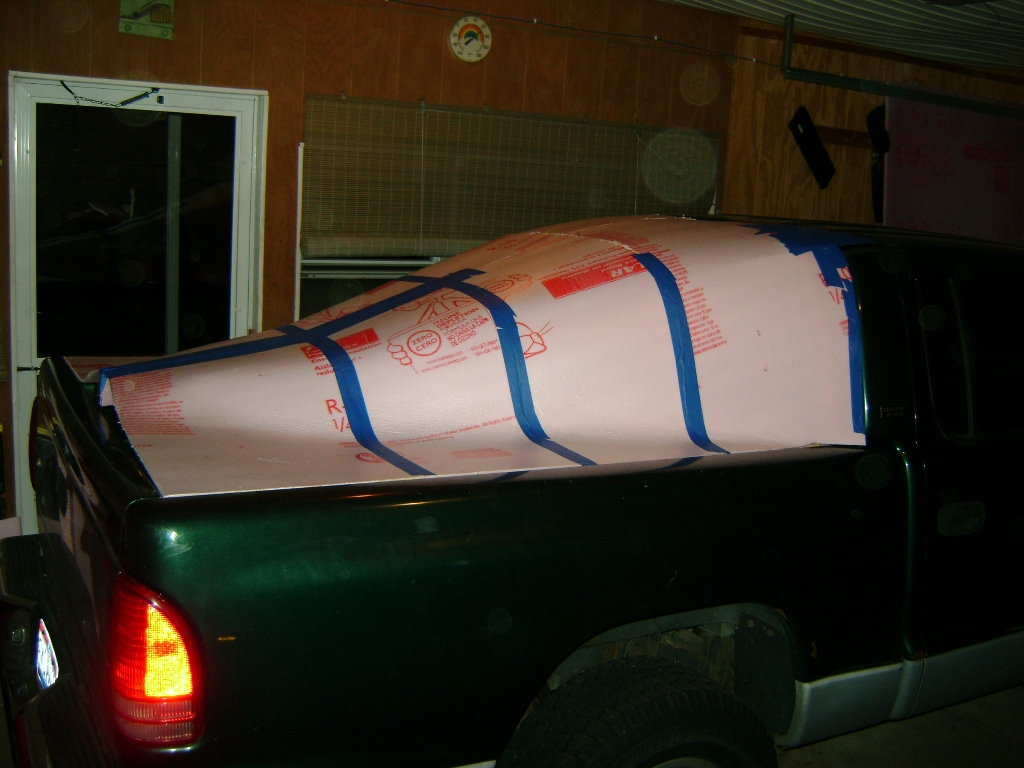
Wow ! That - is - beautiful, especially that A/C fairing.
Bravo.
I agree with everyone else about the angles being too steep on the main 'tail, but on a positive note, you have filled in a HUGE amount of your wake with this mod !
As far as the A/C unit, why not have your cake and eat it too ? Just keep the length and add louvers to it as you mentioned. ( I must admit that I like to look of it though and would hate to see you have to cut on it ) You could also use screen or a fire resistant cloth material which would allow the unit to breathe but keep the full shape.
|
|
|
|
|