05-31-2013, 03:05 PM
|
#101 (permalink)
|
|
Master EcoModder
Join Date: Mar 2012
Location: Salt Lake City
Posts: 292
00C - '00 Toyota Corolla 90 day: 43.54 mpg (US)
Thanks: 147
Thanked 190 Times in 73 Posts
|
Quote:
Originally Posted by tony_2018

So more cargo room in the back, won't that raise the front a little ( or a lot )? If that happens have you looked into ways to keep the car leveled as if there was no extra cargo in the back?
|
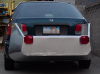
The car is fully loaded, including passengers (except for me, driver's seat) in this pic:
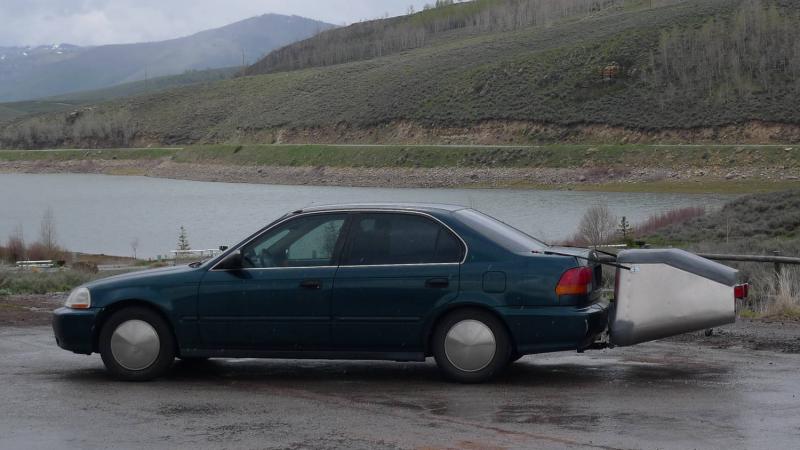
I do keep the heavy stuff in the trunk where it has a shorter lever arm.
(Somewhat related comments on rear suspension: http://ecomodder.com/forum/showthrea...tml#post372464.)
|
|
|

|
 Today Today
|
|
|
|
 Other popular topics in this forum...
|
|
|
|
|
05-31-2013, 04:01 PM
|
#102 (permalink)
|
|
EcoModding Apprentice
Join Date: Oct 2012
Location: United States
Posts: 110
Thanks: 0
Thanked 5 Times in 5 Posts
|
Well you have the struts replaced, but safety wise, what about your braking. If ever in need of emergency braking how will your stock setup handle the extra weight coming from back? Also when swirving out of the way of unseen objects on the road? Things to think about and I'm not hating on this add-on. I'm actually digging it as i also drive a 99-00 civic sedan.
Lighting on the road I've done HID retrofit, suspension wise I now have koni's with stock suspension so the ride is stiffer and adjustable if need be, I'm looking to lowering the car a bit and looking at stock options of either the sporty civic type r springs or the sporty integra type r springs. For swirving out the face of danger I'm looking into upgrading my swaybar to a more stock oem integra type r and a rear civic si swaybar. I've also consider lighter rims, civic HX rims, or using the moon hub cap rims. I'm totally happy with the gas mileage I'm getting a combination of citiy and highway I get 30mpg and straigh highway I get 40mpg, if I'm in lean burn mode I get a +.
|
|
|
|
|
06-01-2013, 07:48 PM
|
#103 (permalink)
|
|
Master EcoModder
Join Date: Mar 2012
Location: Salt Lake City
Posts: 292
00C - '00 Toyota Corolla 90 day: 43.54 mpg (US)
Thanks: 147
Thanked 190 Times in 73 Posts
|
Quote:
Originally Posted by tony_2018
Well you have the struts replaced, but safety wise, what about your braking. If ever in need of emergency braking how will your stock setup handle the extra weight coming from back? Also when swirving out of the way of unseen objects on the road? Things to think about and I'm not hating on this add-on. I'm actually digging it as i also drive a 99-00 civic sedan.
Lighting on the road I've done HID retrofit, suspension wise I now have koni's with stock suspension so the ride is stiffer and adjustable if need be, I'm looking to lowering the car a bit and looking at stock options of either the sporty civic type r springs or the sporty integra type r springs. For swirving out the face of danger I'm looking into upgrading my swaybar to a more stock oem integra type r and a rear civic si swaybar. I've also consider lighter rims, civic HX rims, or using the moon hub cap rims. I'm totally happy with the gas mileage I'm getting a combination of citiy and highway I get 30mpg and straigh highway I get 40mpg, if I'm in lean burn mode I get a +.
|
There is a precedence for hitch cargo carriers, i.e. Thule, but also rack and bag configs for Class I. What may be questionable is the application to a compact car, having no tow rating, though newer generation Corollas and the Matrix/Vibe do have a tow rating (maybe some others AFAIK). EDIT: the extra length of my carrier (3ft vs 2ft typical) is also questionable, but it does taper and I also load it toward the front, which is self-enforcing due to the slope of the box floor, and overall I think it's a wash).
For braking, there is an increase in momentum but a corresponding increase in max braking force, assuming traction is the limitation factor (no shortage of caliper/drum force for some mechanical reason, or overheating). (Both braking force and momentum are linear with mass.) This is assuming the car has ABS. Without ABS there could be an increase in the tendancy of the front wheels to break lose in a hard brake.
For steering it is more complicated, and it might be plausible for a heavy hitch mounted weight to cause a problem. But without doing the math, I'd expect the overall change in center of mass to be fairly small. |
|
|
|
|
06-01-2013, 08:52 PM
|
#104 (permalink)
|
|
Not Doug
Join Date: Jun 2012
Location: Show Low, AZ
Posts: 12,305
Thanks: 7,308
Thanked 2,246 Times in 1,733 Posts
|
Obstacle course A-B-A!  |
|
|
|
|
06-01-2013, 09:35 PM
|
#105 (permalink)
|
|
EcoModding Apprentice
Join Date: Oct 2012
Location: United States
Posts: 110
Thanks: 0
Thanked 5 Times in 5 Posts
|
Cool looking forward to some progress on your design and hopefully you won't have any problems.
|
|
|
|
|
06-06-2013, 12:10 PM
|
#106 (permalink)
|
|
VFAQman
Join Date: Jul 2008
Location: NorthWestWest Florida
Posts: 47
Thanks: 0
Thanked 12 Times in 9 Posts
|
If you don't mind cutting it back up, a relatively self-centering pivot point on the top hinge point can be made with 2 sizes of tubing and a bit of cutting/grinding. It would allow you to drop the carrier into the hitch upright and then insert the pin easily.
Basically, you want to install a piece of tubing through the upright on the carrier that sticks out about 1/2-3/4" each side. Slot the inner sides of the hitch uprights for those tubing stubs to drop into. Weld a slightly larger tube size into the hitch uprights for the carrier upright stubs to rest on. Then weld in the same size tubing as used in the carrier upright to the hitch uprights - basically you are making a captured door hinge.
If you make the slots angled rearwards, so the weight of the carrier pulls it into alignment at the bottom of the slot, you are pretty much guaranteed that the hole for the pin will line up automatically.
|
|
|
|
|
The Following User Says Thank You to talonts For This Useful Post:
|
|
|
06-07-2013, 12:38 AM
|
#107 (permalink)
|
|
Master EcoModder
Join Date: Mar 2012
Location: Salt Lake City
Posts: 292
00C - '00 Toyota Corolla 90 day: 43.54 mpg (US)
Thanks: 147
Thanked 190 Times in 73 Posts
|
Quote:
Originally Posted by talonts
If you don't mind cutting it back up, a relatively self-centering pivot point on the top hinge point can be made with 2 sizes of tubing and a bit of cutting/grinding. It would allow you to drop the carrier into the hitch upright and then insert the pin easily.
Basically, you want to install a piece of tubing through the upright on the carrier that sticks out about 1/2-3/4" each side. Slot the inner sides of the hitch uprights for those tubing stubs to drop into. Weld a slightly larger tube size into the hitch uprights for the carrier upright stubs to rest on. Then weld in the same size tubing as used in the carrier upright to the hitch uprights - basically you are making a captured door hinge.
If you make the slots angled rearwards, so the weight of the carrier pulls it into alignment at the bottom of the slot, you are pretty much guaranteed that the hole for the pin will line up automatically.
|
It took me a minute to envision this, but I like it. It's definitely a good way to get the box on and off the car. My other idea is to make a stand to hold up the back of the box so the stinger can be removed from the receiver by one person. Before the end of the summer I'll decide which one wins and put it into action, thinking I'll need it to get the A-B-A tests done. |
|
|
|
|
06-07-2013, 01:09 AM
|
#108 (permalink)
|
|
VFAQman
Join Date: Jul 2008
Location: NorthWestWest Florida
Posts: 47
Thanks: 0
Thanked 12 Times in 9 Posts
|
Quote:
Originally Posted by christofoo
It took me a minute to envision this, but I like it. It's definitely a good way to get the box on and off the car. My other idea is to make a stand to hold up the back of the box so the stinger can be removed from the receiver by one person. Before the end of the summer I'll decide which one wins and put it into action, thinking I'll need it to get the A-B-A tests done.
|
The other advantage of the "captured hinge" is that you can leave the receiver uprights in place, and build other things to hook into it (bike carrier, etc). The most difficult part of the whole hinge setup is finding tubing of the right sizes, but you could just use 90deg angle for the "outer tubing", since it is just there for the smaller tubing to rest on, but a proper half-pipe would give more bearing surface and less wear.
You can place the 3 pieces of smaller tubing, run the pin through them, spotweld the outer 2 pieces in place, lift out the center piece that is mounted in the carrier upright, place the tubing group into the receiver uprights through the slots, spotweld everything, then cut out the outer tubing from the gap between the uprights. Then put the carrier upright between the receiver uprights, run a center punch through the hinge tubes on the receiver uprights to mark the carrier upright. Drill the carrier upright, run the small tubing through it, tack it, and check everything before final welding. Total time, probably an hour or less. |
|
|
|
|
06-07-2013, 01:30 AM
|
#109 (permalink)
|
|
Master EcoModder
Join Date: Mar 2012
Location: Salt Lake City
Posts: 292
00C - '00 Toyota Corolla 90 day: 43.54 mpg (US)
Thanks: 147
Thanked 190 Times in 73 Posts
|
Early tuft testing
All of us have underestimated the potential for aerodynamic misbehavior in this design, although I think it will be fairly easy to repair by adding a baffle and controlling detachment lines.
Here is a preliminary shot around 35 MPH:

That's right, I've got air moving up the rear glass. If I'm not mistaken, the low pressure at the base of the windshield and trunk is actually pulling air up from the underside of the car.
It's unexpected, but something I knew was coming, since at 65 MPH last week I saw rain water fly up from behind the trunk and land in the middle of the rear glass. (And thought 'd&^#, what a spectacular goof'.) I even knew right from the first day I drove it to work that something was amiss, since I coast down a hill from my house and I couldn't tell any difference in coasting or P&G rhythm. Certainly the MPG numbers from our 2 long-hauls with the box in place have been lack-luster. I don't have good baselines to compare to, but I think they registered somewhere around 0% or -5% (loss).
(So, a lot of good I did myself meeting my fab deadline without any testing.)
Not shown, because the image quality was terrible after it got too dark, I also got a brief tuft test with a quick-and-dirty cardboard-and-duct-tape half Kammback over the rear windshield (the version that doesn't cover the trunk at all). Even after rewatching it twenty times to tease out the info, I have to call it preliminary. The tufts that are directly in the stream (top of the Kamm and top of the Aero Box) seem to look reasonably smooth, and I think the tufts on the rear windshield may indicate a reduction in the violence of the flow, but I'm still getting some flow from the bottom to top. The Kammback did not improve the turbulence along the sides that I noticed.
So I need to improve my camera boom and test in broad daylight, and add some more detachment garnishes on the sides, and maybe a baffle to stop the upward flow at the bumper, and see how far that gets me.
Last edited by christofoo; 06-07-2013 at 10:28 AM..
|
|
|
|
|
The Following 6 Users Say Thank You to christofoo For This Useful Post:
|
|
|
06-07-2013, 10:53 AM
|
#110 (permalink)
|
|
Aero Wannabe
Join Date: Dec 2007
Location: NW Colo
Posts: 738
Thanks: 705
Thanked 219 Times in 170 Posts
|
Quote:
Originally Posted by christofoo
All of us have underestimated the potential for aerodynamic misbehavior in this design, although I think it will be fairly easy to repair by adding a baffle and controlling detachment lines.
|
I hope so. Even a small gap seems to have an effect.
Quote:
Originally Posted by christofoo
That's right, I've got air moving up the rear glass. If I'm not mistaken, the low pressure at the base of the windshield and trunk is actually pulling air up from the underside of the car. It's unexpected, but something I knew was coming, since at 65 MPH last week I saw rain water fly up from behind the trunk and land in the middle of the rear glass. (And thought 'd&^#, what a spectacular goof'.)
|
I take it you did not notice the rain droplet phenomenon without the cargo carrier in place?
From the one photo you posted the tufts seem to be going in the right direction on the cargo carrier. Perhaps you end up with extra cargo space that doesn't hurt your mpg and some important lessons for the rest of us. It is easy to speculate but harder to do it right. Thank you for jumping in and trying something in real world conditions.
__________________
60 mpg hwy highest, 50+mpg lifetime
TDi=fast frugal fun  https://ecomodder.com/forum/showthre...tml#post621801

Quote:
Originally Posted by freebeard
The power needed to push an object through a fluid increases as the cube of the velocity. Mechanical friction increases as the square, so increasing speed requires progressively more power.
|
|
|
|
|
|