 05-16-2013, 04:13 PM
|
#81 (permalink)
|
|
Master EcoModder
Join Date: Sep 2011
Location: USA
Posts: 469
Frogger - '00 Honda Insight Gas Only (unHybrid) 90 day: 68.51 mpg (US)
Thanks: 13
Thanked 247 Times in 133 Posts
|
Great work! Can't wait for the good ol' numbers. Keep it up!
|
|
|

|
 Today Today
|
|
|
|
 Other popular topics in this forum...
|
|
|
|
 05-16-2013, 04:32 PM
|
#82 (permalink)
|
|
Not Doug
Join Date: Jun 2012
Location: Show Low, AZ
Posts: 12,249
Thanks: 7,258
Thanked 2,235 Times in 1,725 Posts
|
That looks amazing!
Can we get a picture with the lids closed?  |
|
|

|
 05-17-2013, 08:57 AM
|
#83 (permalink)
|
|
Rat Racer
Join Date: May 2011
Location: Route 16
Posts: 4,150
Thanks: 1,784
Thanked 1,922 Times in 1,246 Posts
|
On the front page!
That is just beautiful work.
__________________

Quote:
Originally Posted by sheepdog44

Transmission type Efficiency
Manual neutral engine off.100% @∞MPG <----- Fun Fact.
Manual 1:1 gear ratio .......98%
CVT belt ............................88%
Automatic .........................86%
|
|
|
|

|
 05-20-2013, 04:47 PM
|
#84 (permalink)
|
|
Master EcoModder
Join Date: Mar 2012
Location: Salt Lake City
Posts: 292
00C - '00 Toyota Corolla 90 day: 43.54 mpg (US)
Thanks: 147
Thanked 190 Times in 73 Posts
|
Quote:
Originally Posted by Xist

That looks amazing!
Can we get a picture with the lids closed?  |
While we were out and about I tried to keep a lookout for nice backdrops.

Here's a side-view (at the tail end of a high-altitude hail storm):

=========================================
Next two action items are 1) tuft testing and 2) A-B-A, preferably coast-down. Need to do some planning for that - I never have found a good place to do it. The Salt Flats are not a million miles from here, but it would be nice to find something even closer for optimization testing.
I also have a few backlogged updates that will trickle in this week. Also need to do another fill to check the SGII again, but the MPG for this trip won't mean much, considering all the factors and lack of baseline.
|
|
|

|
|
The Following 9 Users Say Thank You to christofoo For This Useful Post:
|
|
 05-20-2013, 08:02 PM
|
#85 (permalink)
|
|
Not Doug
Join Date: Jun 2012
Location: Show Low, AZ
Posts: 12,249
Thanks: 7,258
Thanked 2,235 Times in 1,725 Posts
|
Thanks for the pictures! When you do A-B-A, are you going to put an equal weight in the trunk?
I am not sure that would be necessary.
|
|
|

|
|
The Following User Says Thank You to Xist For This Useful Post:
|
|
 05-20-2013, 08:13 PM
|
#86 (permalink)
|
|
Master EcoModder
Join Date: Mar 2012
Location: Salt Lake City
Posts: 292
00C - '00 Toyota Corolla 90 day: 43.54 mpg (US)
Thanks: 147
Thanked 190 Times in 73 Posts
|
Quote:
Originally Posted by Xist

Thanks for the pictures! When you do A-B-A, are you going to put an equal weight in the trunk?
I am not sure that would be necessary.
|
That's not a bad idea. Depending on test speed and Crr, ~50 lbs could account for a half % of net drag, or so. |
|
|

|
 05-21-2013, 02:00 AM
|
#87 (permalink)
|
|
NightKnight
Join Date: Dec 2008
Location: Placerville, CA
Posts: 1,595
Thanks: 315
Thanked 314 Times in 187 Posts
|
Gotta say... awesome work!
__________________

|
|
|

|
 05-21-2013, 02:57 AM
|
#88 (permalink)
|
|
Master EcoModder
Join Date: Mar 2012
Location: Salt Lake City
Posts: 292
00C - '00 Toyota Corolla 90 day: 43.54 mpg (US)
Thanks: 147
Thanked 190 Times in 73 Posts
|
Tongue weight without a tow rating
A couple weeks ago I had the Civic in for service for several issues, one of which was upgrading the rear springs and replacing the struts, which seems pertinent.
Many months ago we had the rear tires wear out a bit prematurely, with heavy wear on the inside tread, at about 2/3 of their 90,000 mile tread warranty (Toyo Eclipse). The Les Schwab tech said the old struts were at fault (also lectured me on rotating my tires once in a while).
My regular mechanic agreed about the struts. I also explained that I installed a hitch reciever and use it for carrying cargo at around 200 lbs tongue weight, despite no tow rating (and thus no tongue weight rating) from Honda, and so he upgraded to stiffer springs while he was at it.
TL $700 ($180 labor, $460 parts, $60 alignment).
Probably there'd be $300-400 on the table if I were smart enough to do it myself, but I'm getting to that point where I just want to explain a problem to the mechanic and let him figure it out. Call me crazy.
(Anyways, even after I factor this and the other repairs in - and the struts were due for replacement anyways - our grand total in maintenance and repair for the last 40k miles (120k - 160k) has been a mere $0.06 per mile... [not including newest little issues though, pending repair...])
Last edited by christofoo; 05-21-2013 at 12:42 PM..
|
|
|

|
 05-21-2013, 04:32 PM
|
#89 (permalink)
|
|
Master EcoModder
Join Date: Mar 2012
Location: Salt Lake City
Posts: 292
00C - '00 Toyota Corolla 90 day: 43.54 mpg (US)
Thanks: 147
Thanked 190 Times in 73 Posts
|
Bottom corners
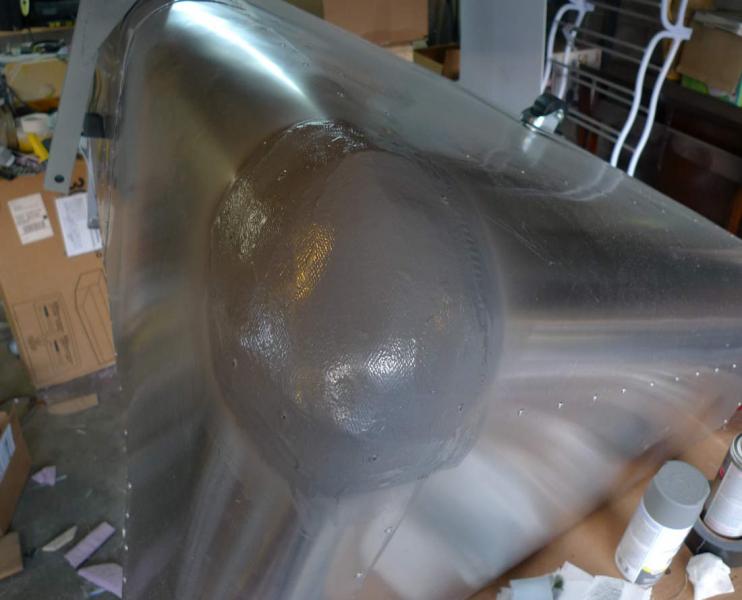
How-to make tough fiberglass corners on the aluminum skin base:
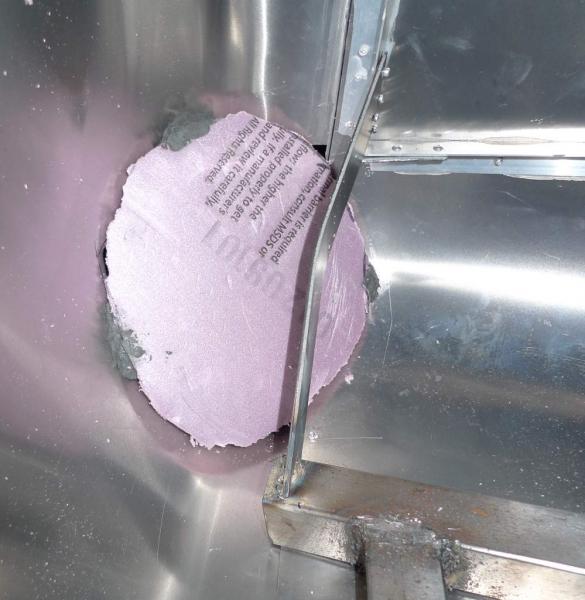
Press a section of 2" pink foam against the corner, trace it, and saw it out. Keep sanding until it plugs in from the inside. Apply 5-minute epoxy putty (Kwiksteel) to hold it in place. Need to work the putty a bit to get it to adhere to the rough foam surface.

Sand it to the right form from the outside.

Several steps in the next photo: - Materials: "Parks Super Glaze" is basically an epoxy resin. Rust-Oleum Parks 1-Qt. Finish and Preservative-241352 at The Home Depot A non-zero number of surfboard builders have used a similar type of product as an epoxy resin (How to Build Your First Surfboard). My attraction to the "Parks Super Glaze" is that it can be found at Home Depot and thus can be obtained in a few minutes, and it is less than twice as expensive per quart as mail-ordering 2 quarts of Klear Kote. To make light-weight low-fume paste, I'm filling my own epoxy using microballoons (by Alumilite Amazon.com: 32oz Microballoons: Toys & Games). Finding microballoons on Amazon Prime meant I could get them within 48 hours with free shipping. Microballoons are hollow glass spheres that are so small that they have the consistency of powdered sugar. As far as fillers go, they are very light and produce a strong sandable paste. (This was more important for the lid than for the corners, I'll come back to that.) Sawdust might have worked just fine for this. I wore a very good filtering mask (my Techno Respro smog mask) while working with the microballoons. Mixing them with epoxy resin is a lot like mixing flour with eggs, and I just keep adding microballoons until I got the consistency of peanut butter, such that the paste could stand up on a vertical surface. I decided to scalp my fiberglass welding blanket for a few lay-ups, it was only $24 (or $0.66/sqft) IIRC and seems to be about a 2-oz weight (unless I'm confused about glass cloth weights, I think it means weight of the cloth per sqft, I weighed a section of my cloth on a kitchen scale). I've had good luck using wet paper towels as a formable welding blanket anyways, whenever I really need it.
- After sanding the foam, I formed some microballoon putty with a plastic paint scraper to fill gaps. (>8 hr cure cycle.)
- Used my epoxy 'resin' to layup my 'glass cloth' over the corner. Because of the viscosity of the epoxy and the weight (and maybe weave) of the cloth, it helps to apply the epoxy under and over the cloth. (>8 hour cure cycle.)

- Sand with 80-grit.
- Drill 1/8" holes for rivets.
- Add another layer of microballoon putty, like a gel-coat (just because I didn't prepare for a gel-coat and I don't like the fumes of the Bondo Body Filler I have on the shelf). I'm becoming rather averse to solvent fumes, if I do fiberglass again it will be 100% epoxy based, no matter what.
- Add rivets while putty is wet. Putty flows enough to mate with rivet head and distribute force from head, making the rivets as strong as possible.

- (>8 hour cure cycle.) Sand with 80-grit.
- Paint.

=========================================
Having already completed both corners, I thought of a better way to form foam corners: - Tape cardboard to the inside, plus wherever needed outside.
- Apply pour-foam. (Cure.)
- Sand.
This is all assuming that the sheets are not formed evenly enough to use a generic spherical surface, like a barbeque lid. Maybe Phil (Aerohead) measures his metal sheets twice and cuts once?  (Or assembles in a different order.) My methods are for working with imperfections, where the corner is the last step and over-constraining with a true sphere might cause trouble.
Last edited by christofoo; 05-21-2013 at 06:27 PM..
|
|
|

|
 05-21-2013, 04:47 PM
|
#90 (permalink)
|
|
Batman Junior
Join Date: Nov 2007
Location: 1000 Islands, Ontario, Canada
Posts: 22,534
Thanks: 4,082
Thanked 6,979 Times in 3,614 Posts
|
Quote:
Originally Posted by christofoo

Next two action items are 1) tuft testing and 2) A-B-A, preferably coast-down.
|
Woohoo!
After seeing the latest pictures, I'm a little concerned about this transition:

Hopefully it's not too abrupt, going from horizontal on top to the "template" angle. (If it is, do you have the ability to make a bigger radius/smoother transition there?)
|
|
|

|
|
The Following 2 Users Say Thank You to MetroMPG For This Useful Post:
|
|
|