01-06-2017, 12:52 AM
|
#41 (permalink)
|
|
EcoModding Lurker
Join Date: Oct 2013
Location: San Francisco, CA
Posts: 19
Thanks: 15
Thanked 2 Times in 2 Posts
|
Progress update
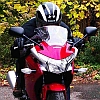
I have the DBL2 installed and a decent first paintjob.
I'm sorting out the windscreen to close up the front still, so drag reduction is minimal right now with a lot of air just flowing inside.
The Dzus fasteners are pretty handy but the mounts on the structure underneath are provisional and I'm working out how to fasten everything perfectly.
My windscreen's aerodynamic tuning is no longer suitable: since the nose is doing a lot of work on the air, the windscreen is now pushing too much air and resulting in a vortex that strikes me in the back a bit. It's possible I'll have to downgrade the windscreen to get the right effect.
On the other hand, everyone likes the look so far! I'll be augmenting the single blue stripe appearance with a vertical stripe up and around the opening so it has an "arrow" side profile.
|
|
|

|
|
The Following User Says Thank You to briantrice For This Useful Post:
|
|
 Today Today
|
|
|
|
 Other popular topics in this forum...
|
|
|
|
|
01-07-2017, 09:14 AM
|
#42 (permalink)
|
|
Master EcoModder
Join Date: May 2011
Location: Syracuse, NY USA
Posts: 2,935
Thanks: 326
Thanked 1,315 Times in 968 Posts
|
Keep in mind that way more than half the aero improvements in any vehicle happen at the back. Not the front. Check out all of Aerohead's excellent post's.
.
.

.
.

.
. |
|
|
|
|
The Following User Says Thank You to sendler For This Useful Post:
|
|
|
01-07-2017, 12:39 PM
|
#43 (permalink)
|
|
Two weels Zero sparkplugs
Join Date: May 2016
Location: NL
Posts: 95
Thanks: 0
Thanked 40 Times in 27 Posts
|
Such tails are good for a motorway cruiser but I have to filter and go down narrow city streets, usually on the edge of what is allowed/sensible to get pole position at the traffic light if you know what I mean 
There will be a small improvement on the rear for charger mounting and added drag resistance but the benefit of front fairing is that you can just scoop up an existing fairing and adapt it instead of breaking new grounds.
Quote:
Originally Posted by briantrice

I have the DBL2 installed and a decent first paintjob.
I'm sorting out the windscreen to close up the front still, so drag reduction is minimal right now with a lot of air just flowing inside.
The Dzus fasteners are pretty handy but the mounts on the structure underneath are provisional and I'm working out how to fasten everything perfectly.
My windscreen's aerodynamic tuning is no longer suitable: since the nose is doing a lot of work on the air, the windscreen is now pushing too much air and resulting in a vortex that strikes me in the back a bit. It's possible I'll have to downgrade the windscreen to get the right effect.
On the other hand, everyone likes the look so far! I'll be augmenting the single blue stripe appearance with a vertical stripe up and around the opening so it has an "arrow" side profile.
|
The dustbin looks good an sich but the gaping hole in it looks kinda odd if I'm honest... How about extending it a bit with the milk carton stuff? Did you already noticed increased range? |
|
|
|
|
01-07-2017, 01:21 PM
|
#44 (permalink)
|
|
EcoModding Lurker
Join Date: Oct 2013
Location: San Francisco, CA
Posts: 19
Thanks: 15
Thanked 2 Times in 2 Posts
|
Yes, a tail is planned
Quote:
Originally Posted by sendler
Keep in mind that way more than half the aero improvements in any vehicle happen at the back. Not the front. Check out all of Aerohead's excellent post's.
|
Yes, yes, yes!  It's coming. This is a work in progress (see my next reply).
The bike was at the fabricator's shop for way too long, unfortunately delaying concurrent work. They also wound up putting in too many hours on an overcomplicated design, so I'll have to design a simpler one for plans now that I've made the first. |
|
|
|
|
01-07-2017, 01:34 PM
|
#45 (permalink)
|
|
EcoModding Lurker
Join Date: Oct 2013
Location: San Francisco, CA
Posts: 19
Thanks: 15
Thanked 2 Times in 2 Posts
|
Quote:
Originally Posted by Erasmo
Such tails are good for a motorway cruiser but I have to filter and go down narrow city streets, usually on the edge of what is allowed/sensible to get pole position at the traffic light if you know what I mean
There will be a small improvement on the rear for charger mounting and added drag resistance but the benefit of front fairing is that you can just scoop up an existing fairing and adapt it instead of breaking new grounds. |
There will be a tail, just shorter: not the ideal 7 degrees but Kamm ended and probably 10 degrees which with a 6" wide Kamm back makes a tail only 31" from the back edge of the luggage rack.
I'll attach a CAD screenshot of the outline comparison.
What I've spent time on is making sure I can easily remove the tail by using the luggage rack for attachment points and the seat plus top rack for another support. So the construction has been a thought process.
The other difficulty is an effective way to craft a rounded front / seatback for the tail. Any thoughts? For the DSR, I need to put chargers there (on the passenger seat) for ideal load distribution, which I bought a used but suitably-dimensioned Pelican case to mock up and it seems workable. The Pelican case is just too rectangular.
Quote:
Originally Posted by Erasmo
The dustbin looks good an such but the gaping hole in it looks kinda odd if I'm honest... How about extending it a bit with the milk carton stuff? Did you already noticed increased range?
|
The polycarbonate windscreen to cover that area is on order right now and will be ready by Monday. Unfortunately, I'll be on a trip for a week, so won't be able to pick it up and try it until MLK today (following Monday).
I only get the most modest of benefits right now, maybe 10% at best. The airflow is much smoother and it is really doing enough work that my windscreen design is now unsuitable overall (it'd be fine for most riders but I can tell that I might actually benefit switching back to Zero's MRA windscreen with the spoiler). |
|
|
|
|
01-07-2017, 01:38 PM
|
#46 (permalink)
|
|
EcoModding Lurker
Join Date: Oct 2013
Location: San Francisco, CA
Posts: 19
Thanks: 15
Thanked 2 Times in 2 Posts
|
I forgot to include the CAD screenshot.
Anyway, I'm definitely soliciting advice about tail construction, especially regarding the rounded seatback. I know that the Vetter "kit" has one but I'm still waiting on them to be available/produced again.
|
|
|
|
|
01-07-2017, 01:43 PM
|
#47 (permalink)
|
|
EcoModding Lurker
Join Date: Oct 2013
Location: San Francisco, CA
Posts: 19
Thanks: 15
Thanked 2 Times in 2 Posts
|
My main tail construction ideas come from a combination of the Hershner streamliner (got some photos in person to help understand some of the finer details), and Benjamin Nelson's tail build for his Vectrix:
|
|
|
|
|
01-07-2017, 04:54 PM
|
#48 (permalink)
|
|
EcoModding Apprentice
Join Date: Dec 2011
Location: San Francisco, CA USA
Posts: 142
Thanks: 6
Thanked 53 Times in 31 Posts
|
Brian, are you talking about putting a 90 corner radius around the front edge of the seat back? If so, you could take sections from PVC pipe split lengthwise (or whatever tube of the appropriate radius you can find) to make the long straight runs then fill in between them with plaster/bondo and use spline of a matching radius (to the tubing) to form the filler. Let it harden up, sand a bunch, then pull a fiberglass mold off of that (or if it is nice enough use that "mold" as the final part).
You could also cut some radiused stations to go inside the bondo (like an egg-crate body buck) to help you get a nice surface on it.
Or just glue up a bunch of easily-sanded wood scraps to make a big U shape and then cut/file/sand that to match the tail section and form the radius.
cheers,
Michael
|
|
|
|
|
01-08-2017, 02:37 AM
|
#49 (permalink)
|
|
EcoModding Lurker
Join Date: Oct 2013
Location: San Francisco, CA
Posts: 19
Thanks: 15
Thanked 2 Times in 2 Posts
|
Quote:
Originally Posted by Michael Moore
Brian, are you talking about putting a 90 corner radius around the front edge of the seat back? If so, you could take sections from PVC pipe split lengthwise (or whatever tube of the appropriate radius you can find) to make the long straight runs then fill in between them with plaster/bondo and use spline of a matching radius (to the tubing) to form the filler. Let it harden up, sand a bunch, then pull a fiberglass mold off of that (or if it is nice enough use that "mold" as the final part).
You could also cut some radiused stations to go inside the bondo (like an egg-crate body buck) to help you get a nice surface on it.
Or just glue up a bunch of easily-sanded wood scraps to make a big U shape and then cut/file/sand that to match the tail section and form the radius.
|
I am willing to make massive compromises so that it takes ten times less complication/effort than that.
More specifically, the idea of a seat back is not what I intend; it's merely the language that everyone seems to use around the topic of tails. I do not want my back to rest against anything; I just need a round shape of the right size to serve as the lead for the tail.
That said, I have read your posts and your website and do respect your perspective. It's just that I do not value something boutique or requires a lot of bespoke crafting. I want something simple that I can document in plans and drawings for others to repeat or iterate on.
For context, I have a totally unlit single-car garage with one 110V outlet, partly used for the garage door opener, and I commute nearly two hours per day on top of a software startup workload, so my fabrication time and ability to work on an elaborate plan is very limited. |
|
|
|
|
01-08-2017, 07:20 AM
|
#50 (permalink)
|
|
Master EcoModder
Join Date: May 2011
Location: Syracuse, NY USA
Posts: 2,935
Thanks: 326
Thanked 1,315 Times in 968 Posts
|
Quote:
Originally Posted by Erasmo
Such tails are good for a motorway cruiser but I have to filter and go down narrow city streets, usually on the edge of what is allowed/sensible to get pole position at the traffic light if you know what I mean |
My tail is only a few inches behind the rear wheel.
.
And I wouldn't know what you mean since I am never on the edge of sensible. I would hope that you would be patient and safe in traffic. Aggressive and selfish riding by a few gives us all a bad name.
|
|
|
|
|