Go Back   EcoModder Forum > EcoModding > Fossil Fuel Free
Register Now
 Register Now
 

Reply  Post New Thread
 
Submit Tools LinkBack Thread Tools
Old 02-02-2012, 01:36 PM   #81 (permalink)
Master EcoModder
 
Join Date: Apr 2009
Location: Charlton MA, USA
Posts: 463

EVVette - '71 Chevy Corvette Coupe
Thanks: 31
Thanked 183 Times in 94 Posts
Quote:
Originally Posted by Tango Charlie View Post
Awesome project! Thanks for letting us watch...love all the pics and videos. That frame is a work of art, now!
Did your heart beat faster when you were chiseling the fan off of a $2500 motor? Mine would have! Ha ha!
Yes, Im very happy with how the frame came out as well. It was alot of work, but a crucial piece so it was dont right.

Yea, it was a little nerve racking when I could not get it off easily. I ended up having to drill some holes in the fan and then whack it with a chisel to break it. I was trying very hard to not make little pieces that could end up in the motor.

-Adam

__________________
www.EVVette.com - 1971 Corvette Coupe Conversion to all Electric!
www.AdamBrunette.com - Machining, CNC, Robotics and Electronics.

You can download RTD Explorer for the Cougar controllers at www.EVVette.com
  Reply With Quote
Alt Today
Popular topics

Other popular topics in this forum...

   
Old 02-02-2012, 05:02 PM   #82 (permalink)
Master EcoModder
 
Join Date: Apr 2009
Location: Charlton MA, USA
Posts: 463

EVVette - '71 Chevy Corvette Coupe
Thanks: 31
Thanked 183 Times in 94 Posts
Alright, Time for another update. After this one, Im going to try and stay up to date every Monday. Lets start with a video from October:


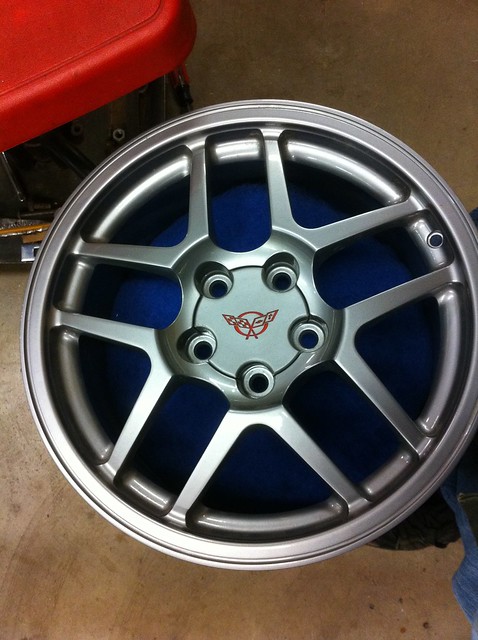
The car is moving right along. I have completed all work on the frame except for some simple little things like installing the brake calipers and shocks. I have gotten a set of S10 wheels that have the same bolt pattern as the corvette, but had the wrong offset. Well since they are temporary, I just put them on backwards. Good enough while I do the body work. The wheels that will be going on the car when its done are some of my favorite wheels. 2001 C5 Z06 Corvette wheels.


Untitled by AdamBrunette, on Flickr

This is a 17" wheel thats 9.5" wide. I know it will be killing my efficiency, but it needs fat tires so it doesn't just smoke them off with the slightest pedal movement. I will be running a 275-40/17 tires on all 4 corners.

Now, to travel back in time.

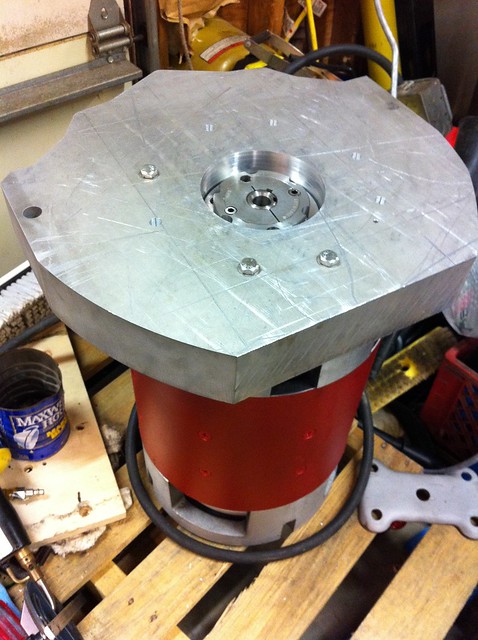
I picked up the aluminum plate for the adaptor on ebay for $208. It was a cut off from a surplus place. It cost me something like $48 for shipping as it weighed 70lbs. As soon as it came in, I dropped it off at the local waterjet shop for them to cut the profile of the bell housing and the center bore as well as the dowel pin holes. When I got it back, All I had to do was open up the center bore with a boring bar on the mill to the 4.0005" to fit nicely on the location boss of the motor. Here it is temporarily bolted to the motor.


Untitled by AdamBrunette, on Flickr

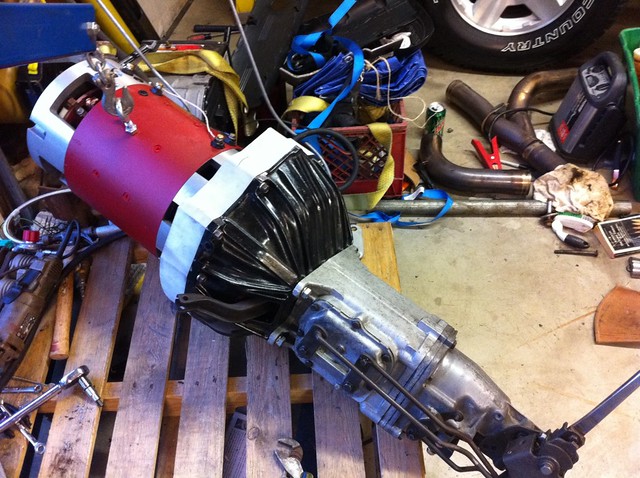
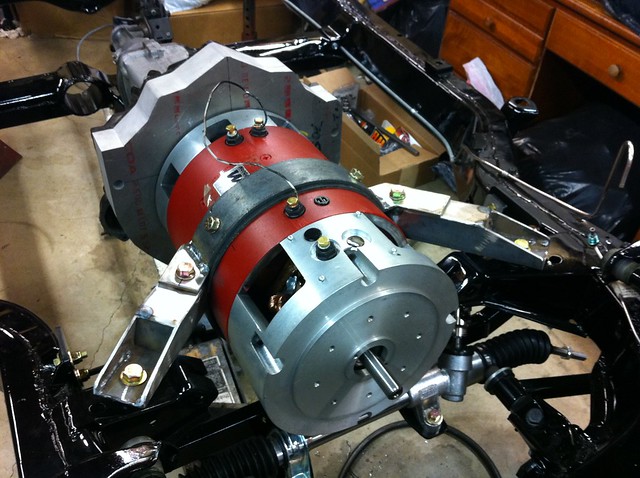
After that, all I had to do was bolt up the clutch and transmission and it was all set to go in the car. That was an exciting day. Here are some pictures of the the motor installed and a time-lapse of the actual install!


Untitled by AdamBrunette, on Flickr


Untitled by AdamBrunette, on Flickr


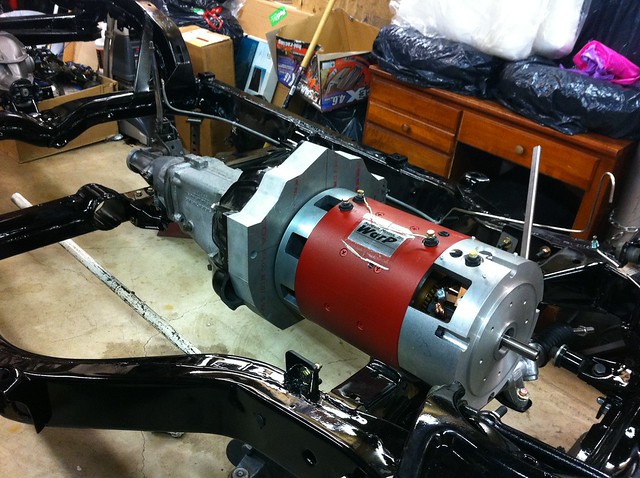
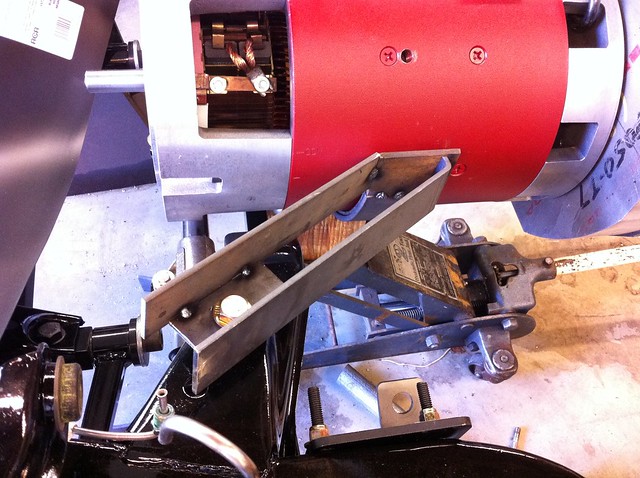
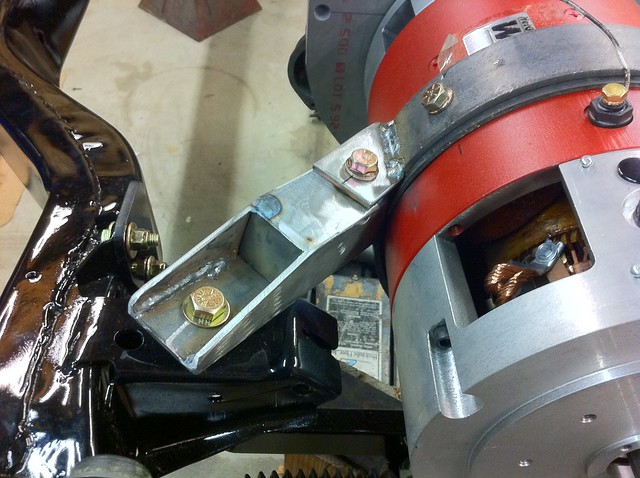
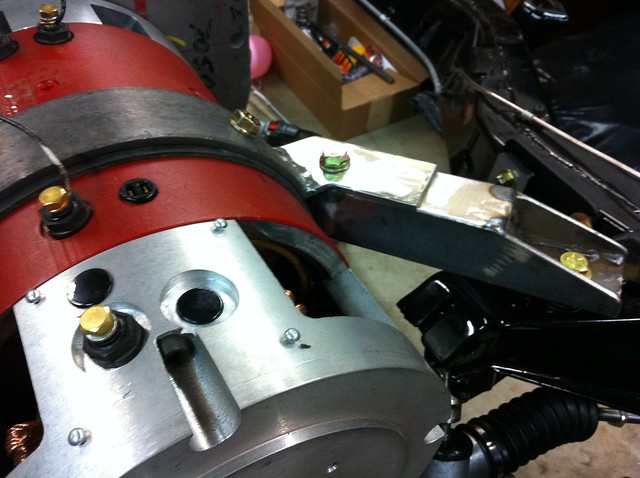
The weekend after that, came the motor mount. I originally tried to use factory motor mounts, but since the motor sits so low, and is much wider then the stock engine, they would not fit. What I ended up doing was drilling 2 holes, 1 in the top of each engine mount arm, and using some urethane bushings to isolated the motor from the frame. 2 bushings per side, 1 on top and 1 on bottom with the frame in the middle. I spent an entire saturday building the mount. I had a local metal shop bend me 2 bands of 1/4" thick 3" wide steel to wrap around the motor. This would be padded with rubber to absorbe some vibration. Next, I started building the arms that would secure the motor. I put the lower center band in place and held it there with a jack holding the motor as well. This way, nothing would move around. I first cut the plates on each side that would sit on the bushings and bolted those in place. I then started bending, cutting and welding pieces in place to form a box structure to hold the motor.


Untitled by AdamBrunette, on Flickr

When I was done with all the grinding, I ended up with this:
Untitled by AdamBrunette, on Flickr

Here is each side:
Untitled by AdamBrunette, on Flickr


Untitled by AdamBrunette, on Flickr

And a video walk through of the motor mount.


Skip forward a few months, More work happend on the frame, body and other parts of the car.

I now have the blower mounted to the motor!


Untitled by AdamBrunette, on Flickr

The unit is a Jabsco vent fan for boats. Its rated at 250CFM and has a 4" intake and 3.625" exhaust port. It runs on 12V and WOW does it move alot of air. I have no doubts that it will keep the motor cool.

I started mounting the blower by removing the studs that hold the original shroud on and drilling and tapping those holes to 5/16-18 mostly so I could use nice looking pan head cap screws. I then wrapped a piece of 4" wide 1/16" aluminum around the motor. I cut 2 slots in each end of the band and used pieces of hose clamps to create a way to pull the shroud tight around the motor. Along then edges of the band, I applied strips of 1/16" thick 1/2" wide cork with sticky back to act as a gasket.

Here is a shot of the band with the 2 hose clamp straps. Once the clamps are pulled tight, the screws will be inserted to hold everything.


Untitled by AdamBrunette, on Flickr

I then started building the box that will mount the blower. I did this out of 4 pieces of aluminum and while making this, taught myseld to tig weld. This is the first tig welding of aluminum I ever did! Here is the final result with the blower mounted.


Untitled by AdamBrunette, on Flickr

And a front profile:


Untitled by AdamBrunette, on Flickr

In the end, I will end up using some 4" aluminum tubing to move the air cleaner to the nose of the car and make room for the front battery tray.

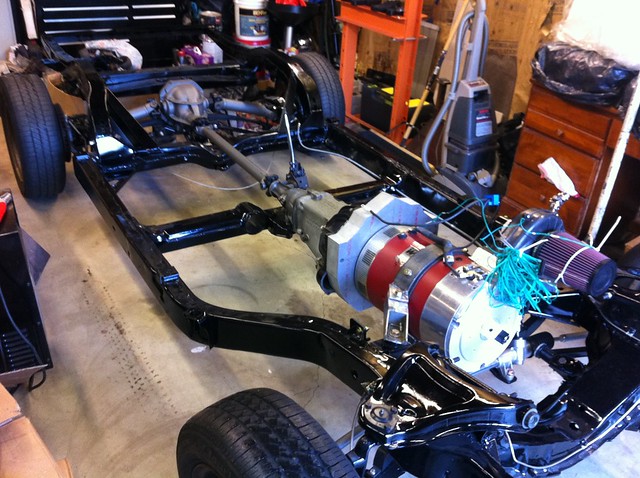
Other then the blower, I finished up the frame. Here is the whole rear suspension and drivetrain together:


Untitled by AdamBrunette, on Flickr

Last weekend, on sunday, I finally sat the frame back on wheels of its own for the first time in 1.5 years!


Untitled by AdamBrunette, on Flickr

Its so LOW! Currently the frame rails sit 9.5" off the ground and I expect the rails to end up at 6" above the ground. It looks like a skate board!

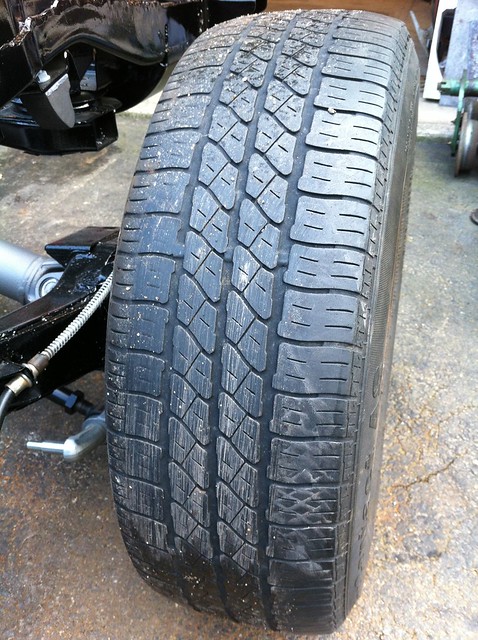
I had to take the car out to the driveway, I was just too excited. It was pushed out with less effort then it takes to push a wheel barrow! And, this is with tires that are so far out of alignment that they squeak when rolled.

Well when it was outside, I wanted to see how it would roll under its own power. I put it in reverse, pulled in the clutch with a pipe and started the 12v jump pack. I slowly let out the clutch, the motor slowed and the car started moving backwards! Well that was exciting! I rolled forward again and had to do it again. This time, My hand slipped and I let the clutch out a little fast.... well...even 12v can spin the tires!


Untitled by AdamBrunette, on Flickr

Yup, 1/4 revolution tire spin. That made my day!

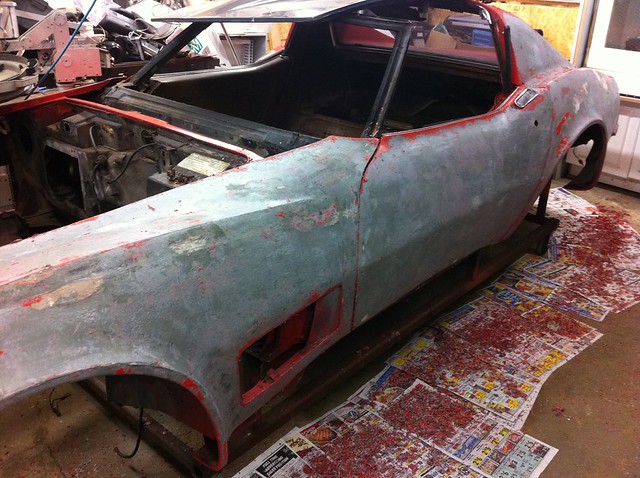
Currently, I am working on the body work of the car. I have started strippin the paint and have just the passenger side left to do.


Untitled by AdamBrunette, on Flickr

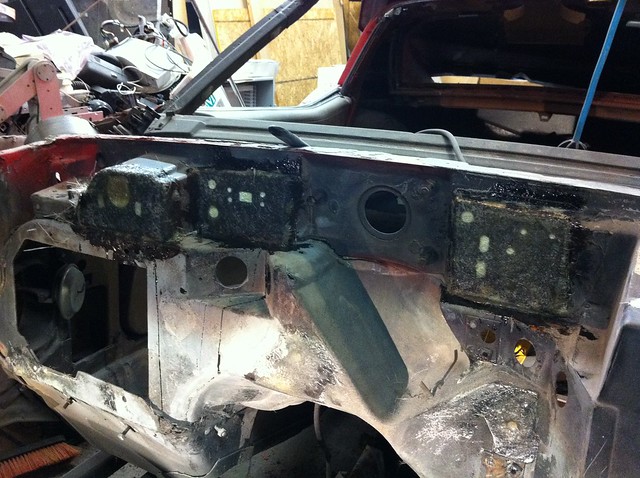
Last friday, I pulled the nose off the car to get to the firewall for repair.


Untitled by AdamBrunette, on Flickr

There was so many cracks, that it barely could hold itself together. Once the firewall is repaired, the body can be put back on the car.

Well thats it for now. Hopefully on monday.

-Adam
__________________
www.EVVette.com - 1971 Corvette Coupe Conversion to all Electric!
www.AdamBrunette.com - Machining, CNC, Robotics and Electronics.

You can download RTD Explorer for the Cougar controllers at www.EVVette.com
  Reply With Quote
The Following 3 Users Say Thank You to adamj12b For This Useful Post:
LouMan (02-02-2012), Ryland (02-02-2012), sawickm (02-03-2012)
Old 02-02-2012, 05:23 PM   #83 (permalink)
EcoModding Apprentice
 
NHRABill's Avatar
 
Join Date: Jul 2010
Location: New Jersey
Posts: 191

Tahoe - '95 Chevrolet Tahoe LT
90 day: 13.22 mpg (US)

SRX - '04 Cadillac SRX AWD

XL - '05 Harley Davidson Sportster XL
90 day: 49.97 mpg (US)

Alero - '02 Oldsmobile Alero GLS

Corvette - '75 Chevrolet Corvette Stingray
Thanks: 3
Thanked 8 Times in 8 Posts
Quote:
Quote:
Quote:
Originally Posted by NHRABill
Tough to read that you used a 71
Why is this? Is it because of its classic nature or the aerodynamics? The car was not worth much except for some parts when I started. Currently with the work dont with restoration, its worth alot more.
for my own selfish reasons I cringe I love the 71 style much more than a 74 + and they do have good value in comparison good driver 71 will be around 10K you had a nice base 250 model .. they didn't come with 327 that year. just my outdated opinion

Quote:
I have already checked out the diff and like the previous owner said, it didn't have many miles on it. It looked new inside so i cleaned it up and replaced the seals while I had it apart. So you broke one of these rear ends with only 435 ft-lbs at the wheels?? Now you have me worried. What size tires were you running? Im planing to run a 275-40/17.
I was running street tires first time I popped the rear reached for 3rd and kaboom chug chug chug and stop. tires I used to run on Street early on were 255 /60/ 15 probably goodyear eagles I later settled on a 275 60 15 hoosier quicktime had at least 4 sets of them out back.

Quote:
I am running a composite spring in the back to lower the weight and hold the weight of the rear battery pack. It will weigh in at about 280lbs which is about 140lbs heavier then the gas tank full of gas
I am running a similar spring but increased weight to 420lbs. per square inch back end of car would slam down when I launched at 3,000rpm I used extra long bots on the ends of the springs to adjust the rear suspension load lighten or loosen its pressure. 7 Gallon fuel cell replaces stock tank with all the safety features.

Here is a link for the rear

http://www.eaton.com/ecm/groups/publ.../ct_128302.pdf

I wish I saw this thread a year ago I would have pointed you to a cheap striong Ford 9" replacement it is a popular swap for these cars in the drag community they last easy to change out center section for new gears and best of all no worries on half shafts breaking. I kept my stock one cause I am cheap and lazy do all work myself and I know how to do it.

NEVER Mess with driveshafts they are the cars weakest point had seen many twist like a soda can and tear at the track even saw one go through the floor I would have one made from a driveshaft shop not that expensive and last forever. Please please invest in this and also make your own driveshaft loop based on the principles of the NHRA required one. A kit from Summitracing.com or Jegs will NOT work the vette tunnel is too small use scrap metal bang bend and make your own it is Cheap wast to make it just holds the driveshaft in place and stops it from Pole vaulting through that fiberglass floor.

Dennys Driveshaft Corvette C2 C3 C4 steel and aluminum driveshafts rear axle half shafts driveline parts slip yoke and pinion yoke for your race car or street rod or restoration project 1953 to 1996 Chevrolet Corvette

Quote:
I will look into the shatter shield style housing. I do plan to use a less then common clutch in this car. Its a 4.5" 3 stage unit built by quarter master. This will be mounted on a button style flywheel that is neutral balanced. This is mainly for the old M20 transmission as it just does not like to shift without a clutch. So, with the 4.5" clutch, since it never needs to slip, I will basically be installing a switch between the motor and trans. This will also shave a huge amount of rotating mass from the driveline. My plan down the road is to eliminate the weak M20 and bell housing all together and install a power-glide directly bolted to the motor.
I wasn't sure about how your trans would work out Figured you want to light the tires up using a line lock for the front brakes and then cruise in it, not pouinding gears. trans diaper is a lead bag kinda like what you see at a xray office that blocks the bad stuff from you. There are much nicer stuff now then what I had from almost 10 years ago lighter stronger safer and cheaper... just look into it

Please be careful Adam I want to see it complete and you in one piece. Watching people get hurt at the track made me step away for some time. Every time I look at my car I get the itch but have put it off think it will get done this year as a mild cruiser.

here is a picture of my car sitting dormant for way too long I am closing out other projects and then I will get back to work on it.

Good luck

__________________
2012 Chevrolet Traverse *active*
2002 Oldsmobile Alero GLS *active*
2002 S10 2wd p/u 139,000mi. *active*
1975 Corvette Stingray *active*
1994 Camaro Z28 Convertible 149k *Sold 2013*
1998 Blazer ZR2 189k *Sold 2012*
1995 Tahoe LT 250k *Sold 2011*

  Reply With Quote
Old 02-02-2012, 05:50 PM   #84 (permalink)
EcoModding Apprentice
 
NHRABill's Avatar
 
Join Date: Jul 2010
Location: New Jersey
Posts: 191

Tahoe - '95 Chevrolet Tahoe LT
90 day: 13.22 mpg (US)

SRX - '04 Cadillac SRX AWD

XL - '05 Harley Davidson Sportster XL
90 day: 49.97 mpg (US)

Alero - '02 Oldsmobile Alero GLS

Corvette - '75 Chevrolet Corvette Stingray
Thanks: 3
Thanked 8 Times in 8 Posts
don't forget to put posi additive in the rear differential... so easy to forget to do and it will destroy the rear, looks great you made a ton of progress.
__________________
2012 Chevrolet Traverse *active*
2002 Oldsmobile Alero GLS *active*
2002 S10 2wd p/u 139,000mi. *active*
1975 Corvette Stingray *active*
1994 Camaro Z28 Convertible 149k *Sold 2013*
1998 Blazer ZR2 189k *Sold 2012*
1995 Tahoe LT 250k *Sold 2011*

  Reply With Quote
Old 02-03-2012, 07:25 PM   #85 (permalink)
EcoModding Learner
 
Join Date: Jul 2008
Location: East Central Missouri
Posts: 2
Thanks: 0
Thanked 0 Times in 0 Posts
Tire Size

Really nice ride and I like the conversion idea. Just thought I'd bring up a flaw I noticed in your logic.

Quote:
This is a 17" wheel thats 9.5" wide. I know it will be killing my efficiency, but it needs fat tires so it doesn't just smoke them off with the slightest pedal movement. I will be running a 275-40/17 tires on all 4 corners.
Wider tires equals more square inches on the pavement, which equals less weight per square inch. This will reduce, not increase traction. The tires will spin easier, which is the reason drag racers use wider tires so they can be "burned out" to warm them and increase the stickiness of the rubber. Not a good idea for a street tire, but I know lots of "street racers" that make the same mistake.
  Reply With Quote
Old 02-03-2012, 07:53 PM   #86 (permalink)
Master EcoModder
 
mechman600's Avatar
 
Join Date: Jul 2008
Location: Langley, BC
Posts: 1,228

Fusion - '16 Ford Fusion Hybrid SE
Thanks: 190
Thanked 275 Times in 168 Posts
Quote:
Originally Posted by mikeald View Post
This will reduce, not increase traction.
REALLY?

Then millions of people must be wrong.
  Reply With Quote
Old 02-03-2012, 08:14 PM   #87 (permalink)
PaulH
 
MPaulHolmes's Avatar
 
Join Date: Feb 2008
Location: Maricopa, AZ (sort of. Actually outside of town)
Posts: 3,832

Michael's Electric Beetle - '71 Volkswagen Superbeetle 500000
Thanks: 1,368
Thanked 1,202 Times in 765 Posts
I've just been reading up on the subject, and it's really complicated! I guess it's important for the tires to get to the proper temperature so that they have good traction, but not so hot so they are destroyed too fast. Wider tires have better cooling, so you can get worse traction if they can't get to temperature.
__________________
kits and boards
  Reply With Quote
The Following User Says Thank You to MPaulHolmes For This Useful Post:
Ryland (02-04-2012)
Old 02-03-2012, 09:06 PM   #88 (permalink)
EcoModding Apprentice
 
NHRABill's Avatar
 
Join Date: Jul 2010
Location: New Jersey
Posts: 191

Tahoe - '95 Chevrolet Tahoe LT
90 day: 13.22 mpg (US)

SRX - '04 Cadillac SRX AWD

XL - '05 Harley Davidson Sportster XL
90 day: 49.97 mpg (US)

Alero - '02 Oldsmobile Alero GLS

Corvette - '75 Chevrolet Corvette Stingray
Thanks: 3
Thanked 8 Times in 8 Posts
I remember that I had a set of 255 /60/15 on the Front of mine with a manual box it was HELL then again I was driving it on the street at the time. I swapped down to a 235 this was much better and eventually to a 195 obviously I switched the front rims from a 8" down to a 7" rim
__________________
2012 Chevrolet Traverse *active*
2002 Oldsmobile Alero GLS *active*
2002 S10 2wd p/u 139,000mi. *active*
1975 Corvette Stingray *active*
1994 Camaro Z28 Convertible 149k *Sold 2013*
1998 Blazer ZR2 189k *Sold 2012*
1995 Tahoe LT 250k *Sold 2011*

  Reply With Quote
Old 02-03-2012, 09:46 PM   #89 (permalink)
AeroGuy
 
eco_generator's Avatar
 
Join Date: Sep 2008
Location: Ohio
Posts: 224

Outback 14 - '14 Subaru Outback Limited
90 day: 23.1 mpg (US)
Thanks: 73
Thanked 32 Times in 28 Posts
You can't look at this one dimensionally, either. There is no straightforward wider is better/worse explanation.

It depends on the tire compound being used, sidewall ratio, surface driven on, intended use (straight line, corners), suspension setup, and many other factors.

But it is safe to say that there is a point where too skinny is bad and way wide is bad.
  Reply With Quote
Old 02-03-2012, 11:46 PM   #90 (permalink)
EcoModding Learner
 
Join Date: Jul 2008
Location: East Central Missouri
Posts: 2
Thanks: 0
Thanked 0 Times in 0 Posts
Quote:
Originally Posted by mechman600 View Post
REALLY?

Then millions of people must be wrong.
Actually I don't think millions are wrong, but the situation is slightly different.

He is taking a base vehicle and removing a lot of weight from the design. In this case to prevent the tires from spinning easily it might be prudent to move to a slightly narrower version of the original tires rather than wider to keep similar characteristics. Of course there are many things to consider about the tires and the change in the power train (power:weight ratio), but simply making the tires wider will not increase traction in itself.

  Reply With Quote
Reply  Post New Thread


Similar Threads
Thread Thread Starter Forum Replies Last Post
Electric car conversion: Project ForkenSwift MetroMPG Fossil Fuel Free 1041 07-28-2014 09:19 AM
1995 Toyota pickup EV conversion... ModelE EcoModding Central 13 01-05-2010 11:08 PM
Ford Explorer EV Conversion in MA Matt Herring Fossil Fuel Free 0 05-19-2009 12:10 PM
Riley's EV conversion WannabeEVer Fossil Fuel Free 3 06-28-2008 12:47 PM
Practical? Possible? Taurus EV Conversion WaxyChicken Fossil Fuel Free 30 01-17-2008 11:12 PM


Powered by vBulletin® Version 3.8.11
Copyright ©2000 - 2024, vBulletin Solutions Inc.
Content Relevant URLs by vBSEO 3.5.2
All content copyright EcoModder.com